New Firestorm, new features
The latest Firestorm release has a new feature (albeit one that I still consider experimental), the "performance floater". In recent blog posts, I've explained why I created this, in earlier blogs and most recently, in "Upgraders of the lost ARC" I explained a bit about what it does. This post is all about "How to use Performance Floater".
Bundled with the Performance Floater is the Autotune FPS feature, I'll also explain how this works, and how to best avoid getting yourself into a muddle with it.
For a more concise, and probably more readable summary of these two features please refer to Inara Pey's excellent write up, and you can also click on the '?' icon at the top of the floater to go immediately to the Firestorm wiki page, dedicated to this function, which will be maintained and updated as the feature develops.
What does Performance Floater do for me?
Ok so what about Autotune?
Performance Floater best practices.
Initially, we will ignore Autotune and look instead at manual tuning and how the performance floater can help us.
Given that the motivation behind this feature was to highlight the damage that segmented bodies have done to SL performance, it will come as no surprise that it is most useful when applied in crowd scenes. I wanted to allow a finer-grained tuning experience that would allow you to enjoy a crowded club, or similar scene without having to de-render everyone and completely ruin the atmosphere. So how do we go about this?
Step by step - A quick guide.
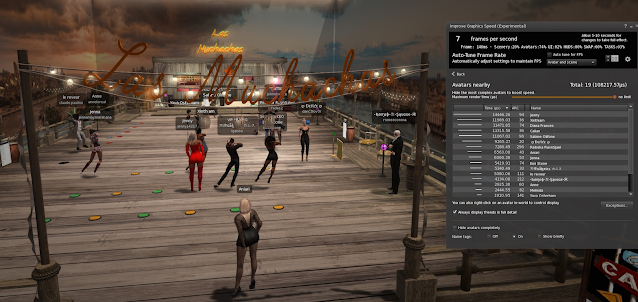
Step 1 - Open the performance floater.
The first thing we need is information, it is hard to know whether you've improved anything without measuring before and after. To open the performance floater, we have a few options
Look for the "Improve graphics speed..." menu entry on either the World menu or on the Advanced->Performance tools menu.
It can also be added to your toolbars for quick access. Look for the Gauge icon on the tool pallette
Step 2 - Review the summary stats


A more complete explanation of these numbers can be found here. What we can find here though is the first hint about what we need to do.
Best practice - Start with the largest number as this is where the biggest gains can be made
If scenery is the largest number then we might start to think about whether our draw distance is too high etc. However, if we are sightseeing or taking photos, then we might want the scenery to be in full glorious detail. If we are shopping we want to see the goods on display, but don't really need to see the displays far away. Think about what it is you are aiming for.
Most of the time you will find that either scenery, avatars or both are high. But occasionally we can find that the other numbers are worth a quick look. If the UI is more than a few percent then consider closing down unwanted chat windows and inventory, etc. If the "HUDs" costs are high, then you should remove as many as you can or simply hide them all using the "show HUD attachments" option on the Avatar menu (alt-shift-H on Windows).
Best practice for general FPS health - Close unnecessary UI and remove (not minimise) HUDs
Keep your UI windows closed and remove HUDs when not using them (the "favourite wearbles" feature is amazingly useful for this.)
"The scenery is killing my FPS"
In this first release, the amount of fine-grained tuning for scenery is very limited (I was focused more on the Lagatar problem). However, we provide quick access to a couple of the controls that make the biggest difference.
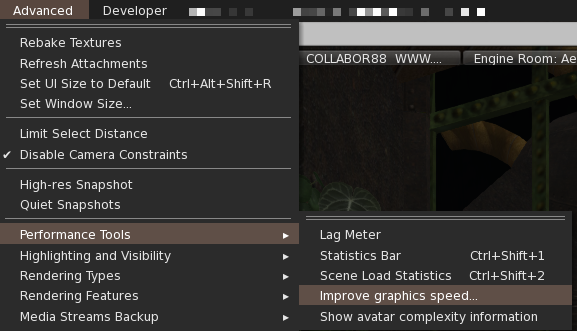
Clicking on the graphics settings panel in the floater will take you to a subset of the preferences found on the main preferences panel. Here we can make wholesale changes to the quality of our graphics using the "Quality vs speed" slider, or tweak individual parameters. The main features exposed here are Draw distance, shadows and water reflections. Draw distance and water can be changed dynamically, and you can watch the impact. Changing shadows is slightly more disruptive as the viewer has to change how things are drawn and this causes a "pause", especially on slower machines.
Best practices for scenes - dumb down the water, shrink the draw distance, remove the shadows.
In general, we want to keep the visual quality as high as we can, whilst still being able to move about. With this in mind, you need to pick and choose between the options. Since EEP, water reflections and refraction have been a terrible burden (a fix is coming from LL, but it is not here yet), You can still have decent looking water, without reflections. Of course, the most obvious (but frequently overlooked is Draw Distance. It's simple really, drawing more "stuff" takes longer. reducing the draw distance shrinks the number of things that need to be considered by the viewer. In a club or shopping mall, shrink the DD to 64m and you'll be more nimble.
Water - If you are not near water, or do not care about water reflections then you should almost certainly switch water reflections to "None; opaque" this gives a big FPS boost whilst still leaving the water looking reasonably nice. For the biggest win, you can always fully disable water on the advanced menu, under rendering types. But don't forget to turn it back on.
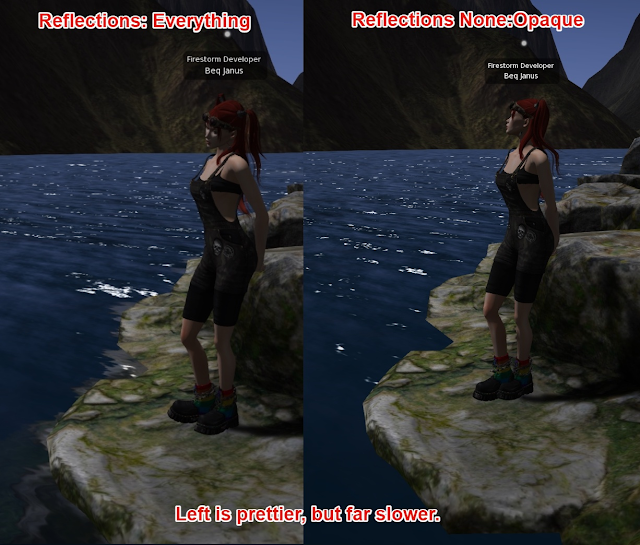
Shadows - The most visually disruptive change. I love to have shadows in a scene, but shadows will typically more than halve your FPS. So if you really need that extra boost then foregoing shadows is a good choice. Use the shadows setting on the floater or in the preferences. this is very useful if you are at a shopping event or club where the shadows are probably not that important.
Things not to do (probably) - Killing Advanced lighting - ALM.
"OMG the avatars are killing me"
When the statistics suggest that avatars are a significant amount of the frame time we can look at the avatars nearby and decide what to do. It does not take many segmented avatar abominations to totally destroy your performance. Modern BOM bodies without the "alpha cuts" or segments are far more performant. So how can separate the good from the bad?
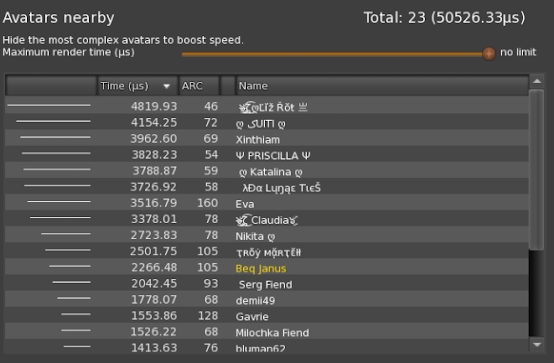
The bar graph on the left of this screen gives a quick visual indication of the costs. This was my favourite feature of the original Linden Lab design, though it was used to show ARC, which as you may have gathered from my other writing, is practically useless.
Along the top of this panel we have a slider, this controls the maximum time we will allow an avatar to take. On the screen above I have 23 avatars in the scene and they are taking a total of 50 milliseconds. Without going into a maths lesson this is a problem, a very large amount of time is being consumed. We can also see that the top 3 "offenders" (those avatars taking the longest) are a large chunk of that total.
If we slide the slider from the right to the left the limit will decrease. In this example, I can set it somewhere around 3800, and any avatars above the limit will be "optimised".
The optimisation works at a fine-grained level that was not possible in the past. The first thing that we do is remove the shadows of the laggiest avatars, this will halve their render time. When this happens an 'S' will appear in the column between ARC and Name. The further you decrease the slider the more avatars will be affected. When an avatar has had their shadows removed and is still laggier than the limit you have set then we take the decision to force it into an Imposter. An 'I' will appear between the ARC and the name.
Imposters are not everybody's cup of tea, but in a crowded club, a few imposters can lift your FPS whilst still allowing a decent visual experience. Try it out and decide for yourself. Derendering is another option of course (not supported directly on this release but accessible on the people floater as usual), "Render friends only" is of course another choice but keep in mind that you cannot easily bring them back. If you don't want to see anyone at all (yourself included) then the check box at the bottom of the panel allows you to disable all avatars.

Best practices - go little by little, and don't forget to reset later!
Things to remember:
- Both this and Autotune change your settings. Use graphics presets to save and restore sane settings just in case.
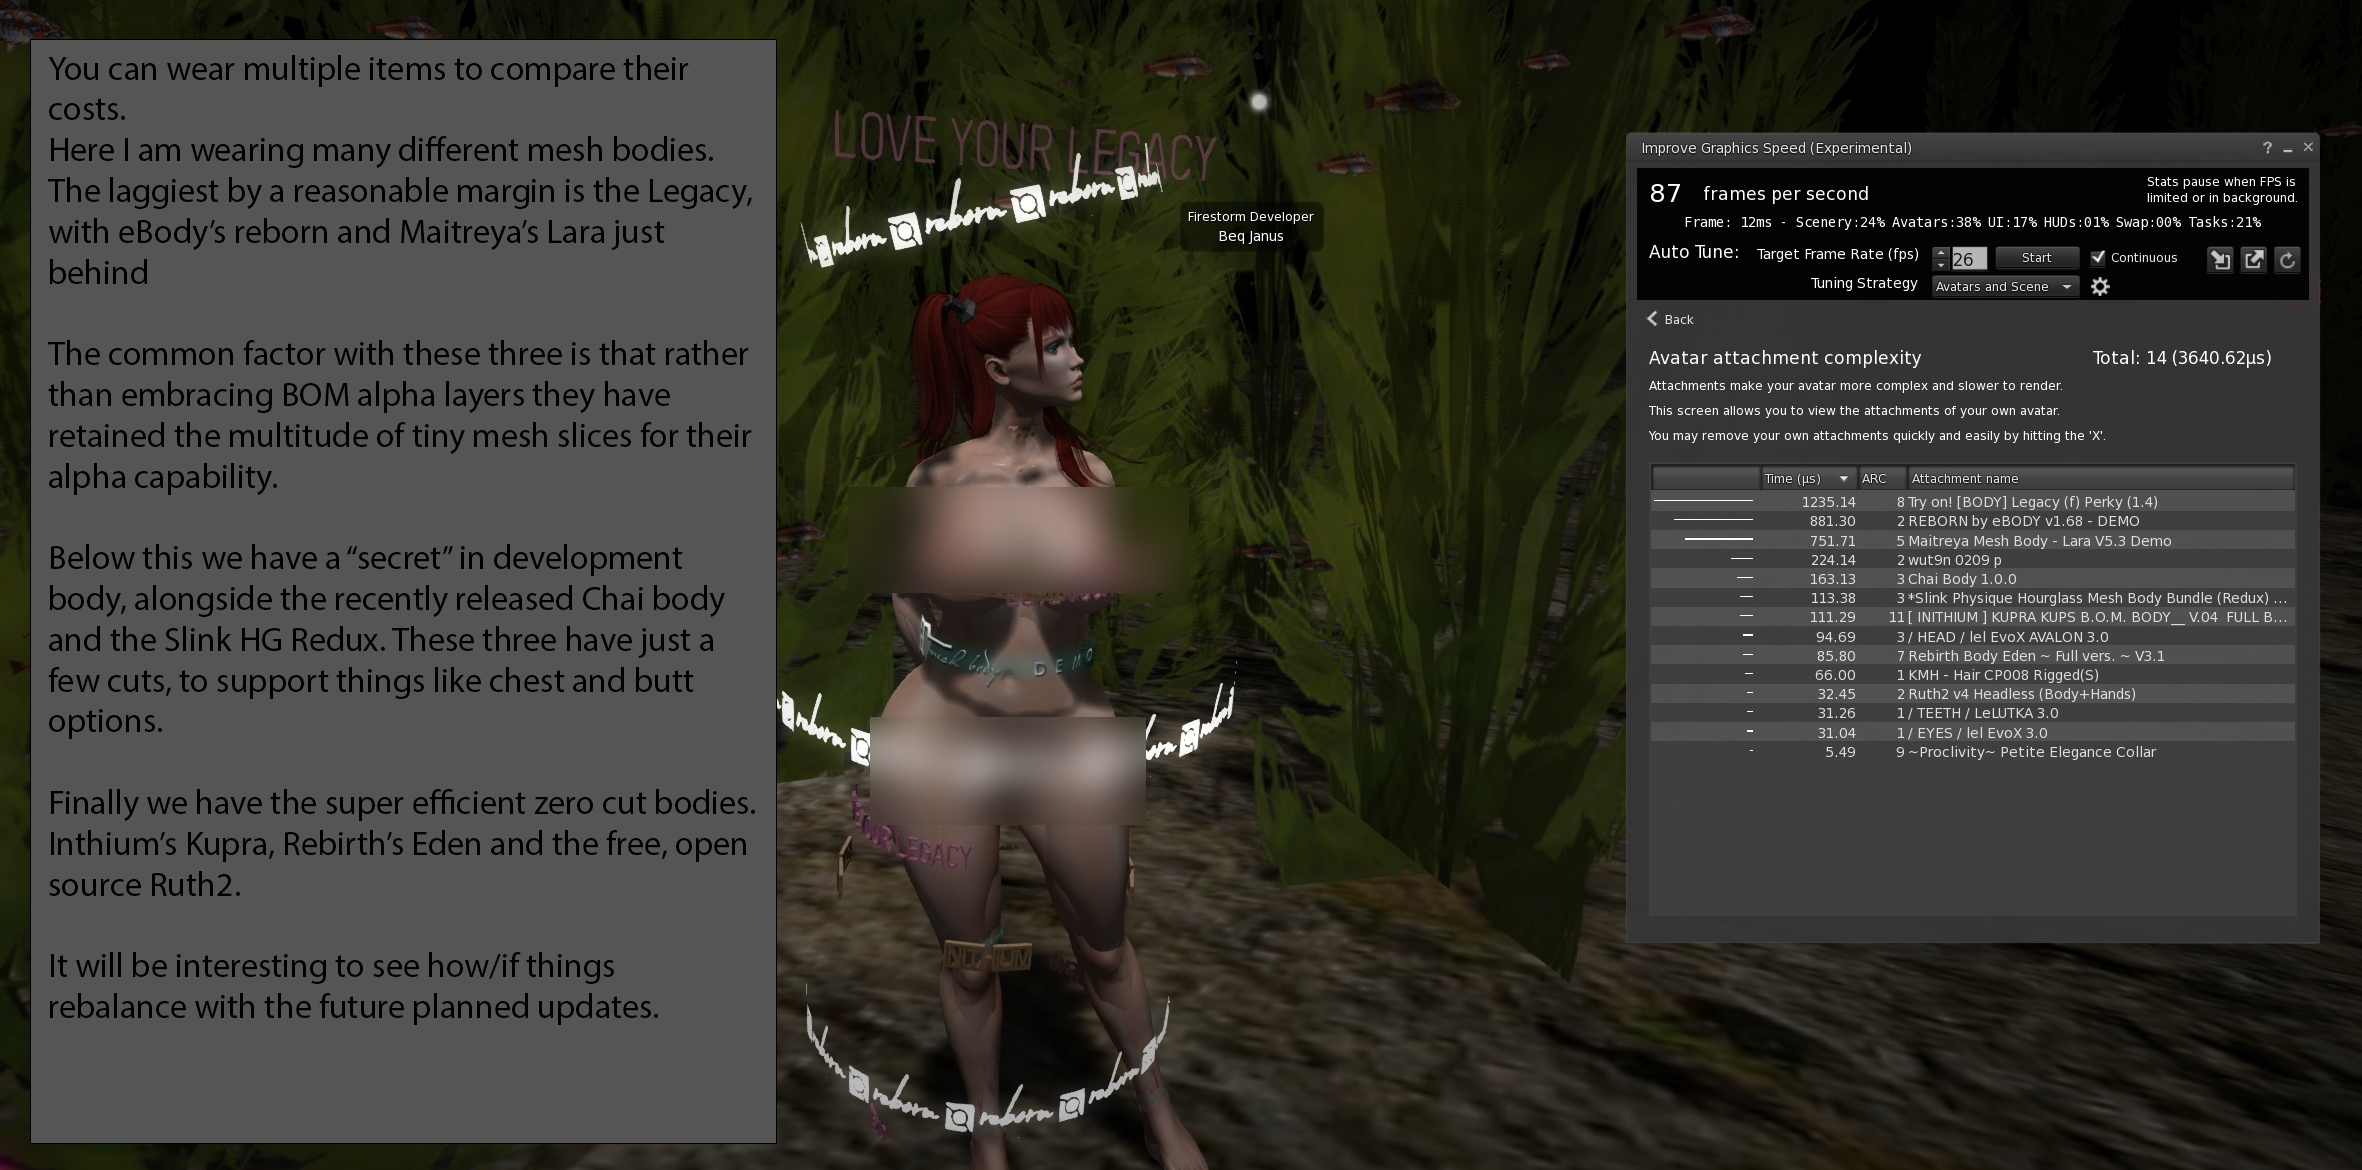
- What you see is the cost of drawing this scene on your machine. Something not in view will show as very low cost. When looking at your attachments, make sure that your avatar is in view and not partially hidden.
Is it me? How can I be sure?
Fist, let me say just how awsum this tool is plus the information you provided in the blogs is invaluable for anyone who wants to truly understand client side lag lik me who is struggling with a very busy sim.
ReplyDeleteI was wondering if it would be possible to have a similar display to the "Avatar attachment complexity" for other avatars like there is for your own. This would go a long way in helping others when managing a busy sim.
Also, would it be possible to have rendering times on objects similar to the avatar list.
Beq said in a thread on Second Life forums: "I had that, however, due to the way that SL works it is not possible to retrieve the another avatars attachments by name without selecting them (this is how the "inspect" works) doing this would be highly disruptive and counter to what we are trying to do so I had a choice of leaving the attachments as UUIDs and thus pretty meaningless or simply removing them and focussing on our own. I chose the latter."
DeleteI know it's experimental, but I love your tools a lot! Not just the autotuner, but I always wished something better and more reliable to check out the impact of the attachments and how they compare to each other. It's really useful. Thank you!
ReplyDelete