One of the things that my recent discussion around the issues with segmented, rigged mesh bodies and the issues they cause for viewers threw into stark perspective was that the current complexity metrics are not in the least bit helpful. In particular the mainstay of the current toolset "ARC".
So what is ARC?
Avatar Rendering Complexity (ARC) is a calculated value based upon an algorithm determined some years ago by Linden Lab. It scores an item based on a preset "cost" per feature, that in theory aligns to the overall rendering impact of that item. It has not been adjusted for many years and even assuming it was ever broadly accurate, it has been outrun by changes in hardware and in content/content creation. The calculation assigns a based cost and/or multiplier based on the type of features used, such as legacy bump mapping, flexiprims, alpha.
Why is ARC wrong?
In part, it is down to bit-rot, it was seemingly based on tests in the past but times and features have changed, technology moved on but the code has not kept pace. However, it is more than just being out of date, even if the algorithm was broadly right for one machine how well would that transfer to another? We can all appreciate that the performance profile of a laptop with "onboard" graphics will differ massively from a desktop with a dedicated GPU. Every one of us has different aspects of our setup. There are too many things that depend upon or are affected by not just your machine, but your settings and circumstances too.
Fine, ARC is not correct, but it's better than nothing, right?
This has been said time and again but frankly, I am far from convinced of this. Back in the summer, the Lab released their first look at "performance floater", this features a new presentation of ARC, ranking the "worst offenders" and allowing you to derender them. This is a great feature, in theory, except it is frequently pointing the finger at the wrong people. Because ARC is flawed, those at the top of the "complexity" list may not be the ones affecting your FPS at all; worse still because the numbers are misleading they can encourage entirely the wrong changes. I have seen people remove all their flexiprim hair and replace it with rigged mesh, their complexity plummets, but the reality is that they are more than likely taking far longer to draw now. A segmented mesh body will frequently have a lower ARC score than an unsegmented one, yet we have seen in my recent posts that the reality is quite different. The result of this misleading information is that people swap out perfectly good assets for dreadful ones making the overall performance worse all the while being lied to by the ARC.
I would argue, therefore, that false information is worse than no information. So what can we do?
Say hello to ART
ART is my cutesy name for the Avatar Render Time. It is a personalised score that reflects the impact of an asset on you and your machine right now, with these settings. It is not a like-for-like replacement for ARC, it is not a tweaking of the algorithm, it is instead a consistent measure of the specific cost of rendering avatars on your machine, with your settings.
Here is an example of the new screen that will be available in the next Firestorm release, taken at a busy Music venue.

This display is derived from the initial work of the Lab as can be seen in their "performance floater" project viewer released in the summer. The presentation has been "more or less" retained, but importantly, I have moved away from ARC. There are a few aspects of this screen that are worthy of note.
The frame summary

Alongside the display of the overall FPS number, we have a breakdown of the time taken to render each frame.
The frame time is expressed in milliseconds (ms), a millisecond is 1000th of a second, in this case, the entire scene was drawn in 70ms, 70/1000ths of a second. 15 FPS is roughly (the FPS is an average of recent frames) 1000/70 and therefore if we want to increase the number of frames per second we must reduce the time each frame takes.
Alongside the Frametime we have the proportion of time spent on various (quite broad) categories.
UI - All the viewer user interface, the floaters and menus that you have open. It is worth looking at how much certain views cost if you are looking to maximise your FPS.
HUDS - The HUDs that you are wearing. I am a little wary of this number, HUDs can be very high texture overhead and while this increases the HUD rendering cost, it also increases pressure on other rendering as those textures displace ones in the scene form the graphics card. This interdependency is not something that we can accurately reflect at present.
Tasks - The time spent keeping your viewer connected to SecondLife, processing all the messages and so forth. This should be comparatively low and stable.
This leaves, Scenery, Avatars and the mysterious "Swap".
Scenery - The scenery number is a gross over-simplification, it effectively means all the rendering that I could not assign directly to a specific avatar (or HUD or UI). It will thus mostly be the environment around you but it can include certain overheads that cannot be easily assigned elsewhere.
Avatars - No prizes for this one; the time spent rendering each avatar, and we'll examine that more closely in a bit.
Swap - Swap is the most obscure stat here, it is uncompromisingly technical. I'll put a footnote to explain it for those who care.
What we note is that in our scene, a relatively simple skybox venue, almost 20% (around 14ms) of our time was spent drawing the static mesh and prims that we see. Meanwhile. the avatars took a whopping 72% (50ms).
The nearby avatar list
Below this, we see the list of "nearby avatars". This list is built based on the draw distance and as such includes avatars that may be out of your direct line of sight.
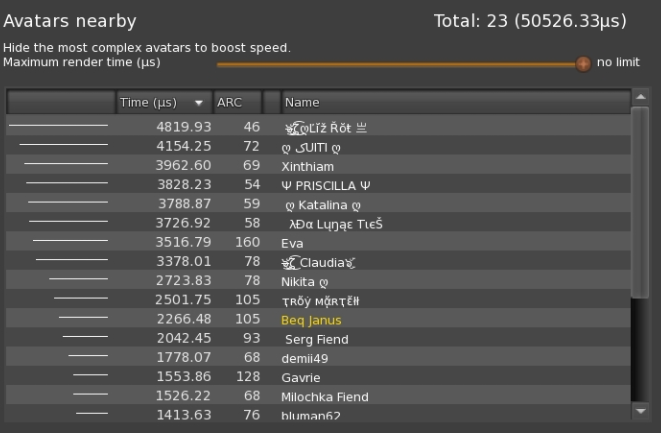
Here we can see that there were 23 avatars being "handled" by my viewer, and we shift into another "scary unit" the microsecond (µs). A microsecond is a millionth of a second a tiny amount of time, used here to allow for the very wide range of rendering times different avatars can consume.
In this snapshot we see that our most complex avatar took more than 4,800 microseconds, this is almost 5 milliseconds. That single avatar (out of 23) was almost 10% of all the avatars combined.
Furthermore, we see the fallacy of ARC writ large (and this was not contrived, but a pure chance) the lowest ARC, the avatar we'd traditionally have considered "the best behaved" is in fact the slowest to be drawn. Meanwhile, we have "Gavrie", who would be second from the top based purely on ARC, showing as one of the more efficient avatars.
We can now choose to manually derender the worst offenders, by right-clicking, or use the "Maximum render time" slider at the top to set a cap of our choosing.
So how is Avatar Render Time determined?
To determine the time we take measurements during the rendering process combining these to find the total time dedicated to drawing each avatar. This number varies a little from frame to frame, it will change when you look away from or zoom in to, a given person due to the way that the viewer reduces the textures and geometry being drawn, as such we cannot say that "Gavrie" is always the better behaved, just that in recent frames their render time has been significantly lower. What we learn from this is that, removing/reducing the cost of a given avatar will save us up to that amount of time next frame and in turn increase our frame rate.
There are about 17ms consumed by the top 5 avatars. If we were to remove them completely that would reduce our frame time accordingly from 70ms to 53ms. or roughly 19FPS. an almost 25% increase.
What drives the render avatar time?
A large proportion of the time is attachments. Don't forget that for the vast majority of us our bodies, heads, hair, hands and feet are all attachments. In my previous blogs, I have illustrated the outright cost of these. There is also an underlying cost of just being an avatar, ironically your invisible basic system body has a cost of rendering that is higher than I had expected (even though it is not there most of the time) but for now at least those are not something we can influence; therefore, we need to look at our attachments and see what we can do to improve ourselves.
The performance floater has an "attachments" view.

Here we can assess whether we are doing the best we can to keep lag down? If I were showing nearer the top of the avatar list I might want to review my attachments and see whether I could remove any of the higher cost ones.
It is worth noting that once again the familiar ARC number is misleading. Faced with the ARC alone I might change my hair and leave the harness straps on my legs.

In fact, those straps are slightly more expensive than the hair in spite of being 1/10th of the alleged complexity.
So does the render time tell us everything we need to know?
Not really, no. What the render time is telling us is long this avatar or this attachment took to draw on our screen. It is a personalised measurement, and for FPS improvement, that is what we need to know.
Of course, if we are not actually looking at the avatar, or the avatar is far away, then the cost will drop. You can see this in the attachment view by simply camming away from yourself.
Importantly, the render cost that I see will differ from the render cost you see. Even if we share camera viewpoint and graphics settings, the difference between my PC and your PC will dictate how similar (or not) our results are.
Render Time addresses:
- What (or more typically who) is causing us to slow down.
- What items we are wearing that might slow us and others down.
- Highlighting the effect of settings changes (shadows on/off, water reflection, draw distance)
It does not (directly) address:-
- The total lack of accountability in SL for what we wear.
It is not usable by region owners to restrict entry and manage the lag on their estate. - The non-rendering impact of complex assets.
There can be an overhead, in preparing complex assets, transmission time on the network, time to unpack and validate the asset, time to fetch things such as textures. These all happen over the course of many frames. - It does not (easily) help creators know "up-front" what the performance of their creation might be.
Creators have become adept at "optimising their creations to lower ARC. Sadly that is frequently a red-herring. ART meanwhile cannot tell them exactly how an item will render on their customer's machines. It can, however, more accurately guide their decisions.