Showing posts with label physics. Show all posts

Sunday, 20 June 2021

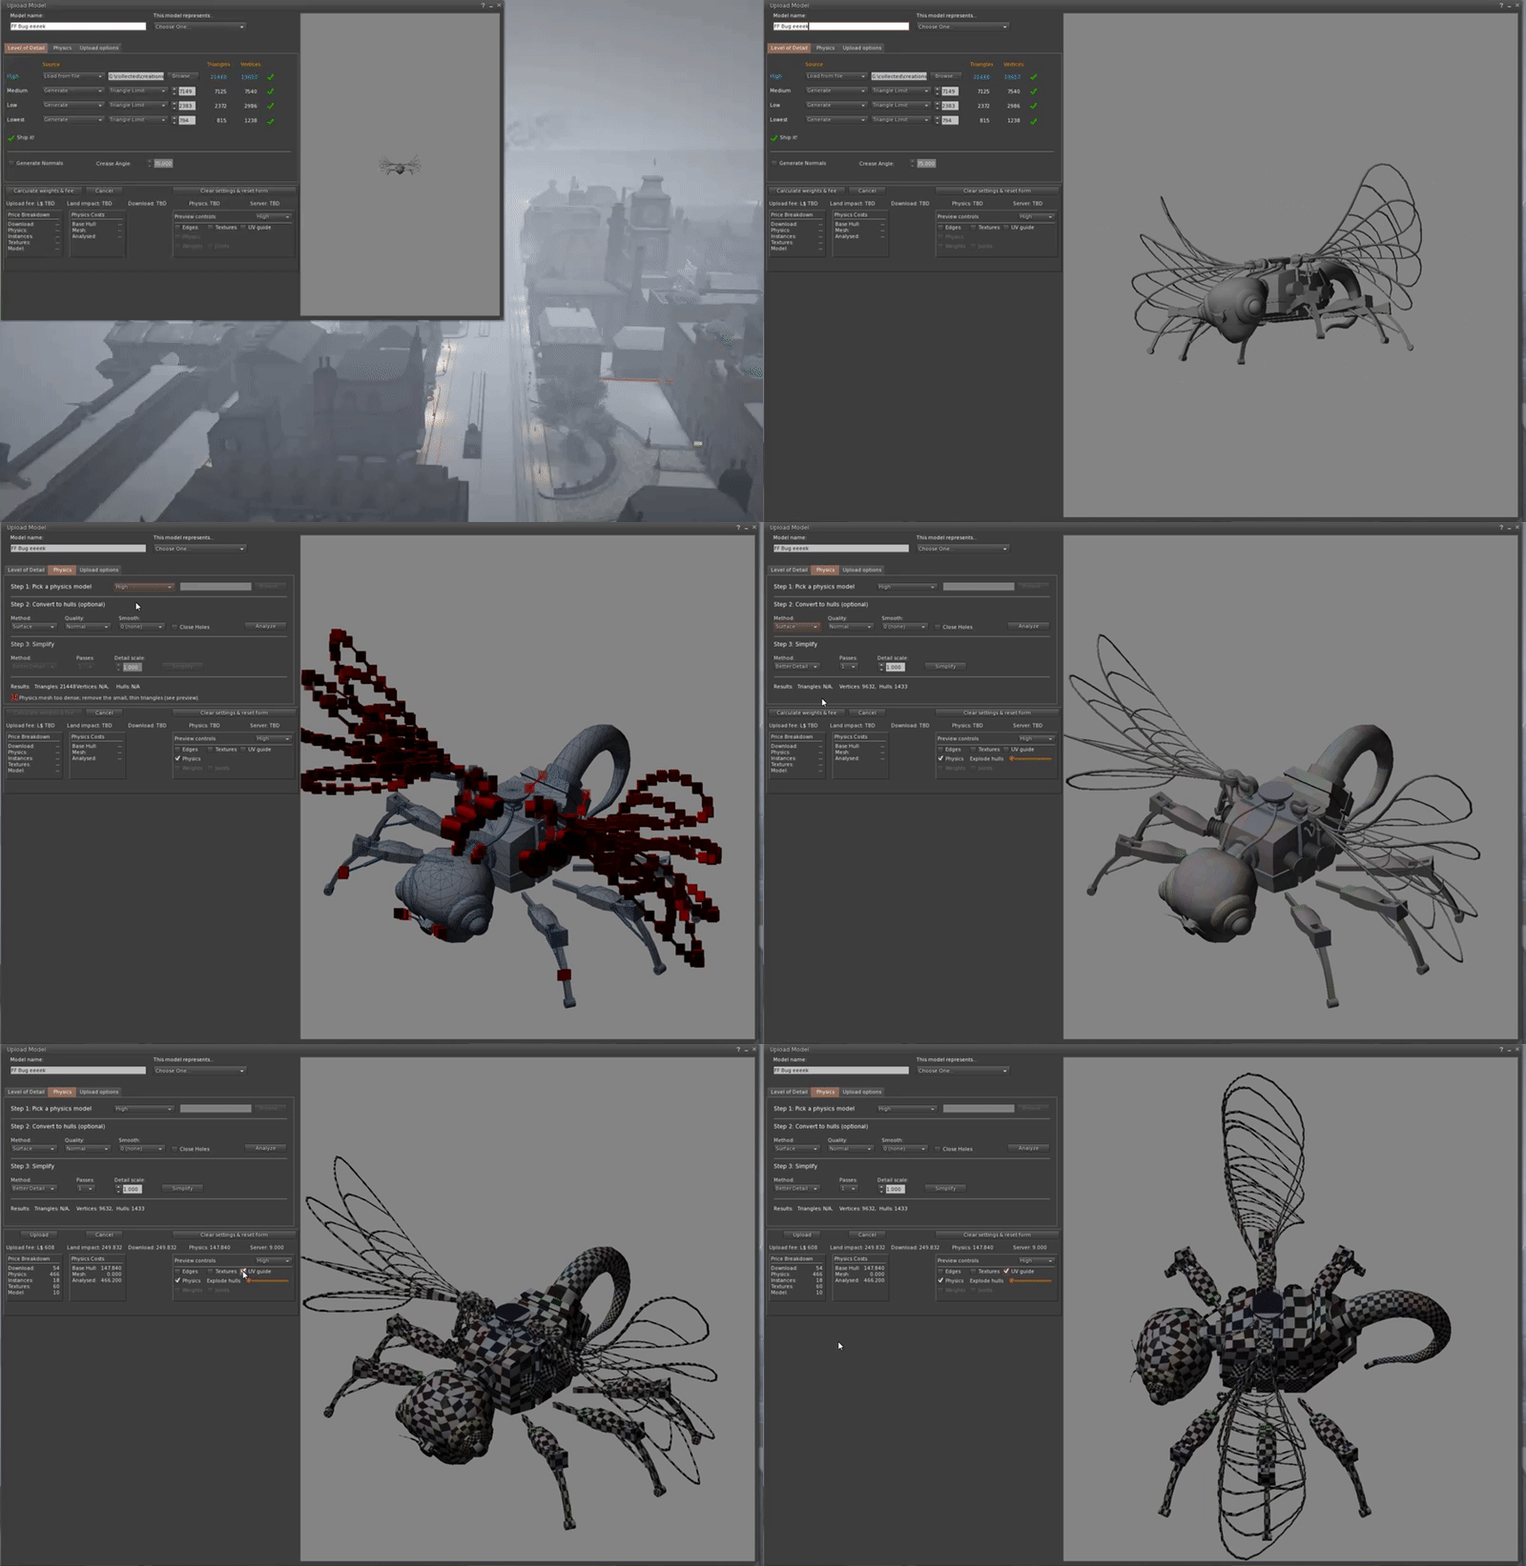
Summarising the next improvements to Firestorm Mesh Upload

In my last blog, I covered at length one of the changes I have put into the forthcoming Firestorm release. This post is a shorter summary of those changes and two other updates that I think will appeal to many mesh creators. 


1) Materials subset handling and related errors

For a full, blow by blow account read the previous blog, but in summary, the way that mesh "texture faces" are handled has been rewritten to give you more freedom in how your meshes are organised.

As best I can tell, there has been a bug in the Mesh upload parser (the thing that reads your Collada files and prepares them for upload to SL/OpenSim), so in-grained was this bug that most of us never realised it was a bug. We have all become accustomed to having to place empty triangles in every LOD model to represent the full set of material faces. Given a Mesh "house" whose High LOD model uses 5 materials, "frontwall", "roof", "door", "carpet", wallpaper", we might remove all the geometry from the interior faces for the lower LODs as you would never see those from the outside. However, creating "house_LOD2", as the medium LOD model with only the exterior materials present would result in the error, "Material of Model is not a subset". We would grumble that this was a subset, but with no way around this problem, dutifully return to Blender and add 2 stray triangles and assign one of the "missing" textures to each.  This is painful, time-consuming and frustrating but most importantly it is very confusing for new creators. It also has a further serious side-effect. the LOWEST LOD model is notoriously over-priced in SL, by which I mean that the cost of each triangle in the LOWEST LOD is so high as to make it near impossible and at best time consuming to produce a good LOWEST LOD model. For example, a small hand tool which due to its small size will rapidly be reduced to LOWEST LOD, can typically have no more than around 20 triangles before it starts to seriously drive the Land impact up. If you have to give away a number of these precious triangles just to please the grumpy uploader trolls then you have already lost a large proportion of your allocation. 

Form the next Firestorm release this will no longer be the case. With the exception of the high LOD model all the other LOD models can now have any valid subset of the High LOD materials, they do not even have to be a subset of the immediate parent LOD. 
Thus you can have the following structure
8 faces in the high LOD - A,B,C,D,E,F,G,H
4 faces in the Medium    - B, E, G, H
2 faces in the Low           - A, C
& just 1 in the LOWEST  - F

Or any permutation of these. The only requirement is that the superset of all materials used in all LODs must be present in at least one triangle in the HIGH LOD.

2) Ready-to-use physics presets


The physics shape tab on the mesh uploader is generally not well understood. This is in part because it is a technically complex thing, in part because the viewer has not helped as much as it could. I can't do too much about the former, though I've written a number of blogs that try over the years, the latter part I can do more with.

As of the next Firestorm release, creators will find 3 new options when selecting a physics shape.
1) The cube.
2) The hexagonal cylinder.
3) the user-defined mesh.

There tend to be two sorts of people when it comes to defining physics shapes, those that do and those that don't. For some items it is barely worth worrying about, for others it is essential. However, given that in SL it is often hard to predict how an item might be used once it leaves your protective custody, it does no harm to make sure it has a minimal physics shape that is broadly aligned to the volume of the mesh.

Many people will select the "lowest LOD", often some unrepresentative triangle. This will upload, but it means that once the item is rezzed inworld people cannot interact properly with it. A much better option for many items is a simple cube, and a lot of us keep a simple 8 vertex cube on our drives for just this. You no longer need to do this. The hexagonal cylinder is intended for items that are not quite so "cuboid".

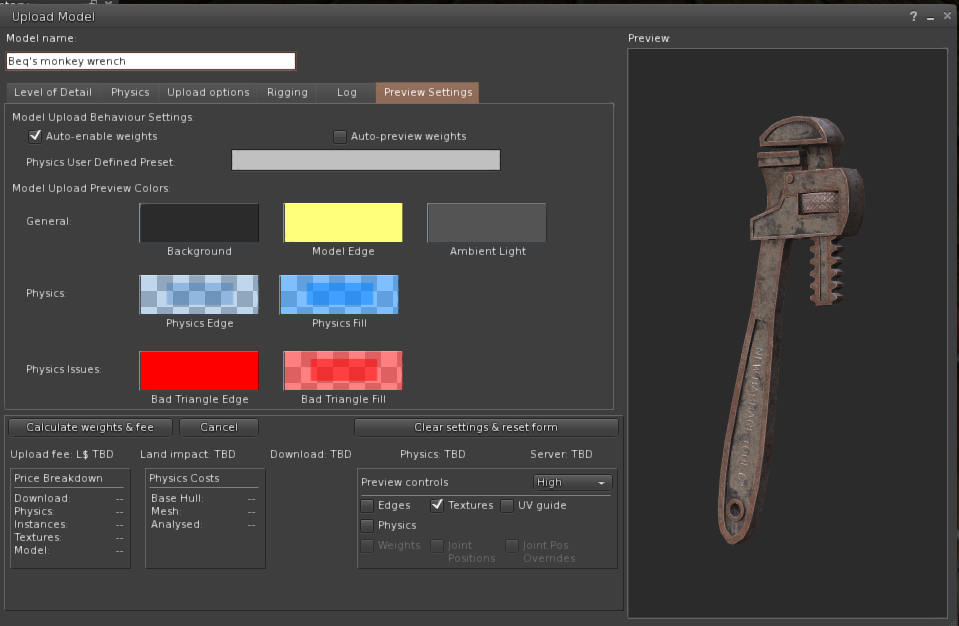
I toyed with providing something vaguely spherical but came to the conclusion that any shape I came up with would fail to meet some need. So instead I added the ability to provide a "user-defined" physics mesh. This is a way to have a shortcut to that "shape you always use". It can be configured in the Settings tab on the upload floater. 


Some items require a custom physics shape, walls with doors and windows that you wish to allow passage through, for example. No defaults are going to help much there, but let me know if there are things that you feel would help. 

3) Ambient lighting in the viewport.

A couple of years ago, I changed the lighting in the preview window to make the three-point lighting work "better" but for some reason, things always remained dull and flat. Recently, it suddenly struck my partner Liz why this is. the ambient lighting is wrong. Upon investigation, it turned out that it was not just wrong it was "black". I have no exposed this setting on the "preview settings" tab so that you can change it, I have found a dark mid-grey about 33% grey works well and makes the lighting "pop" properly. It is especially useful when uploading with textures.

At the time of writing, there are two minor niggles that I may change before release. 
1) It still defaults to black. I considered this as a good plan but given that anyone upset by better lighting can change it to dullness again I think I will change the default to something sensible.
2) When you change the control the preview will not update until you either pan the model or reopen the uploader. I may not be able to fix this immediately.

I hope these three sets of changes improve the quality of the uploading experience for you as much as they have for me.

Take care.

Love Beq
X

Friday, 7 December 2018

Easing the pain of importing Mesh.

A quick guide to the Mesh uploader changes in Firestorm 6.


But first a quick mention of the "other thing"

The big new thing in Firestorm 6 is, of course, Animated objects or "Animesh" which gives you the ability to take any rigged mesh item that you have modify permissions on and turn it into an animated independently moving item. You can read all about Animesh on the Linden Lab blog the regular places such as Inara and Nalates' blogs. Having spent quite a lot of time over the last few months looking at performance concerns around Animesh and tweaking some of the performance of rigged mesh in general, I am relatively happy that Animesh has an overhead not too much more than if that same mesh were being worn as clothing today. That is to say that a single animesh  of say 30,000 triangles will have an impact on your performance more or less equivalent to a 30,000 triangle dress or xmas sweater.


And now on to the main part of the blog...

A side-show to the main event of animated objects, nestling amongst the many fixes and tweaks since the last release, is my revamp of the Mesh Uploader. I teased some of the information on this previously but I'll now give a quick guide to the updates.

What's changed?

  • Cost breakdown, how the L$ charge is calculated
  • Physics details, the costs of the different types of physics (convex hull, prim)
  • Higher resolution preview image
  • Scalable preview window
  • Improved shading/lighting in the preview window
  • Correct highlighting of degenerate mesh
  • Improved error handling for physics models (avoid some of those MAV errors)
  • UV Guide overlay

Why?

So why change the uploader? Primarily because it is awful. A lot of creators struggle with the obscure and limited error handling, the postage stamp preview and poor rendering. The aim is to improve the tools, this is really the first step in what I hope will be a series of improvements both in the capability of the import tools but at least as importantly, in the feedback you get when things go wrong.

So what are these changes?

First of all, we'll look at additional information panels.
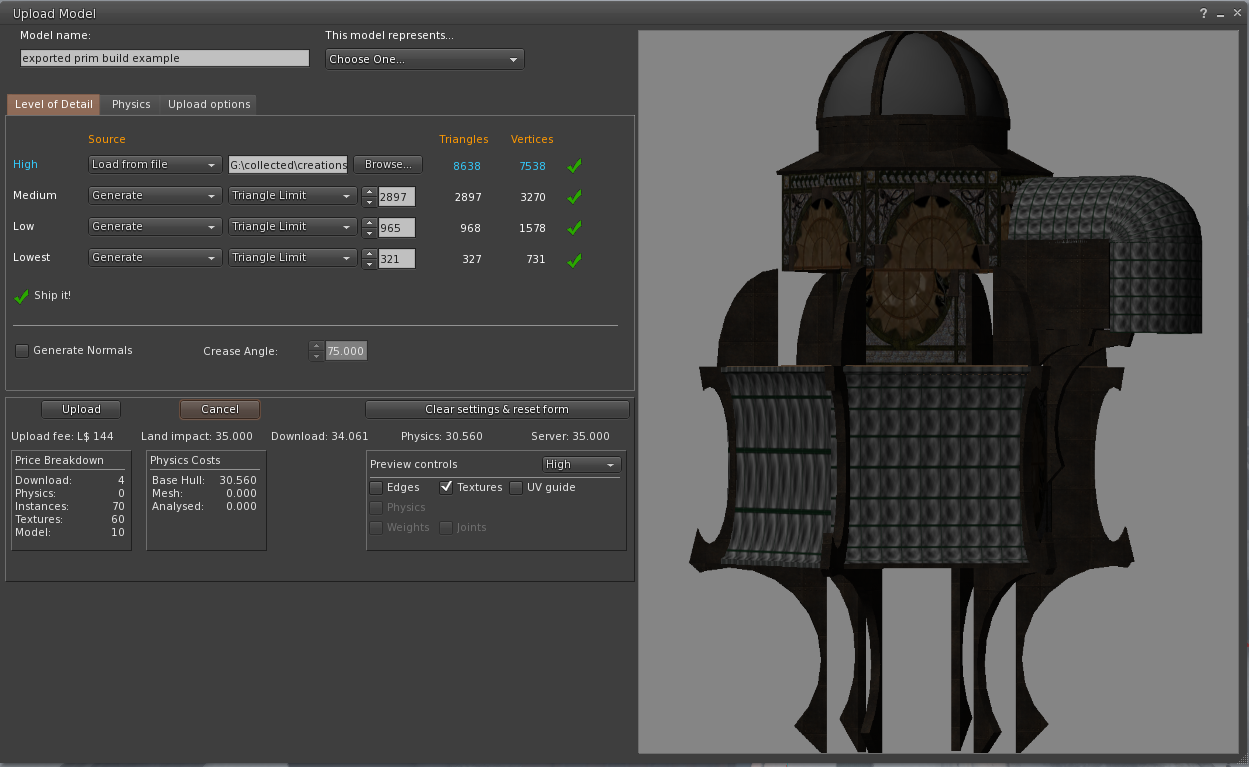
Taking the following object (an old prim building exported from SL)


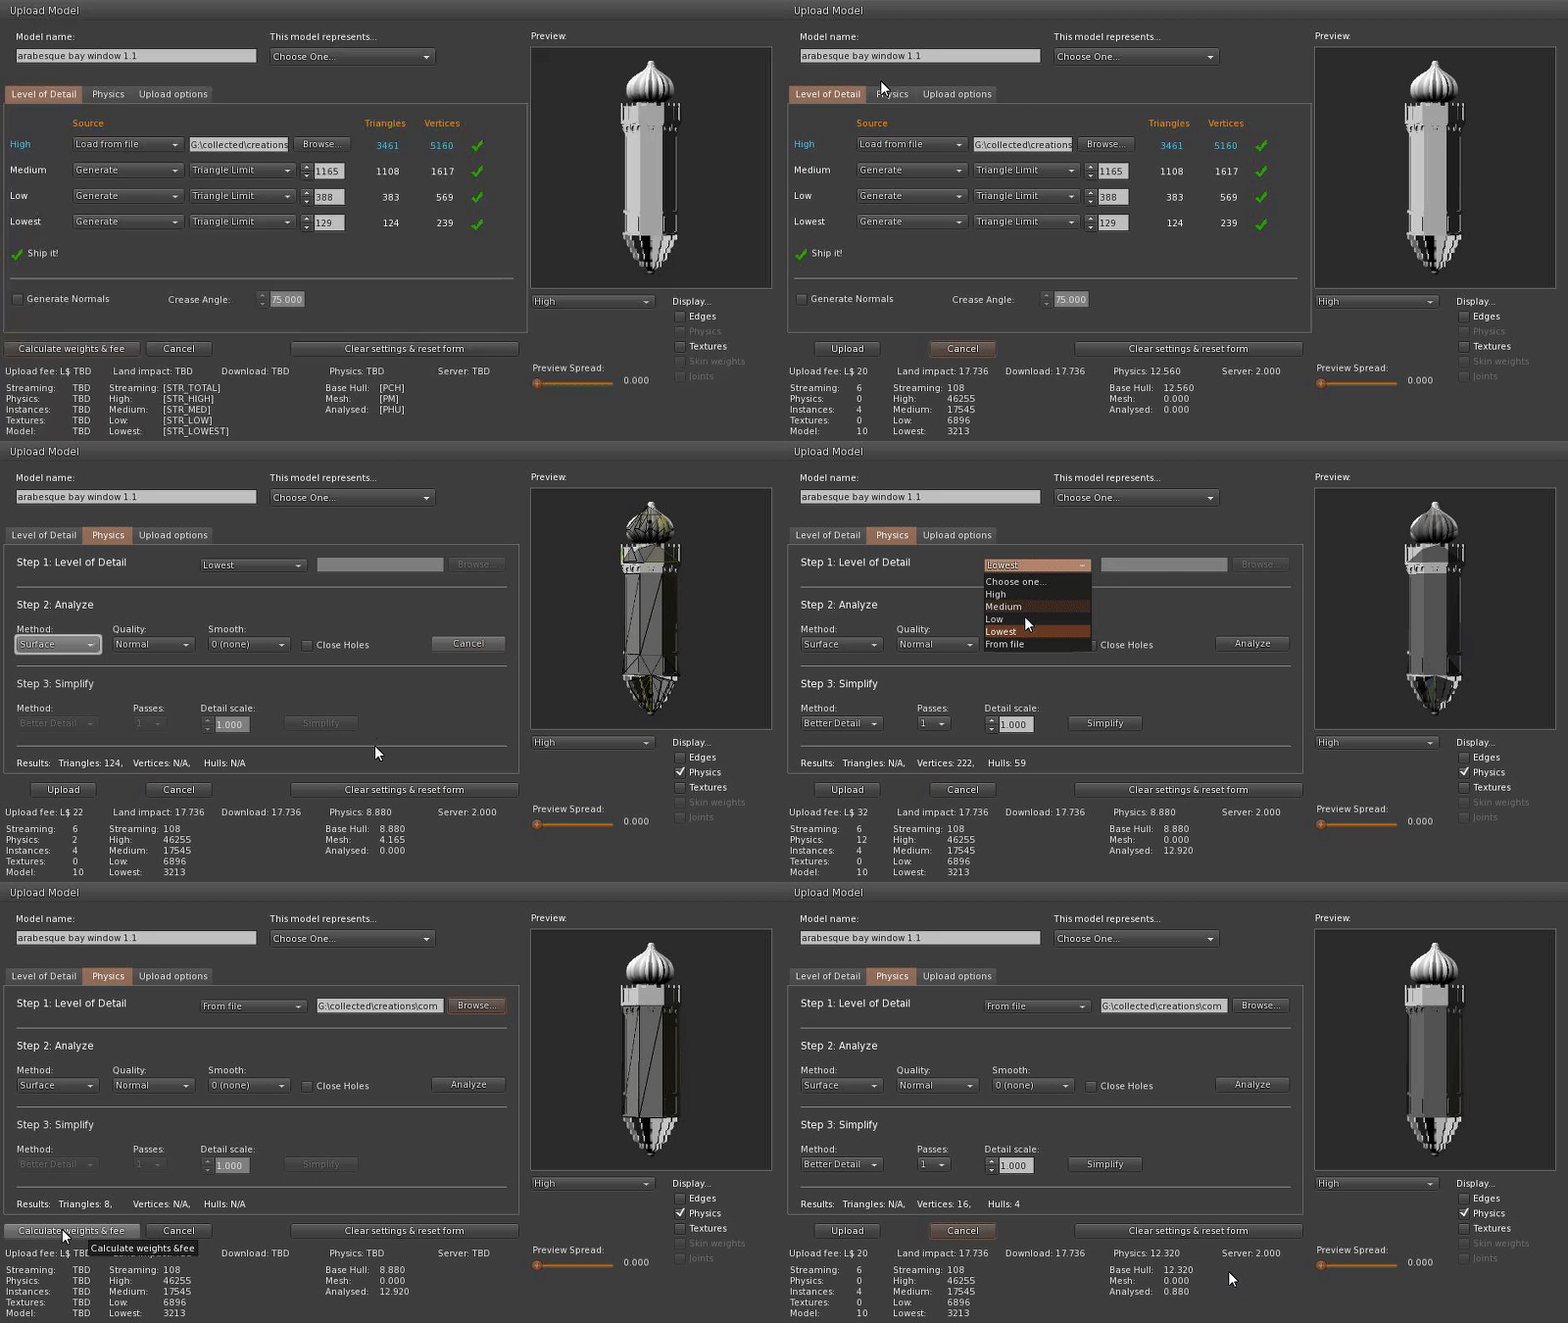
Cost breakdown:

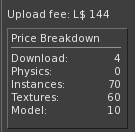
Ever wondered why that first upload cost you L$15 but the one after cost L$25? This information panel will at least tell you where that final number comes from.

The Download fee is derived from the streaming cost of the mesh, shown as "Download" in the standard Land Impact stats.
The Physics fee relates to the cost of the physics model. It is worth noting that the Convex Hull (Base Hull) is free, while a User supplied physics is charged based on its complexity whether it is mesh or analysed (more on that later).
The Instances fee is L$1 per mesh "prim" in the linkset. As can be seen this build has 70 separate meshes in a single model. 
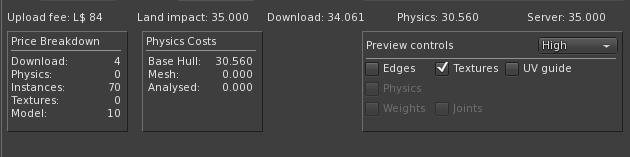
The Textures fee is the standard L$10 fee per texture upload and is only added when the "inlcude textures" box is ticked on the "upload options" tab.
Finally, the Model fee, is normally L$10, the core upload fee irrespective of the complexity of the scene. It may be possible for this to be more in a multi-model DAE but I have not had a chance to test one.

Physics breakdown:

Personally, I think this is the more valuable of the two new panels. It has always been guesswork as to what the inworld physics cost will be if you use anything other than the default convex hull. 
This panel shows you the possible physics costs. There are 3 values shown but typically only two of these will have a value at any given time.
Base Hull: I should probably rename this to Convex Hull to correspond to the inworld name. The Base hull is the default physics shape, every mesh has one of these, in fact, if the uploader is unable to calculate a credible "base hull" you will get a dreaded "MAV block missing error".
This cost is the one traditionally shown in the LI summary because it is the default state of a newly uploaded mesh. However, if you provided your own physics shape, then inworld you can set the physics shape to the equally confusing "Prim". The next two values are related to the "Prim" physics

Mesh: User Mesh physics, this is the value is you have provided a Mesh model and not used the Havok Analyse function. It can sometimes be cheaper than the analysed equivalent but as all regular readers of this blog will know, it can vary with scale. The cost shown assumes the scale as uploaded.

Analysed: If your user-specified MEsh is analysed (and optionally simplified) using the Havok tools then when the fee is calculated it is based not on the original Mesh model but instead on the number of hulls. Using this new info panel you can, therefore, check the non-analysed physics cost and then examine the analysed costs and decide which you prefer before you upload. 

Moving on from the info panels, we'll look at the most obvious visual change, the preview panel itself.

The preview panel:

There have been a number of alterations to this panel. Firstly I have changed the Colour scheme to be more aligned with the inworld editing, yellow highlight for the edges, with translucent blue for physics. these can be overridden in the depths of the debug settings if you really want.

The next change is my favourite, the scalable preview window. The rearranged upload "floater" is already giving you a larger preview are, but depending on your screen size you can now grab the lower right corner and scale it out to as large as you wish. This comes in really handy for identifying those pesky degenerate triangles in your physics mesh. Alongside the increased physical size I have also increased the resolution of the preview giving a less jagged feel to the render. 

A more subtle change is the lighting of the model. The preview window always had very deep dark shadows and investigation showed that this was not actually the intended behaviour but that the 3 point lighting implementation was broken. I have made a quick fix that improves the general lighting but I have future plans to do more with this.

In addition to the existing edges and textures options, I have introduced a new "UV Guide". This displays a simple checkerboard pattern over the mesh and is useful for ensuring that you exported the right UV map before you get inworld. It is possible to add your own UV Guide and in a future release, I hope to make that directly editable from the preferences.

The final visual change was to fix an annoying bug that has meant that the intended "helpful" diagnostic display to highlight the presence of degenerate (i.e. long thin) triangles was more or less indistinguishable from the build. These errors in the physics mesh which were previously highlighted with tiny black lines marginally thicker than the mesh display are now highlighted clearly in bright red.

The following animation shows a quick overview of the new preview window


Finally, at least for this "overview", I have attempted to improve the error handling workflow.

Improved Error Handling:

Anyone who has spent any time uploading Mesh or helping others to do so will have suffered the pain of the obscure and often misleading errors. In this refresh I have tried to ease the pain a little, there's still some way to go I'm afraid but I hope that this start will save people some of the worst of the shortcomings of the old uploader.

Intercepting MAV errors....wait, rewind .. What is a MAV error?

MAV stands for Mesh Asset Validation (or something close) it is the process that occurs when you click the calculate weights button before the server decides on the costs. A MAV error is, therefore, one of a number of "fatal" errors that prevent the mesh being considered as well-formed and given a set of costs and weights. The annoyance factor of these is two-fold, firstly you have to click the button and wait for the response from the server, and secondly, you have to decipher the meaning of the error message. These MAV errors also commit the cardinal sin of error handling "Please look in the log for more information", if you've ever tried to look in a viewer log file and work out what went on you have my pity. 

MAV Errors then and now

There are four main MAV errors that I can think of:-
MAV error block missing: I referred to this earlier, and it can occur for a number of reasons, unfortunately, and because of this, for now at least, I have not trapped this one. The "block missing" means that part of the Mesh data structure was not present when it reached the server. This is purely a technical fault and of no use whatsoever to the user, so what causes this? The Mesh data upload structure has a number of mandatory "blocks" these include the LOD data, a convex hull etc. The most common (in my experience) occurrence of  "Missing block" is when the mesh is so poorly optimised that the convex hull creation failed. another cause is, once again, overly complex mesh that causes the LOD generation library (GLOD) to fail to produce an adequate simplified LOD.  There may well be others.

MAV error: Degenerate Triangles: (Now trapped) Traditionally this has been reported when your user-defined mesh physics shape is too complicated and in particular it has one or more long thin triangles. These are an error because they cause significant issues for the physics engine. As mentioned above I now highlight these in bright red, and this occurs as soon as the user mesh is specified. along with this the calculate button is deactivated (you would only get a MAV error so I am saving you from yourself) and a red error message explaining the issue is shown.

MAV error: Some hulls exceed vertex limit: (Now trapped) In the past your mesh was sent off for evaluation but I now perform this in the preview itself. Hulls are a simple convex shape made up of at most 256 vertices. If the analysis produced more complex hulls then this cannot be stored in the mesh data structure and is a fatal error to the uploader. This is now trapped and flagged as an error, the calc/upload button disabled and a suggestion of how you might fix the issue provided with the error.

MAV error: Too many hulls: (Now trapped) In the past, you would get a MAV error if your analysed results gave more than 256 hulls for any single instance (aka mesh unit) in the model. Once again this is a technical limitation imposed by the system and it prevents the model being uploadable. This is trapped and provides a suitable error and a suggestion of how to fix the problem. As you might expect by now, the calc/upload button will be disabled.

That's all folks

That about rounds up this Blog and the uploader changes. As I have said a few times above, this is the first stage of what I hope will be a more complete revision. If this is well-received I will look at the feasibility of contributing this back to the Linden Lab viewer so that everyone (not just Firestorm users) can take advantage of it. The Mesh Uploader is a complex and fickle beast and while I have tried to cover many areas and check for loopholes there is a chance I missed some. I have also deliberately neglected the rigged mesh tools a little, both to focus the changes and to not mix up any issues with uploader changes with Animesh.

Love 

Beq
x


Wednesday, 3 October 2018

Shedding light on Mesh uploading - Something I'm playing with...

For some, the entire Mesh upload process is wreathed in fog, a murky, mystery-filled place of confusion. Sometimes this is down to misinformation and poor tutorials out here on the web, but the Mesh uploader does nothing to help its own reputation.

With the above thought in mind, I've started to make a few tweaks to the uploader. Nothing major here but I thought I would share a little of the direction I am going in and see what the feedback is.

While I want to address a number of different problems, from the error reporting to the preview window, I've started with some additional information displays. It has been mentioned many times in the forum that the Mesh uploader is a little "random", and whilst there is a grain of truth to that, it is also in large part due to the opaque nature of the numbers we see. In particular, where is the cost derived from and why does the physics shown on the uploader bear no resemblance to that which we see inworld?


Blogger will downgrade this clip but you can peek at the original here

Very rough and ready but what this shows is some extended information that is returned when you "calculate weights & fee". So what goodies do we have here?

There are 3 sets of information I am showing, we will ignore the middle one for now as it is not useful in its present form, so that leaves...

1) The contribution to the fee

As you can see, your upload fee is derived from a number of components:-

Streaming

Streaming is a charge derived from the streamable size of the object.
Physics
Physics is a fee derived from the physics model, and you can see that it varies with the physics costs that are normally hidden from sight.

Instances

Instances is a little misleading, it is not used in the context of repeats of a mesh, as those familiar with 3D modelling might use the term, it is instead derived from the number of mesh units making up the model. It is effectively the "prim count"

Textures

I don't show this in my quick clip above but it is the 10L charge for any textures uploaded with the mesh. Uploading textures with the mesh has always been an option but to my knowledge is rarely used.

Model

I have never yet seen this as anything other than the 10L value shown in the clip. I suspect in the workflow it is effectively hardcoded.

And so on to the (arguably) more interesting information.

2) The physics costs

Here we find the hidden cost of physics. For years we've moaned about the fact that the Physics cost shown has little relation to that which we get after upload. Most of us will have made the link to the fact that the physics cost shown historically is just the "base hull" cost. That is to say, it is the cost assigned to the shape that is used when "convex hull" is selected. This is the default physics shape post-upload and is a mandatory part of the uploaded asset.

But we can also provide a custom physics model, if we choose to provide it as a mesh then a weight based on the number and area of the triangles that comprise that model is computed. While it has not been visible until now, it does influence the price we pay. For reasons we have discussed in this blog many a time in the past, there are occasions where a Mesh physics model is not suitable; in those cases we use the "analyse" function to convert the triangles into a set of hulls, or a "decomposition" in viewer-speak.

While a base hull is mandatory and always present, the mesh and hull based user supplied physics shapes are mutually exclusive, you may only have one. As such pressing analyze and then calculating weights will blank out the Mesh cost and retrieve an Analysed cost.

Will this help you?

OK, so that's it for now. How this will actually appear in a future Firestorm I'm not yet sure. There is a fine line between providing more information and causing more confusion. so while I think it will appear in some form I'll be hoping to discuss it with users and our support team as well.

Personally, while seeing the composition of the fee is interesting in passing, it is not essential and anyone tailoring their mesh to minimise the upload cost really needs to consider their motivations. However, knowing exactly what the physics cost will be in-world before you upload is a massive time saver and I believe that this will be popular with my builder friends.

I'd love to hear your thoughts on this. Am I completely off-piste here?

Saturday, 25 August 2018

Why did my LI just explode, I only linked in two simple prims?

Another tale from the tavern

The long-suffering bar staff at the builders' tavern can share many a tale heard over the sobs of a builder, driven to drink by the seemingly implausible accounting of Second Life. One of the more common tales is "the case of the lunatic link set". There are a few variations on this tale, but the underlying story remains the same.

TLDR; 

Too lazy to read? Simple summary, when building link sets of prims be wary of mixing "new" features and the potential knock-on effects on seemingly innocent prims.

Once upon a time

Our happy builder starts his day merrily slinging prims as he builds a new home. Carefully avoiding linking any meshes to the link set (he's been caught by that before) he finishes around midday, and step back to look at his pretty little 28LI home. He muses over the building as he nibbles a cheese and pickle sandwich.

"You know what?" he says to himself, "it's just missing that little something extra. A little finesse on the front porch."

Putting aside his lunch, he quickly knocks up a couple of simple decorative columns from cylinders, popping on a normal map to give them some nice fluting, he links them into the build. 30LI, very nice, but the columns look unfinished and then he realises, they need a base and capitol. He quickly whips out a couple more prims, one torus top and bottom of each, 4LI extra, still a decent count for a prim house. He links them together and carries on working, it isn't until he stops for a tea break in the afternoon that he looks up and sees that his house now has an LI of 290.

In shock and denial, our builder paces up and down scratching his head. He checks every link in the link set, no meshes, not even a sculpt, (he never really trusted those). He unlinks and relinks, changes colours (cos why not?), restarts the region and moves to another sandbox. So distracted, in fact, that he lets his cup of tea go cold. In frustration, he downs tools and heads for the tavern.

So what is it that drives up the LI and the profits of virtual pub landlords?

He recounts the tale to the ever-patient barmaid. Explaining that he checked every single prim in the build, unlinked the entire thing and reassembled it, no single part has an LI more than 1 and yet when the 34 prims are linked the LI is many times more than the sum of the parts.

The barmaid smiles and pulls him another pint.

"You've used materials, 'aven't ya m'dear?", he blinks, she looks at him; "That'll be 2 Lindens please"

"What? oh!" He pays for the beer, "yes, yes, I used a little normal map, gives these lovely fluted effects to the columns, but even with the normal map those are only 1LI"

"Aye, but I bet you've got some toruses in there, right?" He blinks again, she's not wrong, but what on earth has that got to do with anything.

"I do, of course, but I checked them they are only 1LI too"

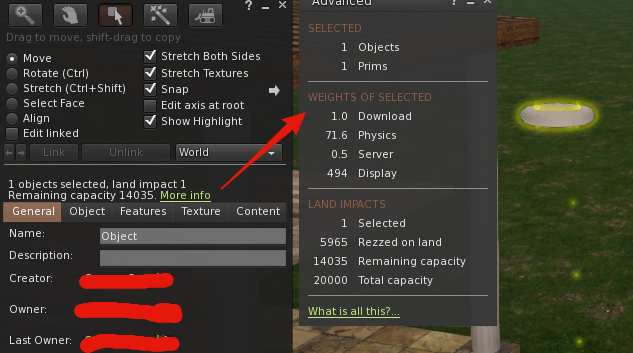
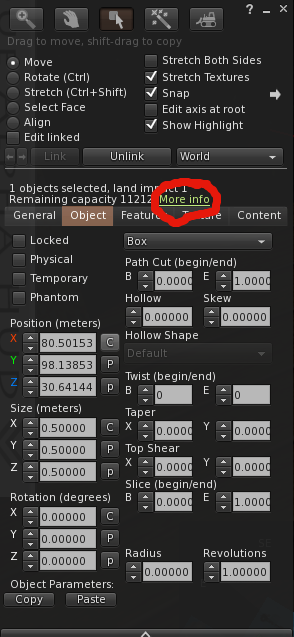
"Go back and look again, but look closely this time." She writes a little note on the beer mat, it simply says "Ask for more info"

Back to work

Somewhat puzzled he heads back to the cottage and once again starts to look through the prims, all at once he notices the "more info" link hidden on the object details.


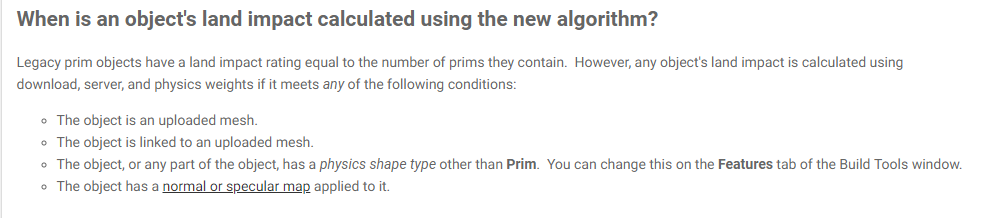
His toruses are costing him 72 LI each, or so it says, but he checks again and sure enough, it says 1LI, what is going on? All of a sudden a distant memory comes to mind. It's not just Meshes that cause the LI to go mad. It's other stuff too... He hunts around and finds a long forgotten post on the community notice board.


The builder stares for a moment, taking in the new information.

"So," he muses, "the normal map on the cylinders may have seemed innocuous because their cost never changed, but it forced the entire link set to use the modern mesh accounting, which means that my pretty torus plinths are costing me a fortune because of the number of tiny triangles." Reinvigorated by new knowledge our builder hero, edits the link set and carefully sets the physics shape of the 4 toruses to be "none" eliminating the physics overhead, reducing the load on the physics engine and making the world a better place in all ways,.

And they all lived happily ever after...

Until the following morning, when while glazing the windows, the builder chose to use alpha masking (because it's better all round right?) and was later found sobbing into another pint of Builder's Bane.


Afterword

The moral of this story is that any link set that uses a post-2011 feature such as mesh, materials or alpha masking will remove the legacy prim accounting cap from the entire link set. The most common case is linking to another Mesh but be aware it is more nuanced than that, as our merry builder friend discovered. Take heart though, all is not lost, you can use those whizzy new features, just take care to minimise the side-effects. Often this means you just need to find the culprits (the firestorm "show physics shape" can help here) and set their physics to none.

Friday, 8 June 2018

The Degeneration game - Nyrva's shower - a simple case study in physics shapes in Mesh Studio


I often come across frustrated builders who have struggled along the right path but for various reasons not quite got to the destination they had hoped. It often reads like a storybook, as our wannabe mesh warrior stumbles into the local inn, seeking solace and with a plea for help.
Nyrva: Hello, question please. If I am trying to build a "sci-fi shower" for RP, that you have to be able to walk inside of, do I have to make it square and boxy in the mesh and physics in order to avoid the "Degenerate Triangles" problem on import? It seems I'm not allowed to do a cylindrical design.


We meet our hero part way through their quest. They've already confronted the uploader troll, and unable to answer the riddle of the degenerate triangle, have retreated for help.


Back in the village tavern, our quester gets a lot of well-meaning advice. It variously consists or perpetuating myths and old wives tales, or valid advice that helped someone once, but does not really help our hero.
helpful soul#1: cylinders can be a pain ... i have found it "cheaper" to make the sides from a number of "box" type prims  for the physics
 helpful soul #2: your physics can be made up of a number of cube prims arrounged in a circle... sounds a pain ...but it is cheaper LI wise ( and i havent a clue why that is so ). I once made a smoke stack for a steam boat .... mesh funnel ... for some reason .... i forget why i need it physical ...... i was lazy and added a normal ( transparent ) cylinder when i added the prim cylinder to my mesh funnel the LI blew through the roof ....???? ( so i made a mesh physics one)
helpful soul #3: Also zeroing out the low and lowest LOD helps lower the LI because you wouldn't be looking at the shower from across the sim
In this case, all good advice in the right place and time but missing the point. Our embattled builder hacks away for a little longer, gets frustrated and gives up, limping defeated to the marketplace to buy something less fulfilling.

So what was the problem?

The MAV errors reported by the Second Life are often considered as dark arts, a kind of voodoo curse that nobody understands, but mostly they are just annoying badly reported errors. MAV comes from Mesh Asset Validation, so this was failing during the validation phase. OK, but what is a degenerate triangle? In mathematics, a degenerate triangle has zero area. In SL and other games use cases a degenerate triangle is one with a very small area. The degenerate triangle check, in SL, goes a step further and penalises "long thin triangles" which are defined as triangles where any one side is more than 10 times the length of any other side.

So the problem is that we have some tiny, probably stretched triangles. This is one of the reasons why I keep repeating over and over that a physics shape must be as simple as possible. If you have a triangle that fails the degenerate check you have definitely not optimised that model.

In the case of our intrepid mesher, they'd not removed all the hidden surfaces and thin edges. This is a common error, people think "this is a physics mesh, not a visible mesh so I don't need to hide the geometry, but it brings us back to rule #1 of physics shapes, every triangle that does not need to be there is a triangle too many.

Right then, how do I find these things?

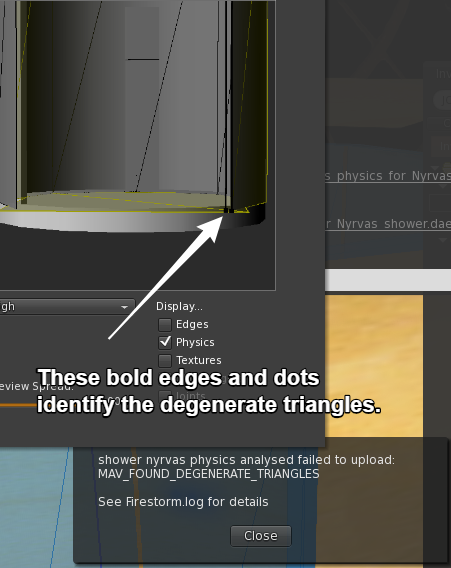
Once you know what the cause is, it is often quite obvious where the problem lies; however, what many people do not realise is that the much-maligned uploader tries to help you. When it finds a degenerate triangle it will highlight it in the preview window.


Happily ever after?

Does this story have a happy ending? We left our hapless builder being bombarded with advice over a beer in the local tavern, but how did it end?

Having been asleep when this tale started, I caught up with Nyrva when I woke to see how they'd got on. 

Me: Hi, did you get past your problem earlier?
Nyrva: no, never did. just wound up buying something off the MP for 55L$. I couldn't make anything below 5LI. For me, it's just another item on the "What MS can't be used for" list. lol!"


Never one to pass up a challenge I asked Nyrva to send me the item. I was able to get the shower to be 1LI with a full physics shape relatively easily. So what magic did I use? Nothing really just careful attention to that law of physics models, delete every triangle that is not absolutely necessary,

The rest of this blog is a brief step by step guide through the process.

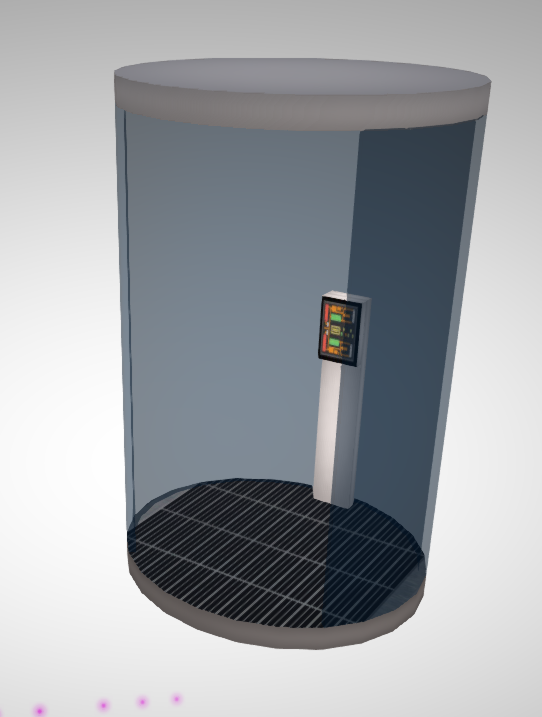
The visible mesh is always a good starting point.
As we can see the structure is very simple, with no obvious reasons why we cannot get a very low LI. The only complexity is that it is cylindrical, in fact, the cubicle is just 3 cylinders, one of which is hollow and 1/4 cut. 

Cylinders are made up of a series of flat edges, a cylinder in SL is by default 24-sided, and in Mesh studio you can step down to as low as 3 sides (where your cylinder will appear as a triangular prism)


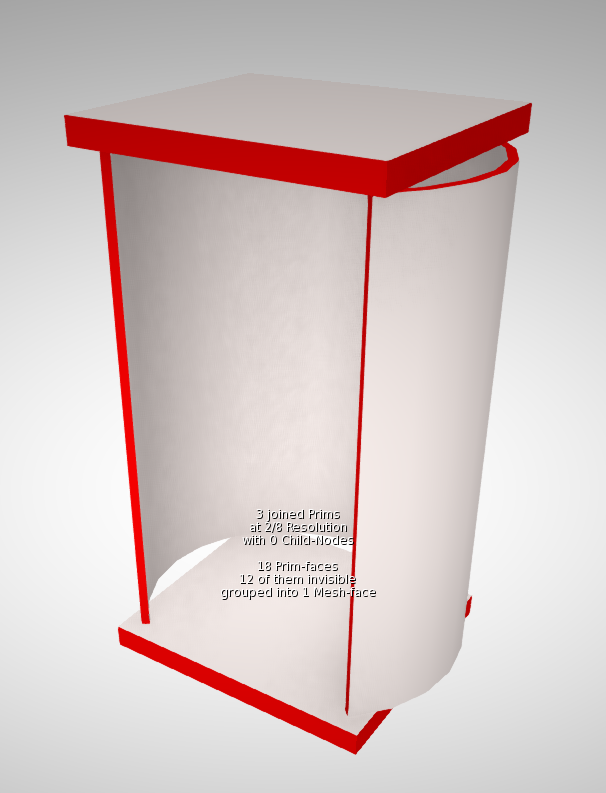
For the visible mesh in the High LOD model leaving the default setting will be fine. However, for the physics, we need to economise.  I chose to use the cylinder and set the number of side to 8 in Mesh Studio, with the quarter cut away this results in a 6 sided cut cylinder, which is 12 triangles on the inner face and 12 triangles on the outer. however, there are also two long thin triangles on the vertical edges and 12 small triangles on the top and bottom surfaces. These triangles are extraneous and also quite likely to be degenerate, I have marked them in RED to highlight them. All of these should be made transparent in the model before meshing.

The two "caps" top and bottom do not need to be curved at all. Leaving them as cylinders, even 8 sided cylinders would have resulted in 16 triangles ( 8 top, 8 bottom - assumes we remove the 16 around the sides). Unless there is a very specific need have the physics shape match the shower visual shape using a square and getting just 4 triangles is far more efficient.

Some of you will be shouting, "but you don't need the underside and the inside surfaces. It is true that the inner shower wall and the underside of the shower ceiling are probably superfluous and would have been the next optimisation if this had remained higher. Note that we cannot remove the underside surface of the floor because we need to have at least one triangle there to match the bounding box of the mesh and avoid stretching.

Uploading with the original visible mesh resulted in a 1LI cylindrical shower. 


Bonus feature

There was a curious outtake during the making of this blog. having duplicated the curved shower glass and used it as the basis of my physics, I made the long thin edges and the top surfaces transparent and generated a mesh.

It refused to accept this as the physics, giving a Degenerate Triangle error. Looking at the image in the upload preview it was clear that the problem was that long thin cut edge, but it was equally obvious that there were no triangles there.

The problem was a little more subtle. Sometime during the editing of the original cylinder Nyrva had picked up a rounding error. and the cut was set to 1.2495 instead of 1.25. When Mesh Studio generates the mesh it obeys this. 0.125 is 1/8 of course. the size of one of our segments in our physics, so what Mesh studio was actually generating was 6 full-size sides and a tiny slither of the 7th side, which was of course, degenerate. Correcting the rounding error fixed the issue.

Tuesday, 31 October 2017

Coming to Firestorm soon... A couple of new features for builders and non-builders alike.

There is a new Firestorm slowly working its way through the pre-release testing process, there's lots of goodness in there that I'll not cover here but I'd like to highlight a couple of features that I have added for builders but which I feel will help other users as well.

Physics view while editing objects.

Regular Readers of my blog will know that I love the physics view in "Render Metadata" for its valuable debug capability. You may recall that I "fixed" a subtle bug in that which prevented us correctly debugging certain "thin wall" problems and that change will be part of the new release. The debug physics view has a couple of major drawbacks, the first is that switching to it is clumsy and slow, requiring that you have the developer menu enabled, the second is that everything gets coloured whether you like it or not, making it difficult to see what is going on.

To address this I have added the ability to show a physics outline for the object that you are editing.
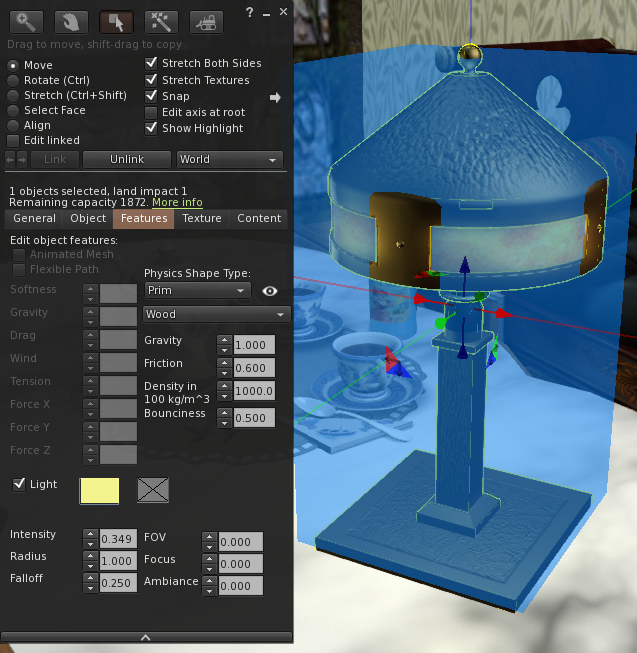
The functionality is accessed from the features tab in the edit dialogue and is represented by an "eye" next to the physics selection combo box.

Clicking on the eye will toggle it on and off, showing a representation of the physics shape as shown in the example here.

Once this mode has been toggled on, it will remain enabled when editing subsequent object unless toggled off;  it will, however, revert to being off after the next login. This is deliberately done to prevent it confusing users who enable it in error and forget how to disable it.


Mesh information in the object panel.

When you edit an object you will be used to seeing information in the object panel. On the left-hand side, the properties common to all objects. The position, scale and rotation.

On the right-hand side details specific to the type, the hollow, cut and taper etc for prims, special features like dimple and hole size on a sphere or torus respectively. For sculpt maps you'd often see the rainbow hues of the sculpt map texture, but for Mesh, nothing. In fact, worse than nothing because you'd get some greyed out leftover fields.

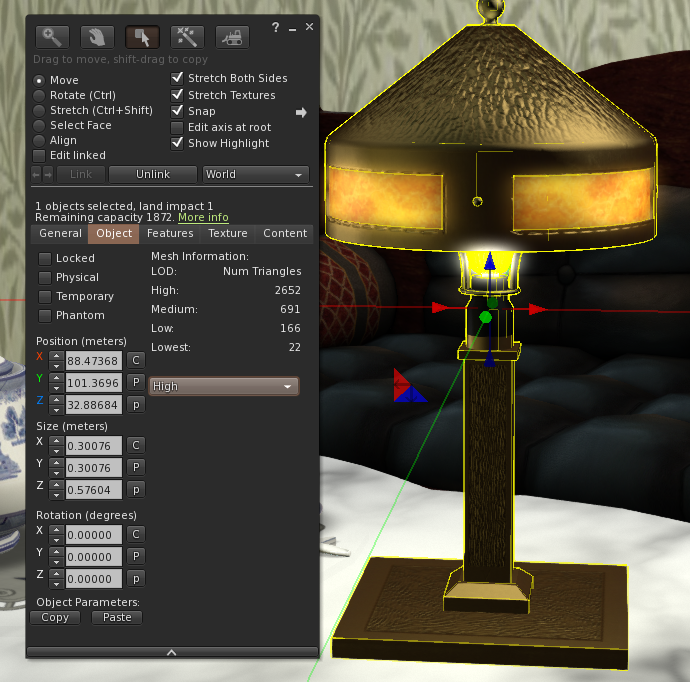
In the new release, however, I have started to address this and have added a Mesh specific information panel that shows you a couple of extra details about the object and also allows you to artificially see what it will look like at a distance by selecting the Level Of Detail.


What does it all mean?

The new physics mode operates in a very similar manner to that given in this more technical blog from a few days ago. In essence, the shape tells you exactly where your avatar and other objects will collide with the object. The colour tells you when the physics "cost" is very high. 

The Mesh info panel tells you how detailed each of the levels of detail in the model are by listing the number of triangles used to make ir, it then allows you to preview the LOD models. 

OK, but really, what does it all mean? Why do I care, I don't even build stuff?

For non-builders there are a few notable benefits. 


Fix those pesky "stuck LODs"

Firestorm "LODv iew" FTW from Beq Janus on Vimeo.

Sometimes, perhaps you've been cam shopping, taking photographs or maybe even perving on your neighbours, then when you "snap back" to your room you find that your clothes are not rezzing properly. There is now a "simple" fix.


1) Find your inventory window and select the worn tab
2) right click the item, and select edit. 
3) Click the object tab, and "edit linked"
4) click the broken item
5) It magically repairs itself

But that's not simple enough I hear you say... We agree and so by the time the new Firestorm is ready for release we hope to have simplified this trick into a one-click fix in the menus courtesy of our lead developer Ansariel.

Why can't I rez on my mesh table/floor/bed.

You know the feeling, you are late to a party, you grab that awesome Gacha "rare" from the reseller on MP. Of course it comes boxed. So you quickly drag it on to the floor....your brain catches up, but it is too slow to stop and your finger releases.... "Can't rez here" says the little pop up. What's worse, your dress is gone and won;t come back until you relog, it may take longer. 

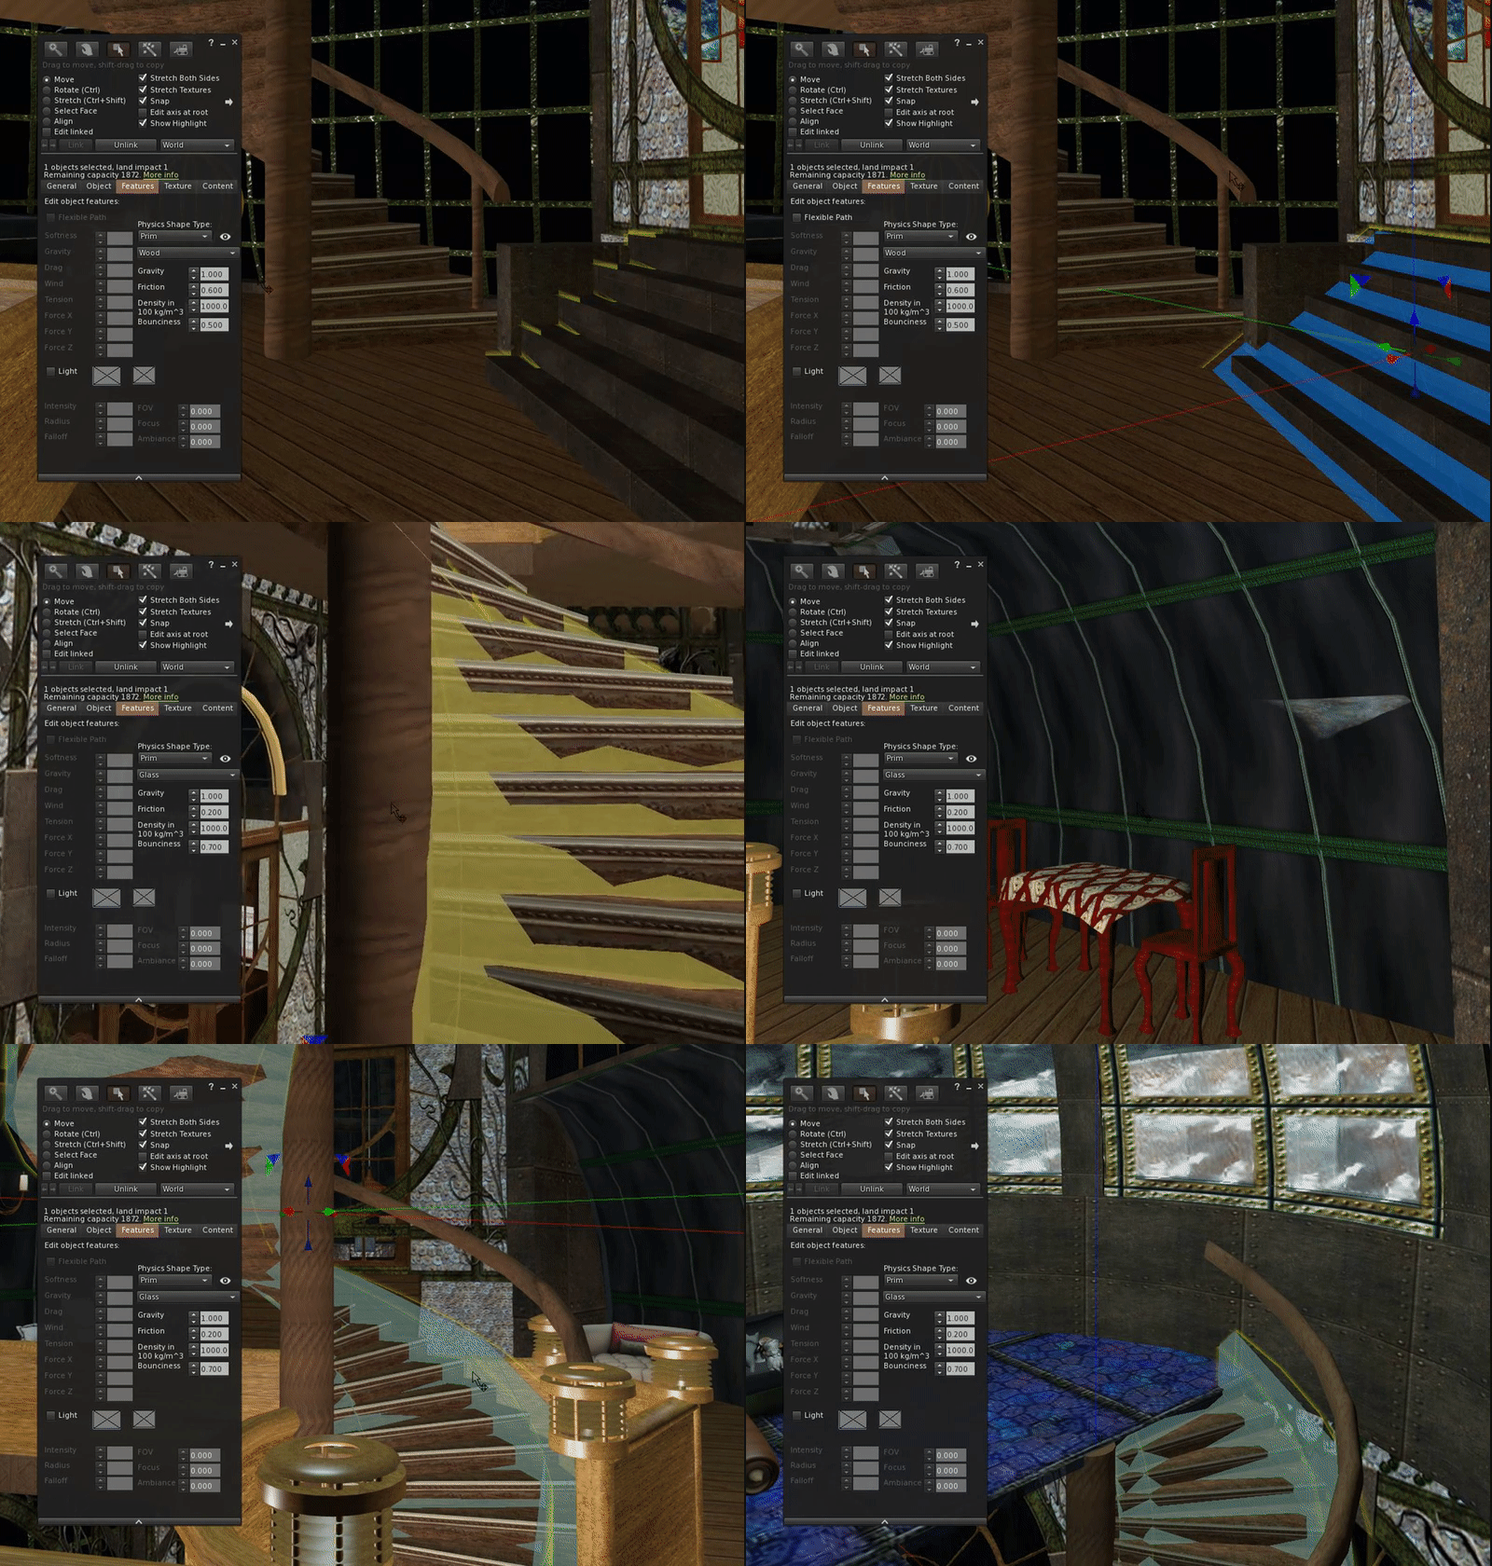
We've all done it. Rezzing items can be a little hit and miss at times but did you ever stop and wonder why? The answer is often simply "laziness". Your special outfit just got eaten by the Linden void because the designer of your house didn't give it a proper floor plane. But it is not just floors, chairs and all manner of objects that you might conceivably drop an item on weren't made with a proper physics shape and even though it tries it's best neither the viewer nor the sim can work out where to place your item and ultimately it gives up. Well now you can find out where the safe spots are.

The physics shape view let's you see how the simulator sees the items when it is trying to work out where to place things, where you walk and how things collide. 

This short video shows the problem with a simple table (deliberately badly made by me!)
Physics View Mini Tip from Beq Janus on Vimeo.

Why do I sink in this floor? Why do I keep falling off the stairs

Of course, physics is used to decide where you can and cannot walk, and even for the non-builder, sometimes it can help to understand why your feet pass through the stairs.


Friday, 27 October 2017

Blue sky thinking - Physics view explained

Introduction

I found I could say things with color and shapes that I couldn't say any other way — things I had no words for. - Georgia O'Keefe
In previous blogs and in various group conversations, I've often discussed the physics overlay renderer of the Second Life Viewers, typically found in the Developer menu under the, perhaps confusingly named, "Render Metadata" menu.
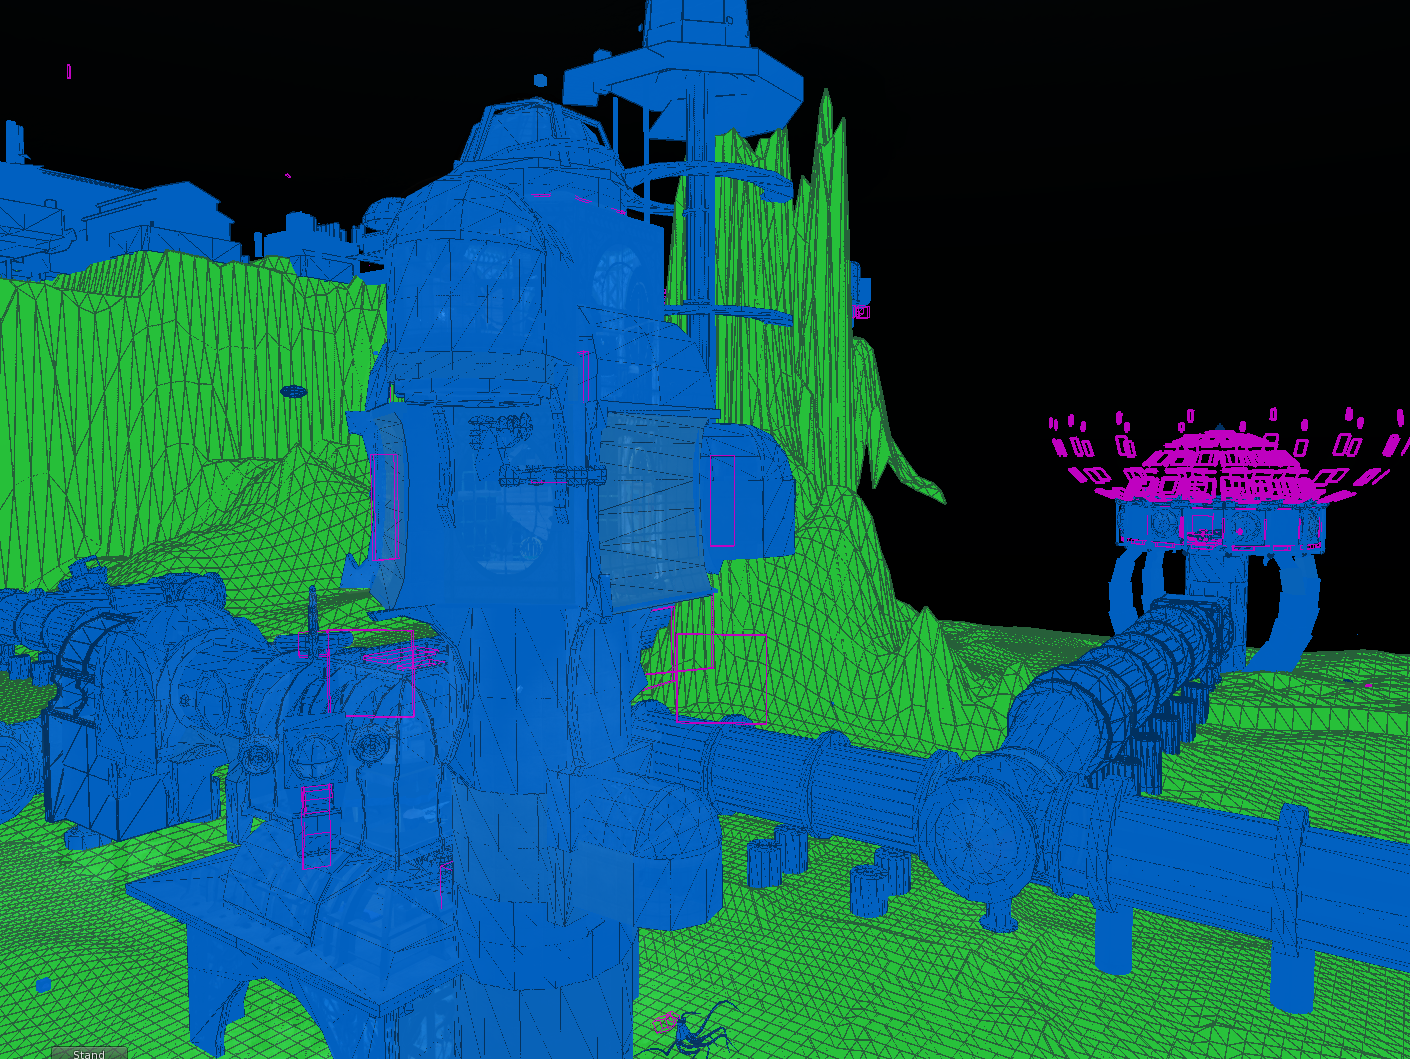
Physics view in all its glory
The Render Metadata menu is a wonderful set of tools that help debug various issues. You may recall the "LOD display" which tells you which Level Of Detail is being shown, for example. They are mostly unnecessary to the average SL user but occasionally, as builders, and educators/mentors, we find that a couple of them can help us a lot at certain times; and primary amongst these, to my mind, is the physics view.

The physics view is a great example of "metadata rendering"; the use of a visual overlay (render) to convey additional information (metadata). So what does it do? Well essentially, it overlays new objects into your view to communicate non-visual aspects of the scene. in this case the physics shapes, but..what does it all mean?

Where do we find it?

Before we get too far ahead, let's take a moment to find the menu. I will, of course, use Firestorm but the feature should exist in all graphical viewers that have any relation to the Linden Lab viewer.

You will need to have access to the developer menu
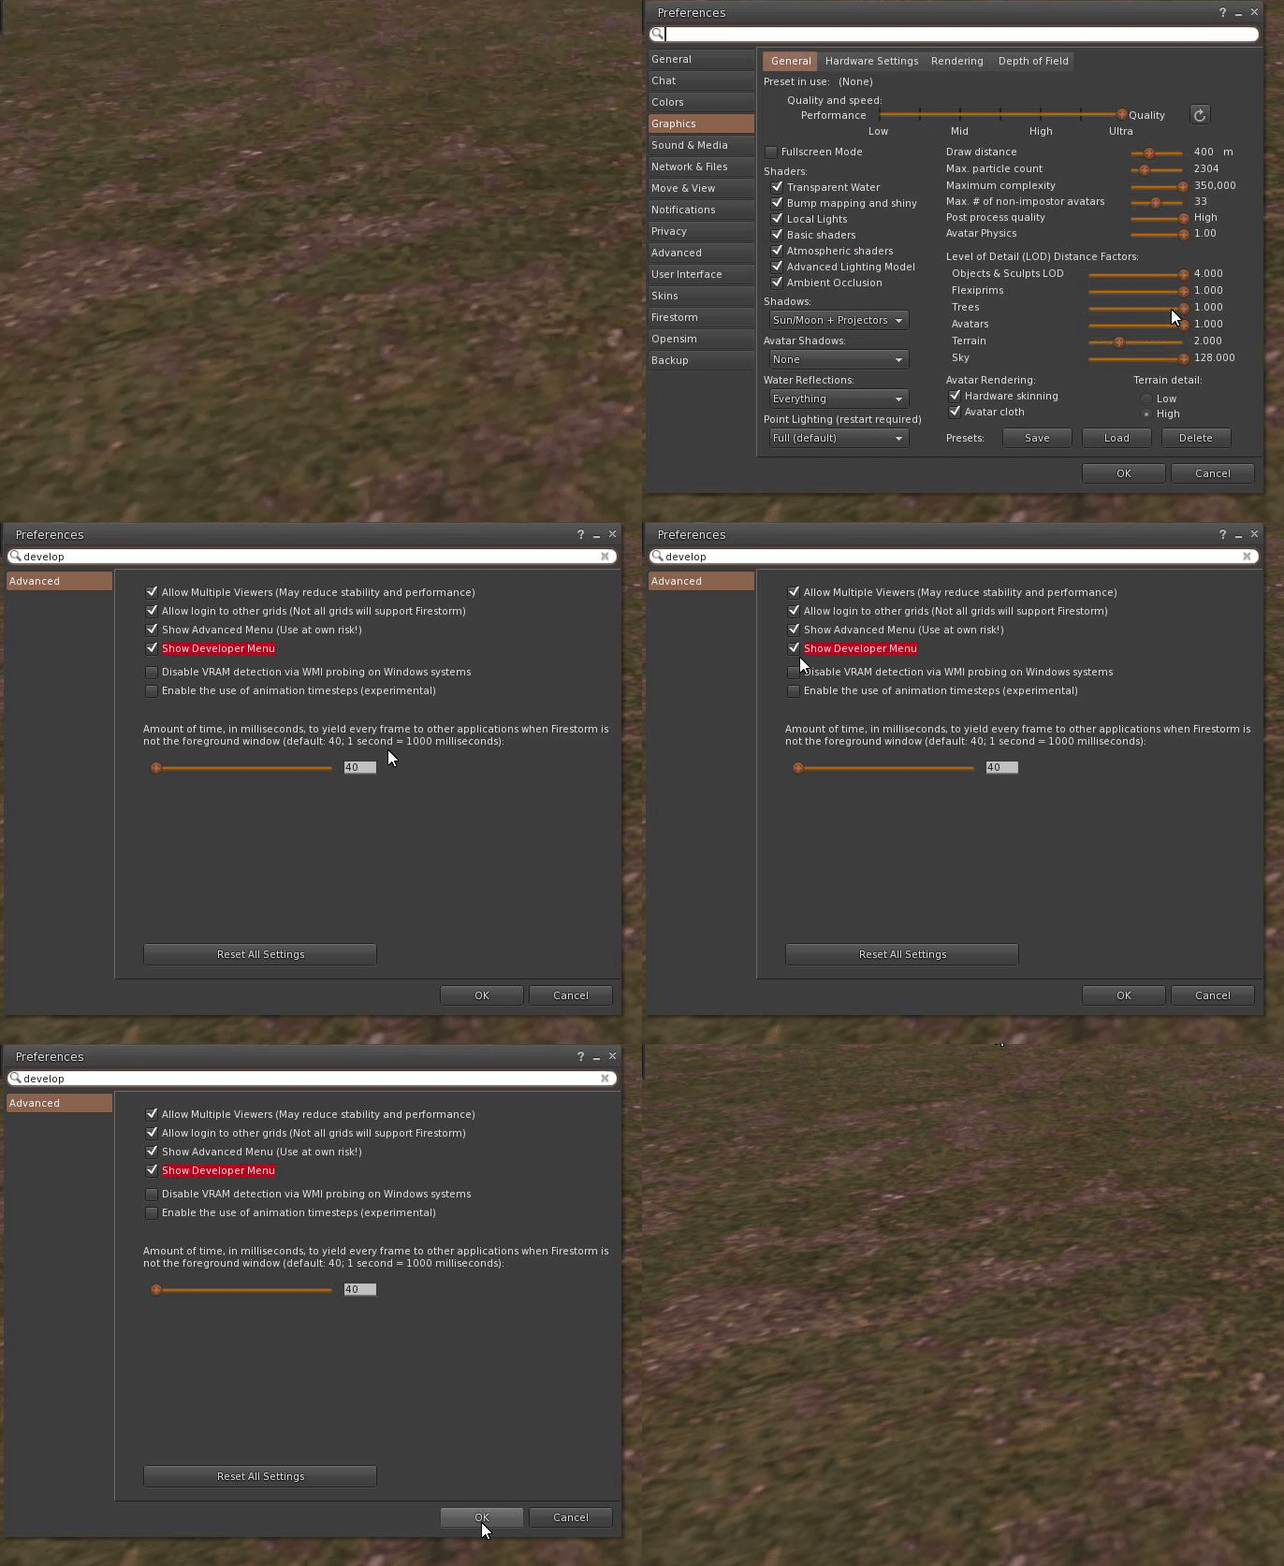
The simplest way to do this is via that excellent preferences search.
Ctrl-p will bring up the preferences dialogue. Then in the search box type "developer".
Tick the highlighted option and hit OK, you should now have the developer menu.

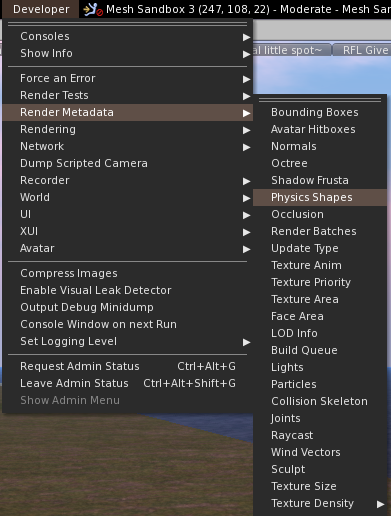
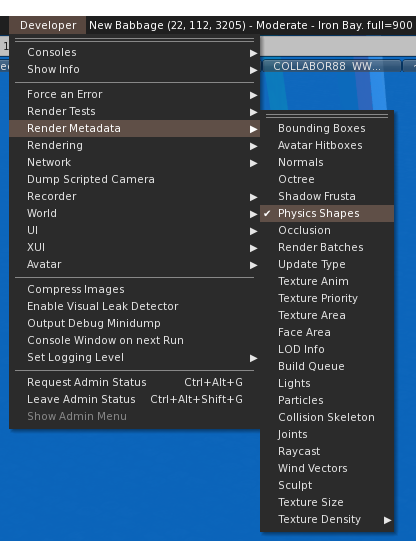
Now, simply click on the "Developer" menu and locate the "Render Metadata" item, and pick "Physics shapes" from the resultant list.


To turn it off again, just reselect the item from the list.

Decoding the view

When you click on the option, you are immediately plunged into a strange parallel dimension; what you see will naturally depend on where you are, and what is around you but it will almost certainly take on a very blue look. It is often worth moving to an area clear of clutter when testing this feature.

New rough approximations of your objects will now have been rendered; your meshes and prims will be blue, or various shades of orange and red, some will have pencil sketched triangles across their surfaces and peculiar coloured boxes will appear. Every part of this is potentially useful information if only you know how to read it. There are two basic representations, the colours and the shapes, we'll look at each in turn.

Colours

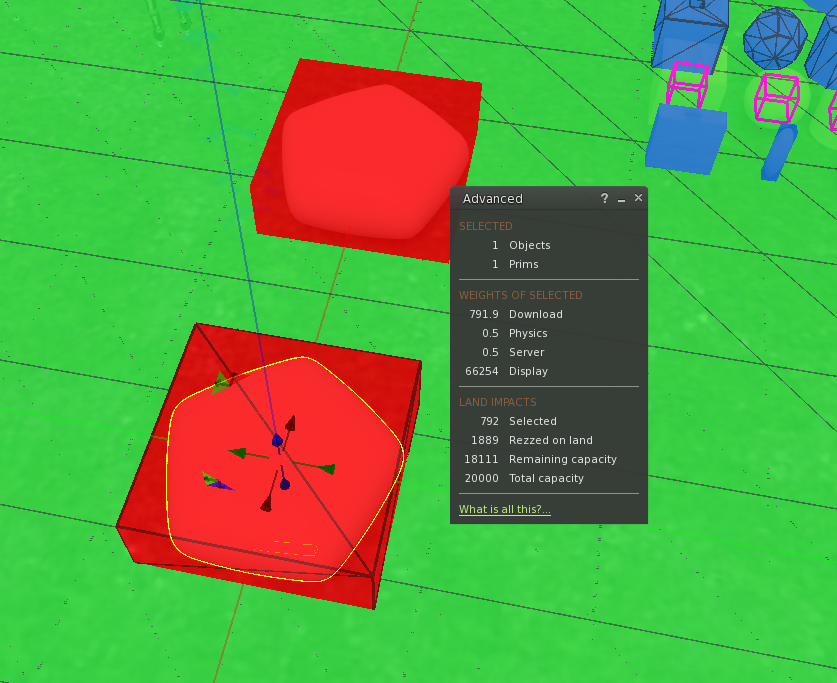
First of all, I will correct the received wisdom of forums and blogs. For a long time most people, myself included, had considered that the colourisation represents the physics weight of the object; however, that is not actually the case. In fact, the view displays colour based on the overall object cost, i.e. the inworld LI. The below image demonstrates this clearly, and no this is not new, or a change in behaviour, it was created like this in 2010 and the assumptions have been made ever since.


With a few exceptions then, the hue of the faces shown in physics view represents the object cost of that object as a colour spectrum. Red indicating an excessively heavy load on the viewer/physics engine, through to amber, and blue.


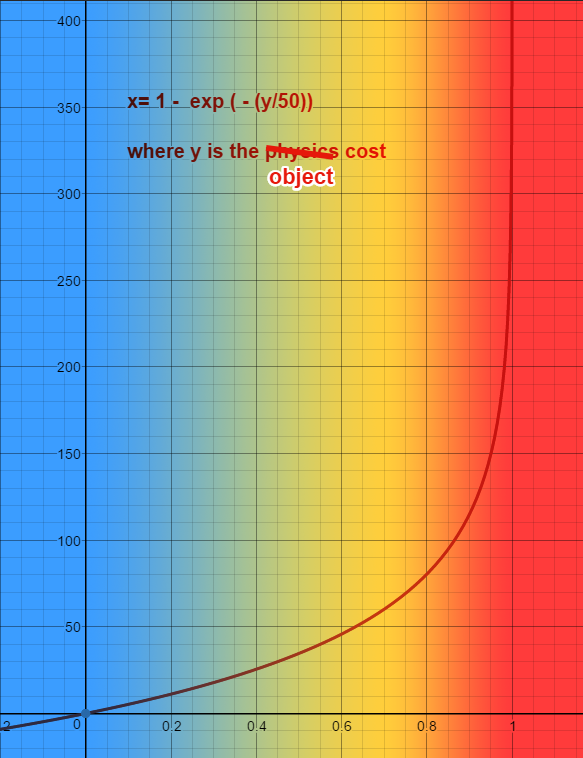
The mechanism by which these are coloured is not entirely straightforward. Firstly the cost is normalised along a logarithmic scale. By default the threshold used is 50, anything over that value is considered high. A plot of this normalisation looks like this.

Anything with a normalised weight of <0,5 (which as we can see from the graph is an actual weight of a little under 35) will be rendered as a mix between the Low colour (blue-green) and the Medium colour (orange). For anything heavier than those the colour is a mix between the Medium and the High (Red) thresholds, giving a range between orange and angry red.

Note: For those interested in the details, the mix is a linear interpolation of the RGBA values of the two thresholds. The colours and thresholds can be changed, and I will briefly cover this at the end of this blog (if I remember), but it should be considered as an advanced use only. So these are really telling us where our heavy physics costs are, especially useful in a multipart build where an unexpected legacy prim has become linked with Mesh and resulted in an unforeseen and undesired spike in the LI.

Shapes

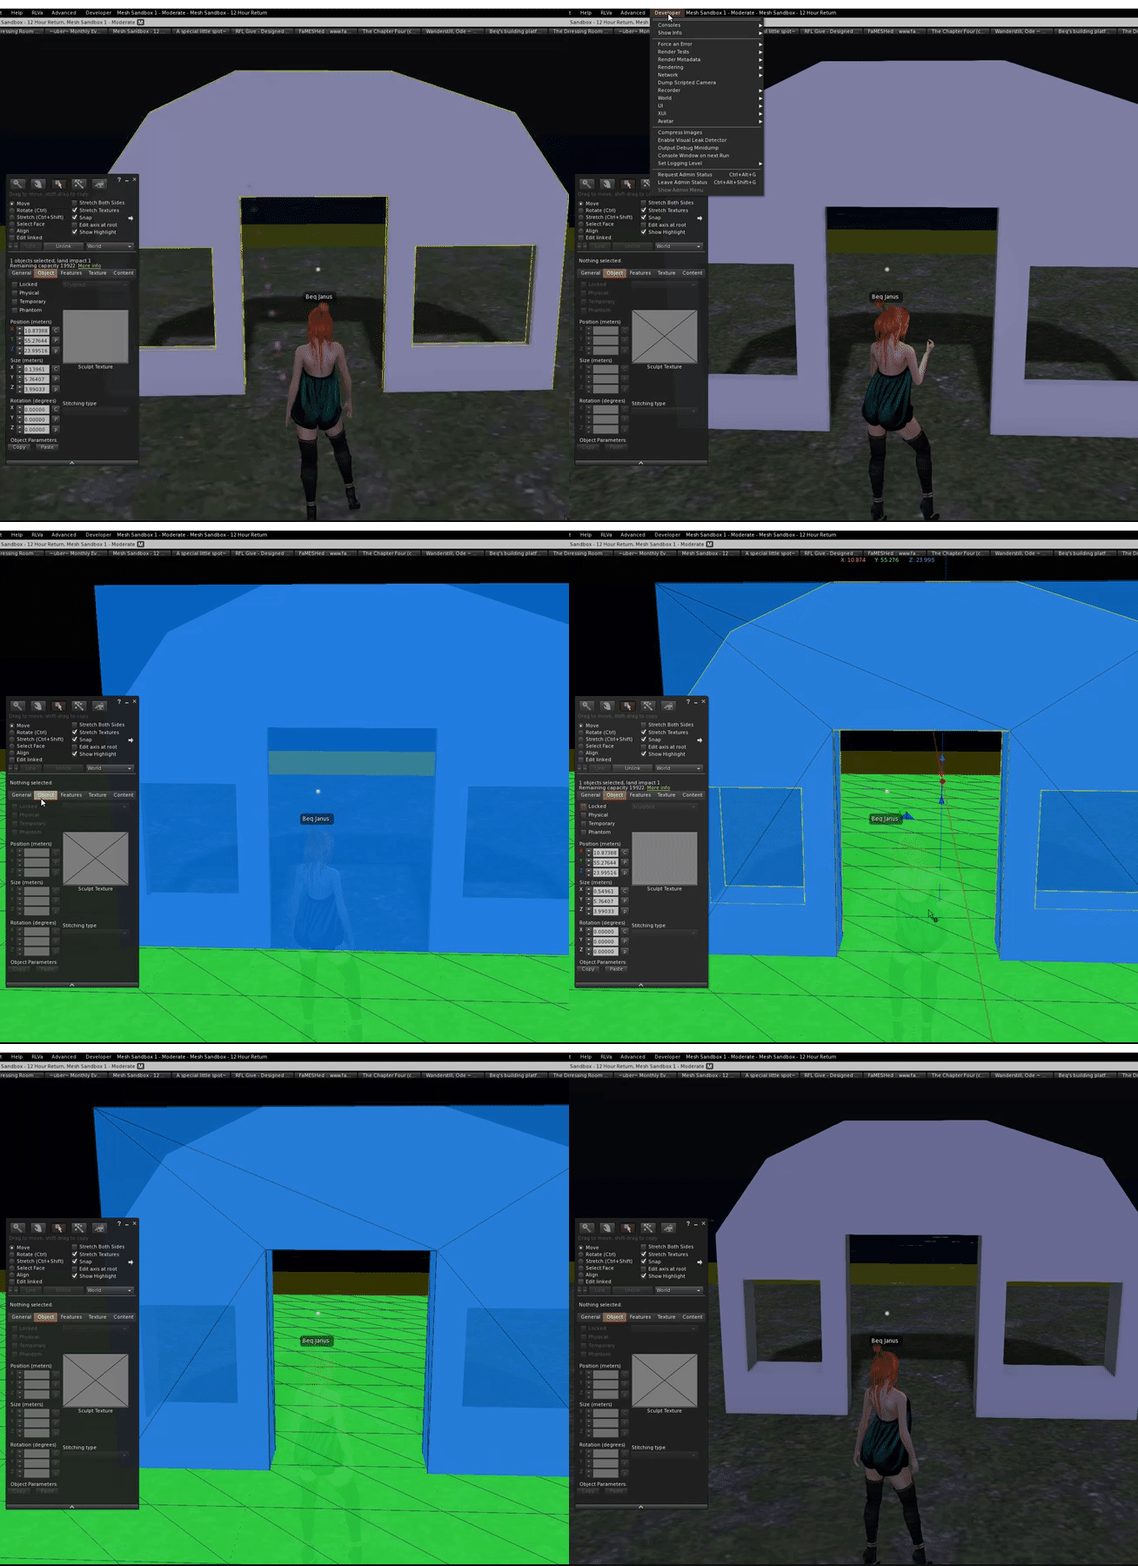
The shapes are where this view excels. When you are trying to understand why your Mentee's mesh wall is not allowing you to pass through the doorway, a quick flick into "Physics view" can often tell you the answer. Even those of us who use them frequently often fail to realise is that there is more information in the display of these than first meets the eye.

The representation is similar for both prim and mesh; similar but not quite the same. Unlike a mesh, a prim has no user-defined physics shape, yet the effective physics shape can be quite complex. Consider a twisted, cut spiral cylinder, used as a staircase. The users expect the physics to work accurately. As a result, there are a couple of optimisations and a default case which can if misused, be a problem.

The way that a shape is shown is linked closely to the type of physics that it represents.
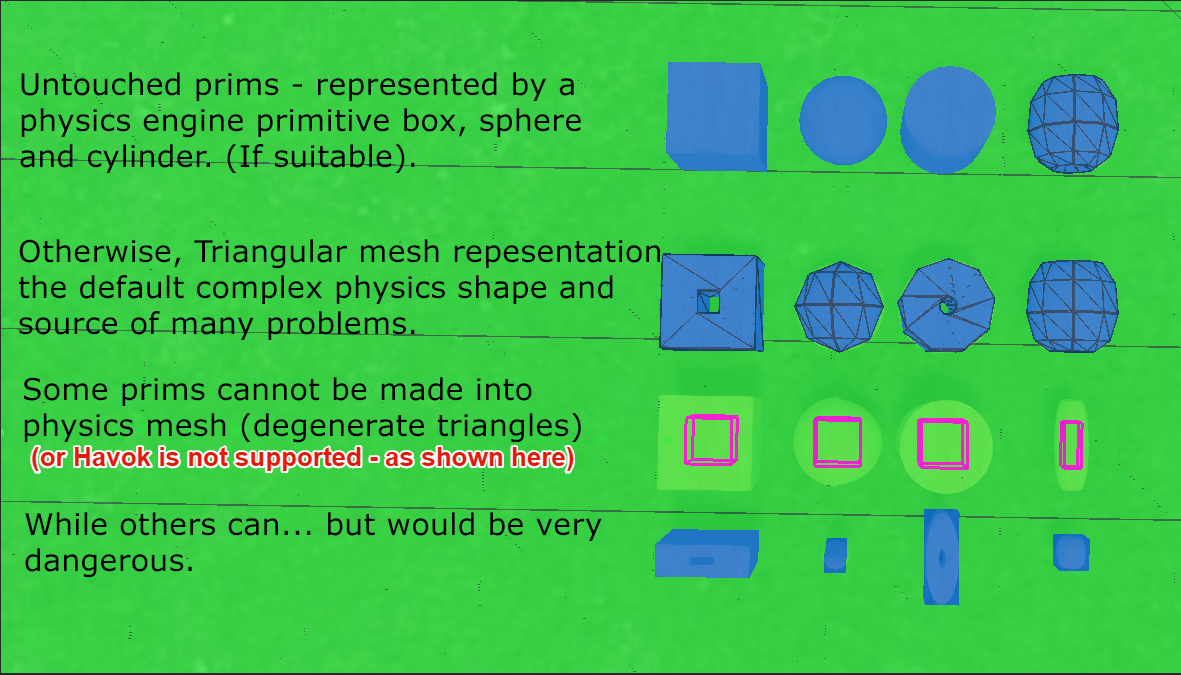
Four prims a cube, sphere, cylinder and torus with various parameters affecting their physics shape


Case #1 The HAVOK Physics shape.

For the general case of a unmodified prim, it will be assigned a highly efficient physics hull that closely matches its shape. There are three possible physics shapes, Box, sphere and cylinder. These shapes are a special case of "hulls" a physics shape used by the Havok engine. These provide for extremely efficient collision detection by simplifying the mathematics required to detect collisions.

An example that seems contrary to many who are used to thinking of mesh shapes, is that the cheapest, most efficient physics shape is a sphere. This is because collision detection of a perfect sphere needs only two values, the centre and the radius, any plane that passes closer than the radius, must be intersecting with the sphere.

Note that complex prims such as the Torus shown top right, do not have an efficient representation and simply fall through to the second category.

For Mesh there is an extension of the simple form, it is known as the base hull and is the shape that you interact with when "convex hull " is enabled. A base convex hull is defined for all meshes and for the most part, appears as if a "cling film" wrapping has been stretched over the object.

These shapes are typically rendered with a semi-transparent tone and no visible edges.

Case #2 almost all of the rest

If a prim cannot be represented by a Havok shape then it will be converted to a "simple" triangular mesh representation. The rules that dictate when a physics primitive is swapped for a mesh are a little too detailed for a blog like this. But with experimentation in Physics view, you can see that typically a cube that is hollowed will "switch" to mesh physics at about 20%. I tend to think about it in terms of "is the hole big enough for something to fall through" (though that is not the real test :-) ).

This is also the typical (not quite a default) case for Mesh physics. A Mesh object must have a physics decomposition provided. There are 3 types, the base hull discussed above which is the actual default. If nothing else is provided then the base convex hull will be used. The second type is a triangular mesh derived from one of the visible mesh models or uploaded as a dedicated mesh (I highly recommend the latter). The third is an analysed mesh, which we will cover later.

A triangular mesh physics shape can be very efficient it allows you to fully represent the shape, with any holes and other shapes. It is important however to be very economical with the mesh used, keep the resolution of the physics as coarse as possible, to improve performance and lower cost.

It is worth bearing in mind that it is a side-effect of the triangular mesh physics and the physics cost calculation that gives rise to the super-heavyweight prims in certain circumstances.

These shapes are typically rendered with a darker outline showing the mesh triangle edges. 

Case #3 rare and getting rarer

From time to time you may see a magenta wire-frame cube 50% the size of the prim. This is effectively an error report. It means that for one of a number of reasons the viewer cannot display the physics shape. With Prims there is typically only one reason for this, the prim has been forced to use Convex Hull and the user is running a viewer that does not have the capability to decode that hull into a visible object. At the time of writing it is quite common in 64-bit third-party viewers such as Firestorm to show all convex hulls (both for prim and mesh) as magenta boxes. 

Why does this affect 64-bit viewers?

The reason behind the limitation is straightforward once you know about it, the Havok physics engine used by second life is a commercial product, Linden Lab kindly provide a special library that supports a limited subset of Havok capabilities but until very recently, the Lab did not have a 64 bit version of their viewer and did not supply a 64-bit compatible version of the Havok Library. Almost all physics functions in Second Life are handled on the server, however, there are a handful of services required by the viewer and the library provides these. The one that most builders notice is the lack of options in the "analyse" menu on Mesh uploads, but another is the ability to convert a "convex hull" into a mesh shape that can then be rendered in physics view. Thus, to keep this short(ish) when you ask a 64-bit viewer to show a convex hull it says "I can't" by showing you a magenta wire-frame.

The next version of Firestorm will be fully Havok enabled and the vast majority of instances when the Magenta boxes appear will be banished to history.

Case #4 The very small object

This case is a safety net. As we observed in case #3, the equation for calculating the physics cost has an often unexpected side-effect for the uninitiated. The logic behind the calculation is clear enough, the Havok physics engine needs to do less work when it hs handling fewer shapes as is shown in this simple animation from a previous blog.
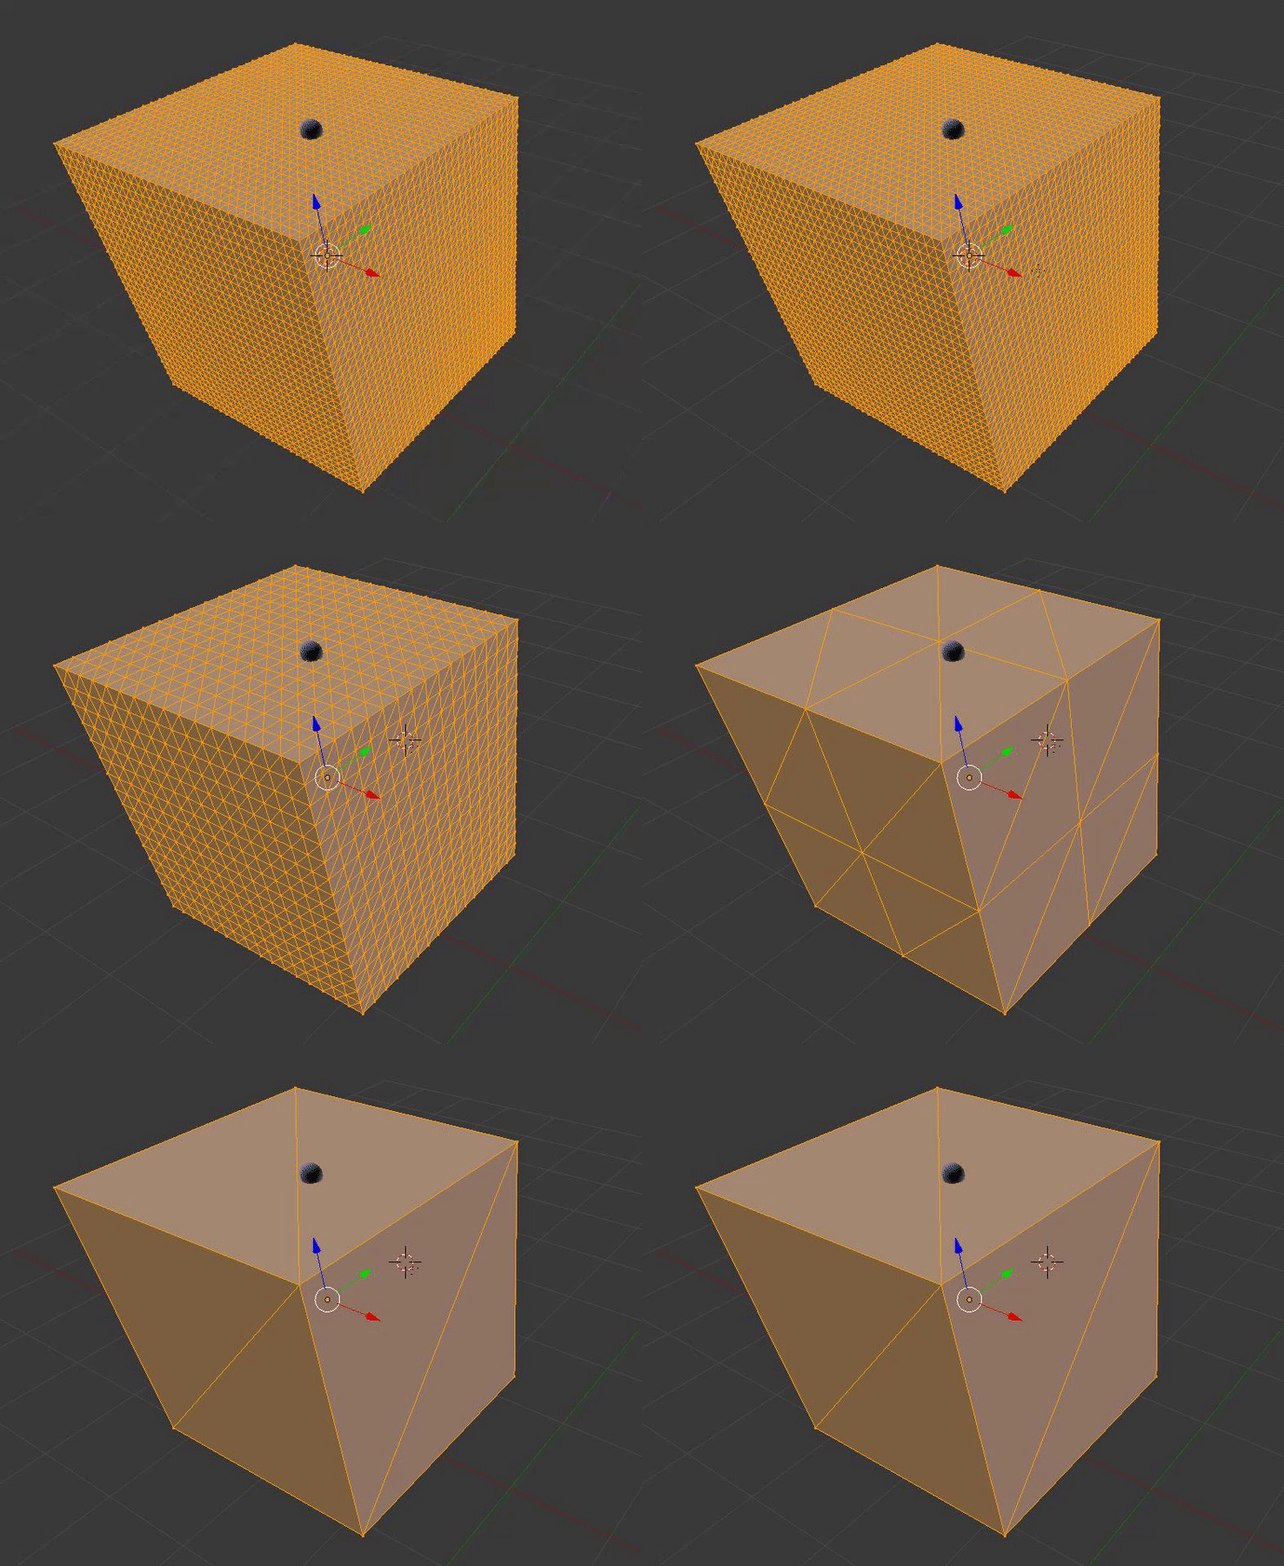
Smaller triangles more work. Which triangle did the sphere hit?

The earlier blog post gives more details on this and describes the conditions under which the Lab implement a cut-off to prevent the asymptotic behaviour. The mechanics we can leave aside, the result though, for our purposes is a simple box physics that wraps around the small objects, removing holes and details completely. For completeness here, I will repeat the conditions (but keep in mind that at the time of writing physics view will lie.)
IF object is a prim AND has more than 2 dimensions less than 0.2mTHEN force the shape to a convex box.ELSIF object is a mesh AND has one dimension less than 0.5mTHEN force the shape to a convex box   
These are shown without edges and are in some ways indistinguishable from (deliberate) hulls 

Case #5 Hulls analysis and fixed cost physics (not shown in image)

The fifth type of physics is an analysed hull based physics. To produce this the viewer takes a user-specified mesh physics shape and applies an algorithm to it to construct a series of 3d "capsules" called hulls. These are Havok primitives, optimised for the engine to process and can in some cases be more efficient than the equivalent triangular mesh. For reasons I have never fully investigated, the cost of an analysed mesh is frequently higher than the equivalent triangle based mesh, a problem exacerbated by the lack of Havok in 64-bit viewers. For this reason, alone people often avoid it and yet it has some very specific benefits. An analysed mesh has a fixed cost, it does not suffer from the increased physics cost when scaled down and it does not have the dimension based cap imposed so is immune to the "thin wall" problem.

These are deliberate hulls and are shown the same as #1 above (and #4)
There's some good news to come on physics views but for now, I've written more than enough.

See you soon

Love 

Beq

x


Friday, 28 July 2017

A (con)Vexing problem - Fixing doors becomes a little easier.

Anyone who has been around Mesh building groups for any amount of time will be familiar with the anguished cries of "Why won't my door work?". One of the most annoying aspects of trouble shooting that problem is about to become a thing of the past.

I covered the "door no working" topic in this blog post last year. Those of us who advise/mentor know what to check for. The first thing is to make sure that they uploaded a physics shape. "Have you switched the physics shape to Prim?", they will typically do this and mostly it fixes things, but then there is still a reasonably significant proportion who return to say "I've done that and it's still not working."

The next step, typically, is to ask what the dimensions of the mesh are. Quite often the poor beleaguered builder will look quizzically at you, conclude you are mad and perhaps go off on some crackpot detour led astray by another helpful but ill-informed soul, they will often end up dropping into physics view and concluding that they are right and that the blocked door is a bug. They are half right, there is a bug, but it is not in the "blocked door".

Who debugs the debugger?

How to find physics view in Firestorm (shoudl work on most viewers)
When we are looking for issues with physics that go beyond the basic checks it is often the case that those who are at least aware of the advanced menus will take a look at the Render Metadata menu, and the Physics shapes view in particular.

Physics shape view is a special display that encodes a lot of information about the physics in the scene. You can use this to examine the physical representation of the region and in particular of the object that you are interested in.However, herein lies the issue. There is a bug, it has been around for a number of years and many of us have raised Jira bug reports against it in the past. With my more recent switch to become a developer on the Firestorm viewer, I was able to spend some time to work out why there was a bug here and what the underlying issue was. You can read the Jira BUG report I raised for the technical background. 

The case of the invisible wall

A typical example, perhaps the most typical example, is a creator who has uploaded a mesh wall with a door in it. The creator sets a custom physics shape in the uploader and remembers to set the phsyics type to "Prim" yet still the doorway refuses to let her pass. She concludes that she must have uploaded it badly and looks at the physics representation using physics shape view. 

This is what she sees.


"What the heck? The physics shape looks perfect why won't it let me through?"
The problem is that the viewer is lying to us. What it thinks the physics should look like is not in agreement with what the server is enforcing.

So what is going on and why is the viewer lying?

Size Matters (sometimes)

If you've read my previous blogs you'll know that there are two distinct ways of representing a physics shape (or physics volume to use a more correct term), hulls and triangles. The key difference is that a triangular physics shape (mesh) changes its value based upon the scale, and to make matters more confusing, it changes inversely with the object scale. this is counter intuitive to the uninformed.

Why does physics cost grow as the objects get smaller?

When you upload a mesh you can define the physics shape that will be applied to the object.
The default gives you no user defined physics at all, in this situation all that the object has when rezzed in world is the "convex hull" and "none" option. We are not going to concern ourselves with this today.

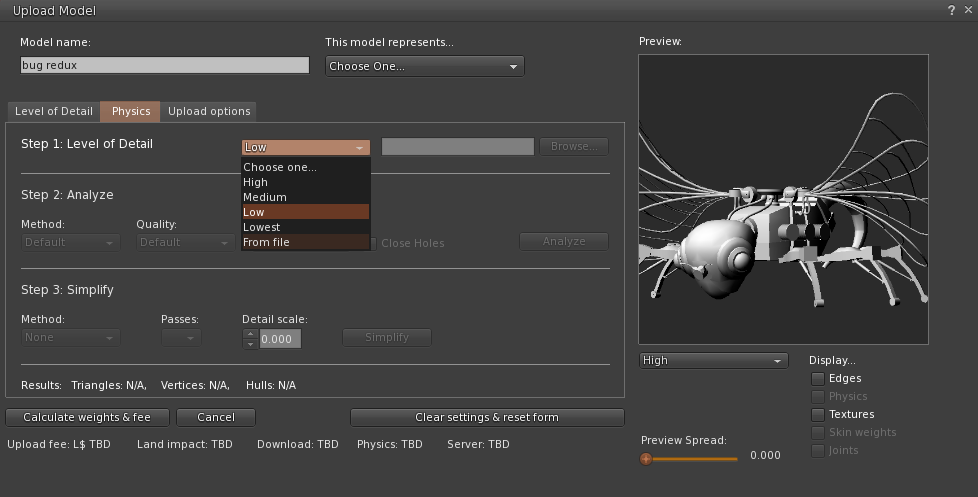
If you look at the physics tab of the upload dialogue you find a selector that allows you to choose a mesh model to be used for your physics.

This is a very important step and often overlooked by Mesh creators.
The Mesh I am using in the example here is one of my bugs from this year's Fantasy Faire. It has around 20000 triangles in the form shown (High LOD) and was designed to be very large (40m wingspan). It would undoubtedly be an awful choice for the physics shape. One of the basic rules of physics uploads is to keep things very simple, the reason is plain; if you want to reduce the lag on the sim and in your client then minimising the work that has to be down to determine when someone has collided with your object is essential.

So how does a collision get detected?

Whenever another object comes within the radius of my object then SL has to decide whether a collision has occurred, this also applies for rezzing and sitting on objects.
If I were to use the High LOD model as my physics shape then every one of those 20000+ triangles is potentially intersecting with a part of the other object. Special optimisations segment the space between objects to reduce the number of checks that need to be made but in the end, it resolves down to individual triangles. the smaller the triangles the more work has to be done to determine which, if any, it will intersect with and the higher the overhead on collision detection.

In the following animation ask yourself "Which of the triangles is the ball touching?"

Which Triangles is the ball touching?


In order to encourage well-constructed Mesh assets, the Second Life land impact algorithm includes a physics weight component. The algorithm itself is not fully public and the documentation incomplete and inaccurate but the principle is clear. The more "skinny" triangles in the object the more your physics cost will penalise you.

The obvious side-effect here is that as you make an object thinner in one dimension the triangles will become thinner and as such will increase the physics cost. The smaller it gets the higher the physics cost. In theory, as width tends to zero the physics cost tends to infinity. This is where Second Life steps in and takes control. In order to prevent the physics cost from going asymptotic Second Life has code that forces an object to have the physics of a simple box once its dimensions go below a certain limit and as many of you will have known from the outset, that is exactly what was affecting our little mesh door. The rule that the viewer enforces is as follows:-

IF object has more than 2 dimensions less than 0.2m
THEN force the shape to a convex box.

"Wait a minute, that's not right" I hear you cry, and yes you are right, our wall was more than 0.2m in all three dimensions. That's because the viewer does not actually enforce the phsyics. The server does and physics view, simply draws what the viewer "thinks" the phsyics is. But it is wrong.

The rule that the server enforces is different.

IF object is a prim AND has more than 2 dimensions less than 0.2m
THEN force the shape to a convex box.
ELSIF object is a mesh AND has one dimension less than 0.5m
THEN force the shape to a convex box  

so here is our answer, the server is far less tolerant of thin meshes than the viewer thinks causing the viewer to display the normal mesh shape when the server has already given up.

Making things right, or "you cannae change the laws of physics, captain"

The big question though is, which one is more correct?
The simple answer is the server rules are right because those are the ones that are enforced, but the 0.5m limit on walls is a pain in the rear, nobody wants thick walls and while analysed mesh is a solution, very few know about this and the second life wiki still recommends non-analysed!
For this reason, I have been lobbying for solution 2 on my Jira to be considered. Fingers crossed we may get the ability to make thinner Mesh walls.

In the meantime, I have updated Firestorm to correctly reflect the enforced laws of physics. This should greatly improve the use of the physics view as a debugging tool.

The following video shows the new changes in operation and now a blocked door looks blocked until the dimensions change. It should be in the next release of Firestorm.


Another overly long and exhaustively explanatory blog. I hope it explained a few aspects of physics and one of the (soon to be ex) annoyances.

Love

Beq
x


Sunday, 24 July 2016

When is a door not a door? And other things they should have told you about physics

There are a couple of features of Mesh physics that come up time and again in group chat. They are the, "oh yeah, *that*, didn't you know about that?" type issue that makes building, or learning to build in SL an "adventure" at times.

The first one goes like this:

Eve: Help, I just returned my housemate's things.

Fred: Did you cut up all his shirts first?

Eve: no no, I was just sprucing up an old build on my platform and lots of things got returned.

Gloria: What do you mean "sprucing up"?

Eve: I have this, old hat I made years ago, I just modernised it by adding some bump and shine.

The second one, starts like this:

Andrew: OK, so I've done all the usual things and I cannot walk through my door.

Brian: Try opening it?

Cathy: set the physics type to prim

Andrew: Yes yes, done all that. It makes no difference. It's a bug in the uploader maybe? I have a wall, The physic shape looks fine in the preview.

This can run on until Andrew loses his cool... For now, though, we'll take a look at Eve's problem.

Physics accounting and the small thin triangles.

In the last blog entry of my Blender Addon Series,  we covered the Mesh asset format and looked briefly at the physics section. We learned from that that there are a few possible ways that a Mesh can convey its physical shape.

  1. A single convex hull. A mandatory shape for any mesh
  2. An additional decomposition of up to 256 hulls, each consisting of up to 256 vertices.
  3. A mesh designated for use by the physics engine.
More details of these can be examined on the Mesh Physics wiki page which has a lot of technical details that we will use in a future blog. For most people, if they specify a mesh model they use a low poly mesh and do not use the analyse button. This typically results in a lower physics cost but herein lies the problem.

Mesh physics shapes

By default when you provide a mesh shape for the physics, the viewer will encode this and upload it. Importantly, however, the physics resource cost is only estimated for the scale that you upload at. If you rescale it in-world it will change the physics cost. This may not surprise you, after all, the streaming cost increases as the size of an object increases, so why would the same not apply to physics? But, in what may seem an odd choice, the physics cost decreases with scale and gets larger as the object shrinks.

So why is this? It ultimately comes down to the cost of tracking objects.it is far more costly to track hundreds or thousands of tiny triangles that really don't add any perceivable value to the accuracy of the shape detection so in order to discourage such behaviour the Mesh accounting algorithm penalises mesh physics for the use of small thin triangles

Eve was only using prims, so why does she care?

Prims have the dubious quality of being capped at 1LI when subjected to traditional accounting. This grossly under-represents their true cost in terms of rendering and lag but the internal physics cost is still calculated and you can see this using the "more info" button on the build/edit dialogue.


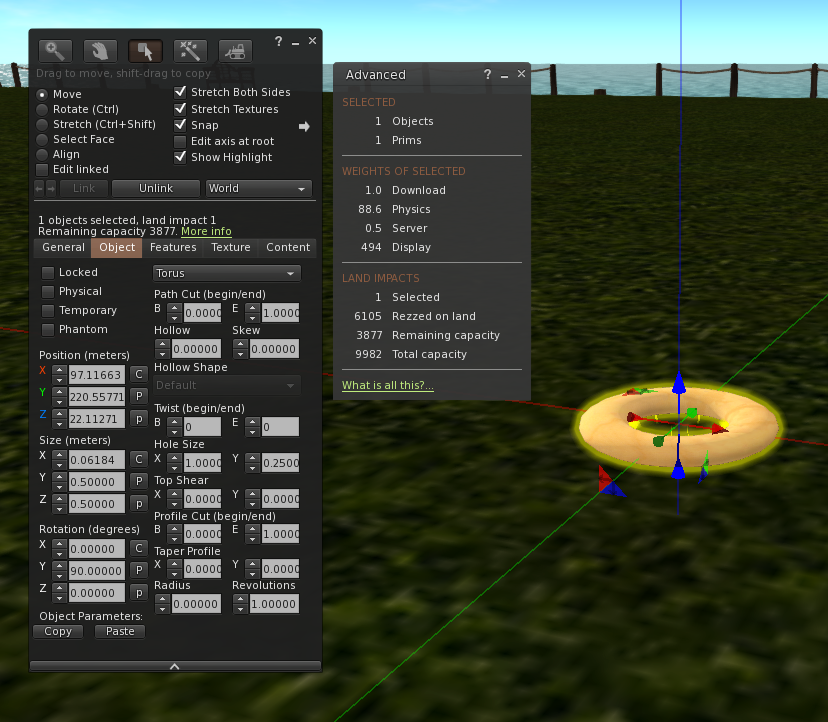
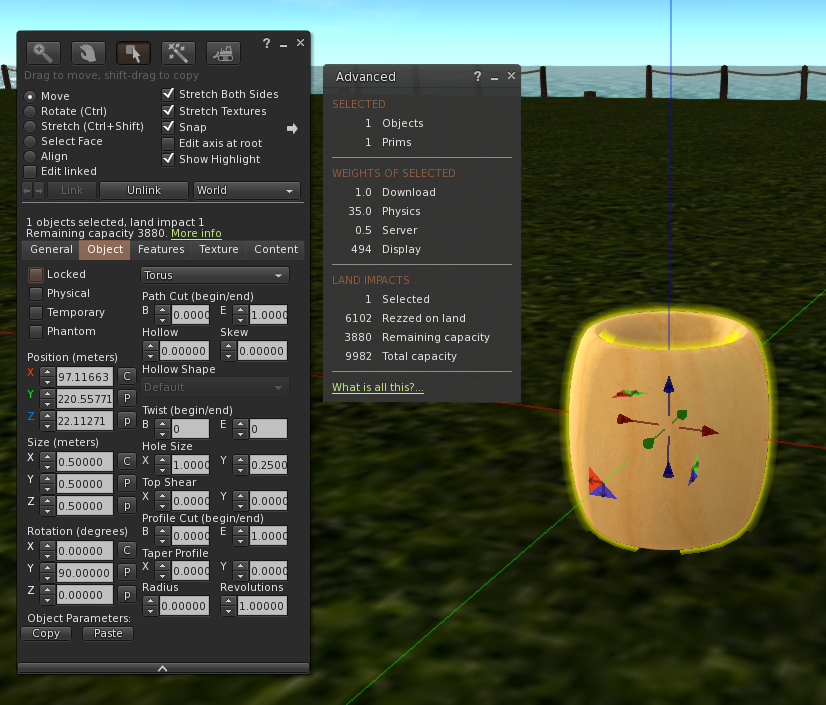
As you can see here the effective physics cost of the humble 0.5 0.5 0.5 torus is 35LI but due to the cap it is only showing as 1LI.

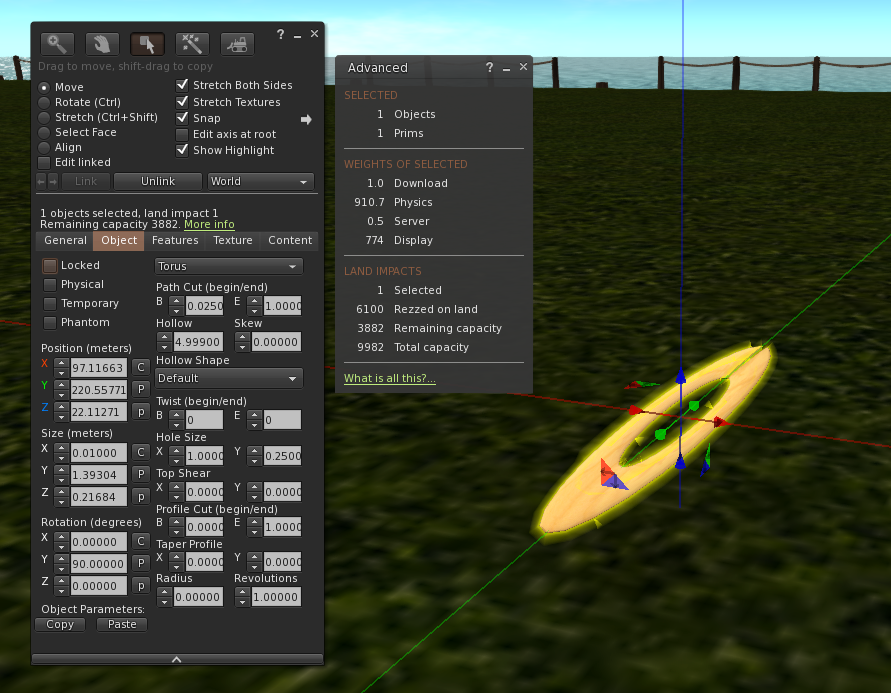
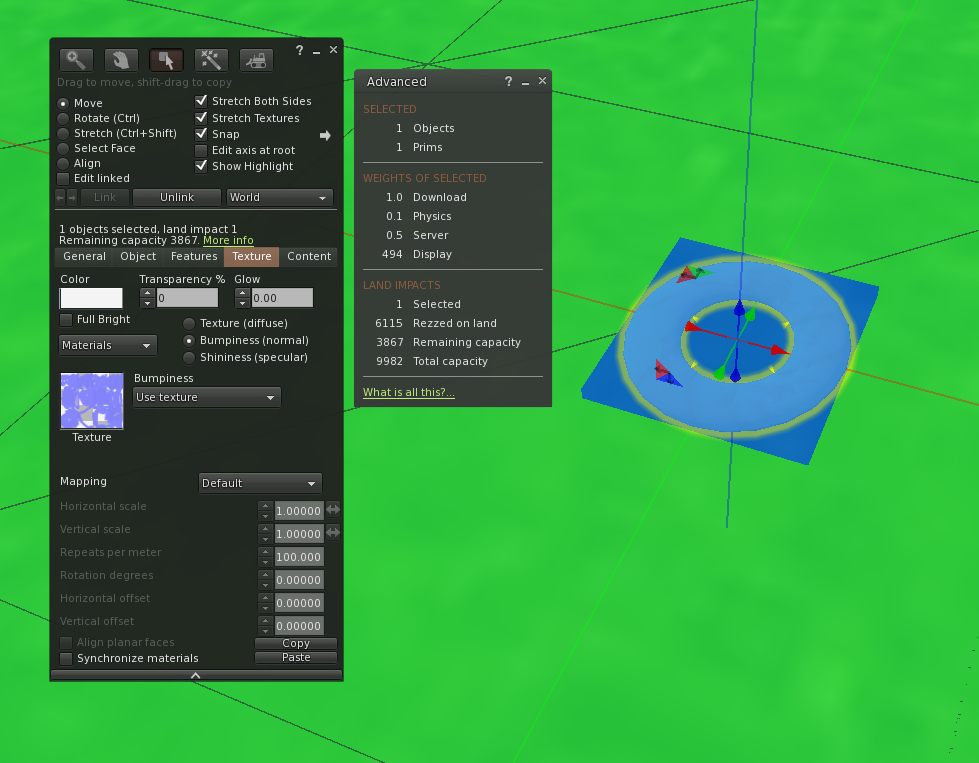
But it is not limited to 35LI. Because the physics cost is driven by scale and the "width of the triangles" compressing a shape massively provoke the physics cost.The next few images demonstrate the results of some minor torturing of a Torus.
By compressing it vertically we lift the Physics to 88.6

By making it long and thin we drive it up to a scary 910.7, but we aren't done yet
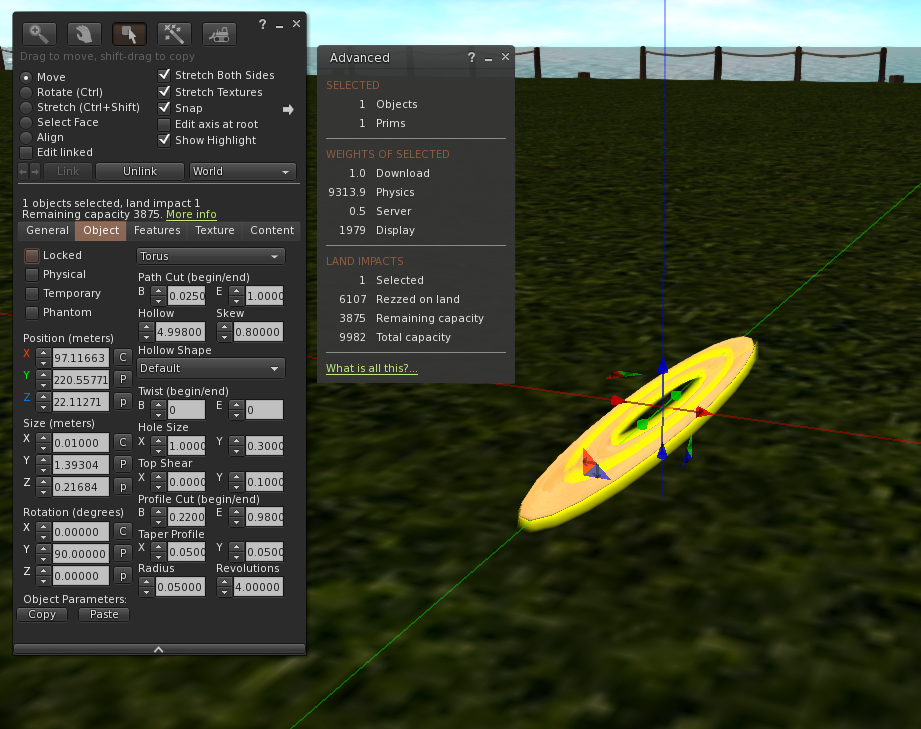
With some carefully applied torture incrementally path cutting, twisting etc. we can achieve a sim filling, sandbox burning, home destroying 9313.8 LI
Consider the above if you have legacy objects that consist of many tortured prims.
 If this were, however, only limited to the "hidden cost" this would hardly be a problem at all but it is not.

Unconstrained prims on the loose

When applying the cap to legacy prims, Linden Lab drew a line under what had gone before and protected it, thus avoiding breaking existing content. However, that rule does not apply to new features being applied to old content deliberately. 
There are two ways of breaking the cap. The first, perhaps most obvious way is to switch to modern "Mesh" accounting by changing the physics type to "convex hull". This can be done accidentally by linking a prim against a Mesh item. It can be pretty dramatic on a domed building or something with a lot of curved surfaces. 

All that glitters is not gold

The second way is more subtle and for the most part less well known and that is to apply a material to the prim. Materials were added a couple of years ago and provide for user defined bump (normal) and specular (shiny) maps. They are one of the quickest ways to modernise a drab looking older build, but they have a hidden surprise, as the moment that a material is applied to a prim it will switch to mesh accounting and reflect its "true" physics cost. 

It is this that Eve stumbled into in the mock scenario above. applying a spec map to an old prim necklace consisting of tortured prims is a great way to very quickly fill your parcel.

So take care when applying materials and linking legacy prims to modern items. You would not be the first person to find that a significant amount of damage has been caused.by an inadvertent ctrl-L

Damage limitation.

As mentioned above, the equation used to determine the physics cost divides by the width of a triangle. The mathematicians amongst you will already have realised that this means that the cost goes asymptotic as the width approaches 0. The 9000+LI that I managed to generate may not be the highest you can get (though it is the highest I have managed to drive a prim up to) but it is more than enough to do significant accidental harm accidentally. To limit the damage the viewer applies a simple constraint to save us. If the dimensions of the prim's bounding box go below 0.5 then the viewer will ignore the physics mesh provided and instead collapse to a simple solid convex hull. An example of this can be seen in the following image where our, previously 35LI, standard torus has been shrunk beneath the limit and now has a physics cost of just 0.1
.

and this brings as back to the question we started with...

When is a door not a door? When it's a hull.

and back to poor Andrew and his wall without a doorway.

Emily: Have you double checked the physics type?
Andrew: yes it's prim. I've done all the usual things, I've run out of options.

and so it goes on

Many times the cause of the issue will be resolved by asking one question.

Me: Andrew, What are the dimensions of the object?

Invariably, the response will be

Andrew: 20x4.5x0.1, I hate thick walls.

Inadvertently, by minimising the wall thickness Andrew has triggered the hull physics, blocking his door and ensuring it will never open. At this point ,Andrew has two options. He can either scale the x or y dimension to make the wall thicker (this is always the best test that this is the correct issue) or he can use the analyse function to produce a multiple hull based physics model that is not affected by scale and does not have the limiter applied. In general, the analysed physics costs more.

Summary

When you specify a mesh physics and don;'t analyse it, or when applying modern features to legacy builds, you open yourself up to physics issues. That can be summarised in a couple of rules
  1. Don't shrink any object with a physics shape without paying careful attention
  2. Don't apply a bump or spec map to a prim build without checking  for side effects.
It has a safety valve that can itself cause issues. Which can be summarised as:-

If your physics shape is set to prim, you are sure it looked right in preview (or metadata - see below). Check that no dimension <0.5.

Both sets of issues are resolved by using "analyse" but be aware that this frequently comes at a higher (fixed) physics cost.


A post script - One last tool in the physics armoury

If the scaling does not fix it then you'll need to prove whether the physics exists where it should.
One mistake that can be common with custom physics shapes is not ensuring that the BB matches that of the object. 
A tool that is specifically designed for tracking down physics issues can be found in the developer menu. (Note: the developer menu can be enabled from the viewer preferences.)
Go to the Developer->Render Metadata-> Physics shapes and tick it. The world will turn mostly blue.

The blue parts are physical surfaces, and, in fact, they are "heat mapped", an object with a very high physics cost will appear progressively orange and then red. More importantly, if you line the object you are inspecting, up against the skyline, you can see the areas that are not blue and which ought to correspond to holes/doors/windows. If the bounding box of the physics model does not match that of the LOD models then it will have been stretched/compressed to fit and any non-alignment will now be clear.

One word of caution when using this, however. There is a metadata display bug (at least that is what I consider it) that means that for Mesh objects, the mesh physics shape will be displayed even when the size restriction means that the default hull physics is being used. The convex hull shape can be seen when "convex hull" is explicitly selected, but will not show when it is being used because of the size limit. Interestingly this is the exact opposite of the behaviour I reported two years ago, so perhaps the change that addressed that problem fixed that and broke this?


Saturday, 16 July 2016

When is a triangle not a triangle? (mesh streaming)

When is a triangle not a triangle?
(when it's compressed)

Welcome to this 6th in the series of blog posts examining the task of creating a Blender Addon to assist with our Second Life Mesh creation workflows.

In the last post, we discovered that all was not quite as it seems in the mesh streaming calculation. Our carefully recreated algorithm repeats all the steps that the published documentation discusses and yet the results did not match. We further learned that this was most likely down to the "estimation" process.

So what is the problem here?

The clue is in the name, "Mesh Streaming Cost" it is intended to "charge" based on the cost of streaming the model; so what does that mean? In real terms it means that they are not looking at the difficulty of rendering an object directly, they are looking at the amount of data that has to be sent across the network and processed by the client. When we export models for use in Second Life we typically use Collada format. Collada is a sprawling storage format that uses a textual XML representation of the data it is very poorly suited to streaming across the internet. This problem is addressed by the use of an internal format better suited to streaming and to the way that a virtual world like Second Life works.

What does the internal format look like?

We can take a look at another of the "hidden in plain sight" wiki pages for some guidance.
The Mesh Asset Format page is a little old, having last been updated in 2013 but it should not have fundamentally changed since then. Additions to SL such as normal and specular maps are not implemented as part of the mesh asset and thus have no effect. It may need a revision in parts once Bento is released.

The page (as with many of the wiki pages nowadays) has broken image links. There is a very useful diagram by Drongle McMahon that tells us a lot about the Mesh Asset Format in visual terms.


In my analysis of the mesh streaming format, it became clear that while Drongle's visualisation is extremely useful it lacks implementation specific details. In order to address this, I looked at both the client source code but also the generated SLM data file for a sample mesh and ended up writing a decoder based upon some of the older tools in the existing viewer source code.
{ 'instance': 
   [ # An array of mesh units
    { 'label': 'Child_0', # The name of the object
                  'material': 
       [  # An array of material definitions
        { 'binding': 'equatorialringside-material',
                     'diffuse': { 'color': [ 0.6399999856948853,
                                             0.6399999856948853,
                                             0.6399999856948853,
                                             1.0],
                                  'filename': '',
                                  'label': ''},
                     'fullbright': False
        }
       ]
       'mesh_id': 0, # A mesh ID, this is effectively the link_id of the resulting linkset
       'transform': [ 10.5, 0.0, 0.0, 0.0,
                      0.0, 10.455207824707031, 0.0, 0.0,
                      0.0, 0.0, 5.228701114654541, 0.0,
                      0.0, 0.0, 2.3643505573272705, 1.0]
    }
   ],
  'mesh': 
   [ # An array of mesh definitions (one per mesh_id)
    { # A definition block
     'high_lod': {'offset': 6071, 'size': 21301},
     'low_lod': {'offset': 2106, 'size': 1833},
     'lowest_lod': {'offset': 273, 'size': 1833},
     'material_list': 
         [ # array of materials used 
          'equatorialringside-material',
          'equatorialringsurface-material',
          'glassinner-material',
          'glassouter-material',
          'strutsinnersides-material',
          'strutsinnersurface-material',
          'strutsoutersides-material',
          'strutsoutersurface-material'
         ],
     'medium_lod': {'offset': 3939, 'size': 2132},
     'physics_convex': {'offset': 0, 'size': 273}
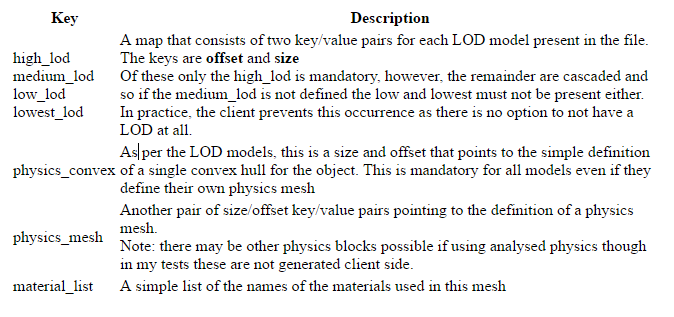
     <compressed data=""> 
     # LENGTH=SUM of all the size parameters in the LOD and Physics blocks
    }
   ],
  'name': 'Observatory Dome', # name of the given link set
  'version': 3  # translates to V0.003
}

All of this is an LLSD, a Linden Lab structure used throughout the SL protocol,  effectively an associative array or map of data items that is typically serialised as XML or binary. The header portion contains version information, and an asset name, it can also have the creators UUID and the upload date (if it came from the server) .

We also see two other top level markers, 'instance' and 'mesh', this is the stuff we really care about.

Instance

'Instance' is an array of mesh units that form part of the link set. Often when people work with mesh they use a single mesh unit but you can upload multipart constructs that appear inworld as a link set.
Each instance structure contains a set of further definitions.


Mesh

The final entry in the header is the mesh array. Like the instance array before it the mesh array has one entry for each mesh unit and as far as I am able to tell it must be in Mesh_id order.
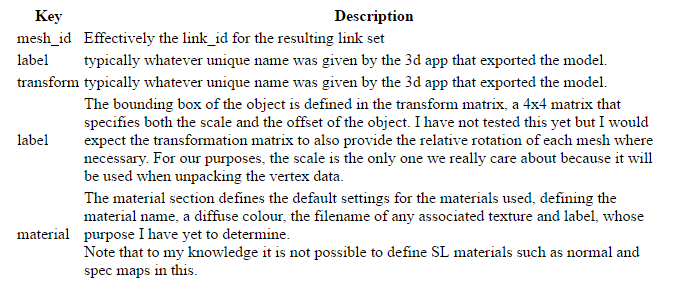
The mesh structure in the array is another LLSD with the following fields:-


At the end of each Mesh is the compressed data that is represented by the bulk of Drongle's diagram and it is for this that we have been waiting for this is why our naive triangle counting solution is giving us the wrong answer.

Compressed mesh data

At the end of each Mesh block is an area of compressed data. Space for this is allocated by the SLM "mesh" entry whose length includes the compressed data even though it is not strictly part of the LLSD.

Once again we need to look at both Drongle's excellent roadmap and the viewer source code to work out precisely what is going on.

As you will recall the Mesh section defined a series of size and offset values, one pair per stored model. In my examples, the physics_convex is always the first model and thus has offset 0.

physics_convex

{ 'BoundingVerts': 'ÿÿÿ\x7f\x00\x00\x81Ú\x81Úa\x18þ\x7fæyþÿÿ\x7f\x00\x00\x
8}%\x81Úa\x18\x00\x00ÿ\x7fa\x18}%}%a\x18ÿ\x7fÿÿa\x181Ö\x16\x86\x97¸ÃŒ)\x17\
                   '¯nÈ\x97¸\x00\x00ÿ\x7f\x00\x00\x9eO\x9aÇ\x94¸Ã„µ\x92í2\x
                   ':Jl\x12.\x0c'
                   '«·a\x133\x0c'
                   'SH\x9dì.\x0c'
                   'T\x85'
                   '\t}þÿªzò\x82þÿF\x85'
                   '\r'
                   '\x83þÿ¸zô|þÿ',
  'Max': [0.5, 0.5, 0.5],
  'Min': [-0.5, -0.5, -0.5]}

Here we see that the compressed data is really just another LLSD map. In this case, we have three keys, Max, Min and BoundingVerts.

Max and Min are important, we will see them time and again and in most cases, they will always be 0.5 an -0.5 respectively. These define the domain of the normalised coordinate space of the mesh. I'll explain what that means in a moment.

BoundingVerts is binary data. We will need to find another way to show this and then to start to unpick it.

['physics_convex']['BoundingVerts'] as hex
dumping 18 bytes:
00000000: FF FF 00 00 00 00 00 00  00 00 FF FF 00 00 FF FF  ................
00000010: 00 00                                             ..

This is the definition of the convex hull vertices, but it has been encoded. Each vertex is made of three coordinates. The coordinates have been scaled to a 1x1 cube and encoded as an unsigned short integer. Weirdly the code to do this is littered throughout the viewer source, where a simple inline function would be far more maintainable. But we're not here to clean the viewer code.
In llmodel.cpp we find the following example

 //convert to 16-bit normalized across domain
 U16 val = (U16) (((src[k]-min.mV[k])/range.mV[k])*65535);

In python, we can recreate this as follows.

def ushort_to_float_domain(input_ushort, float_lower, float_upper):
    range = float_upper - float_lower
    value = input_ushort / float(65535) # give us a floating point fraction 
    value *= range # target range * the fraction gives us the magnitude of the new value in the domain
    value += float_lower # then we add the lower range to offset it from 0 base
    return float(value)

There is an implication to this of course. It means that regardless of how you model things your vertices will be constrained to a 64k grid in each dimension. In practice, you are unlikely to have any issues because of it. And so applying this knowledge we can now examine the vertex data.
expanding using LittleEndian
0: (65535,0,0)->(0.500000,-0.500000,-0.500000)
1: (0,0,65535)->(-0.500000,-0.500000,0.500000)
2: (0,65535,0)->(-0.500000,0.500000,-0.500000)
Max coord: 65535 Min coord: 0

It is my belief that these are little-endian encoded. The code seems to support this but we may find that we have to switch that later.

We can apply this knowledge to all sets of vertices.

Onwards into the Mesh

Looking into the compressed data we find that the LOD models now follow. They follow in the order that you'd expect, lowest to high.

Each LOD model represents the actual vertex data of the mesh. Mesh data is stored as a mesh per material, thus we find the compressed data section per LOD is comprised of an array /list of structures or what Drongle refers to as a submesh in his illustration, one element of the array for each material face. Each material face is the comprised of a structure of the following:
Field
Description
Normal
A list of vector normal that corresponds to the vertices
Position
The vector cords of the vertices
PositionDomain
The min and max values for the expanded coord data (as per the preceding physics section)
TexCoord0
The UVW mapping data. At present, I have not investigated the encoding of this, but it would appear to be the case that these are encoded identically to the Vertex data but with only the X and Y components.
TexCoord0Domain
The min/max domain values associated with the UVW data
TriangleList
The mesh, a list of indices into the other data fields (the Position, TexCoord and Normal) that form the triangles of the mesh itself. Each triangle in the lost is represented by three indices, which refer uniquely to an entry in the other tables.Individual indices may of cours be shared by more than one triangle.

I think this is more than enough for one post. We've covered a lot of ground.
I am now able to successfully decode an SLM asset in Python and so next we can see how this helps us calculate the LI.

love Beq
x