Showing posts with label upload. Show all posts

Sunday, 20 June 2021

Summarising the next improvements to Firestorm Mesh Upload

In my last blog, I covered at length one of the changes I have put into the forthcoming Firestorm release. This post is a shorter summary of those changes and two other updates that I think will appeal to many mesh creators. 


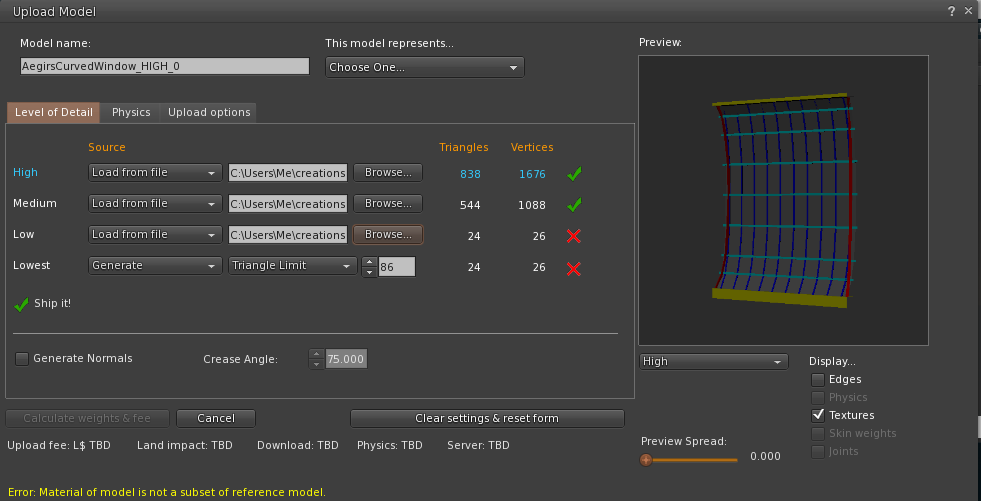
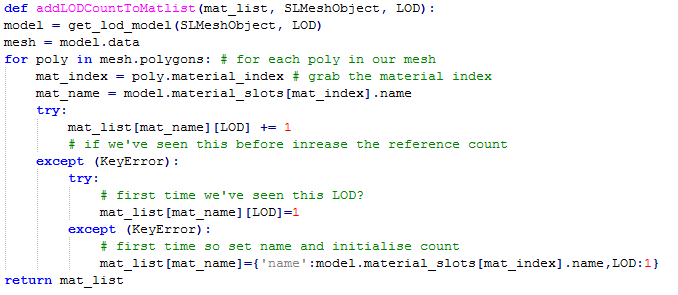
1) Materials subset handling and related errors

For a full, blow by blow account read the previous blog, but in summary, the way that mesh "texture faces" are handled has been rewritten to give you more freedom in how your meshes are organised.

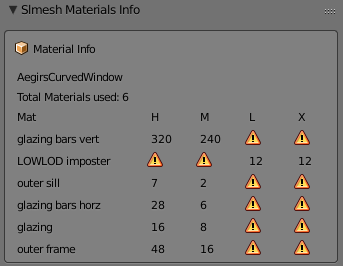
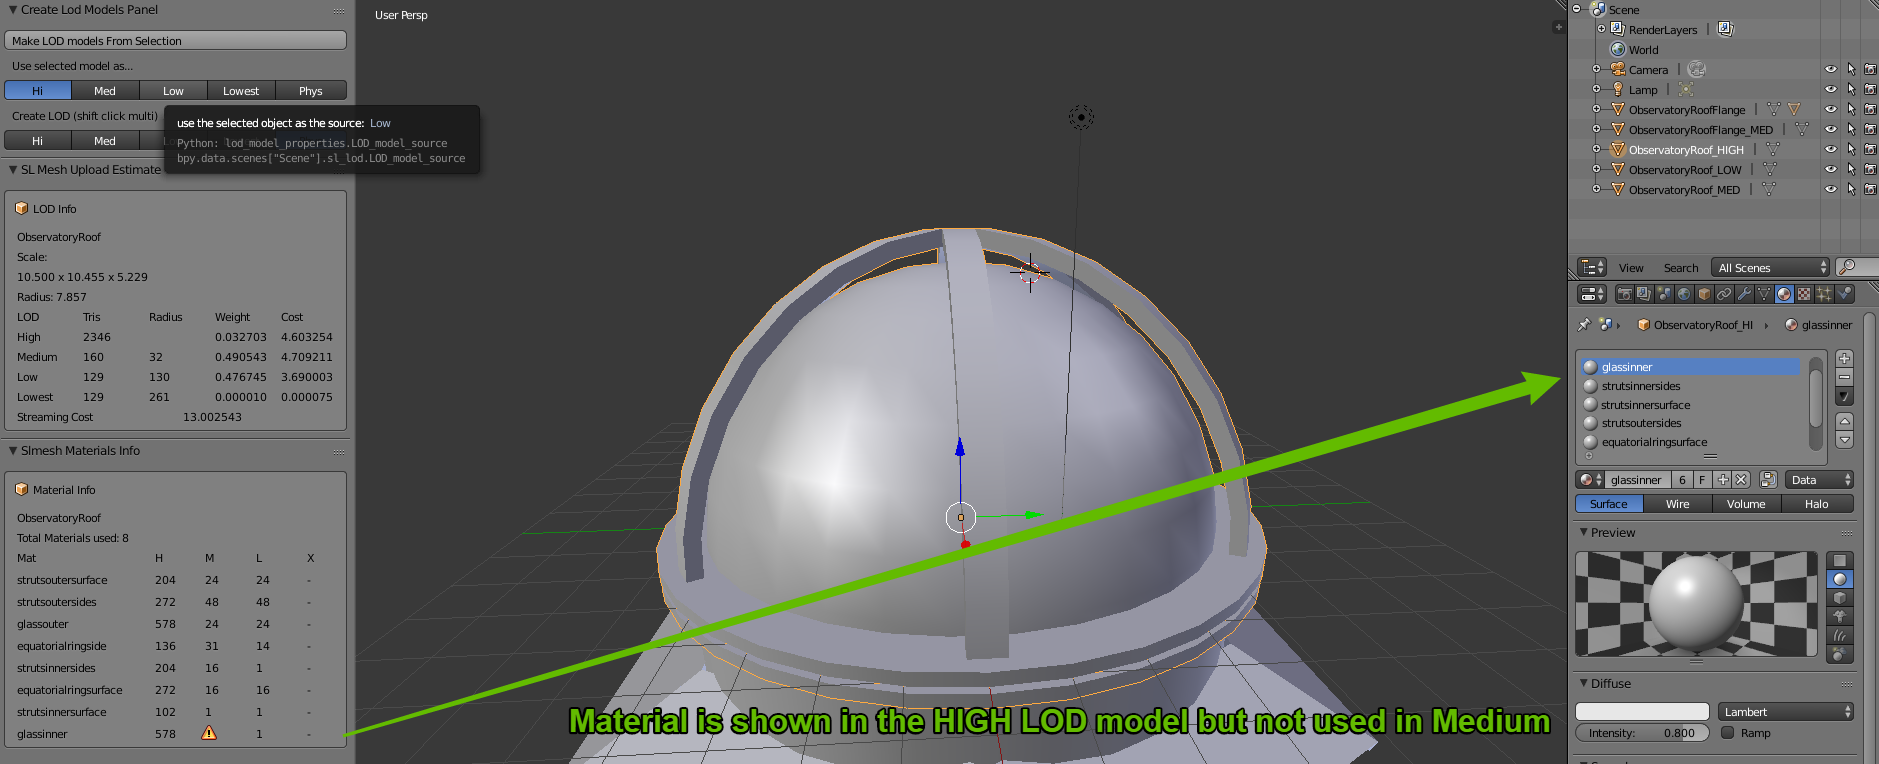
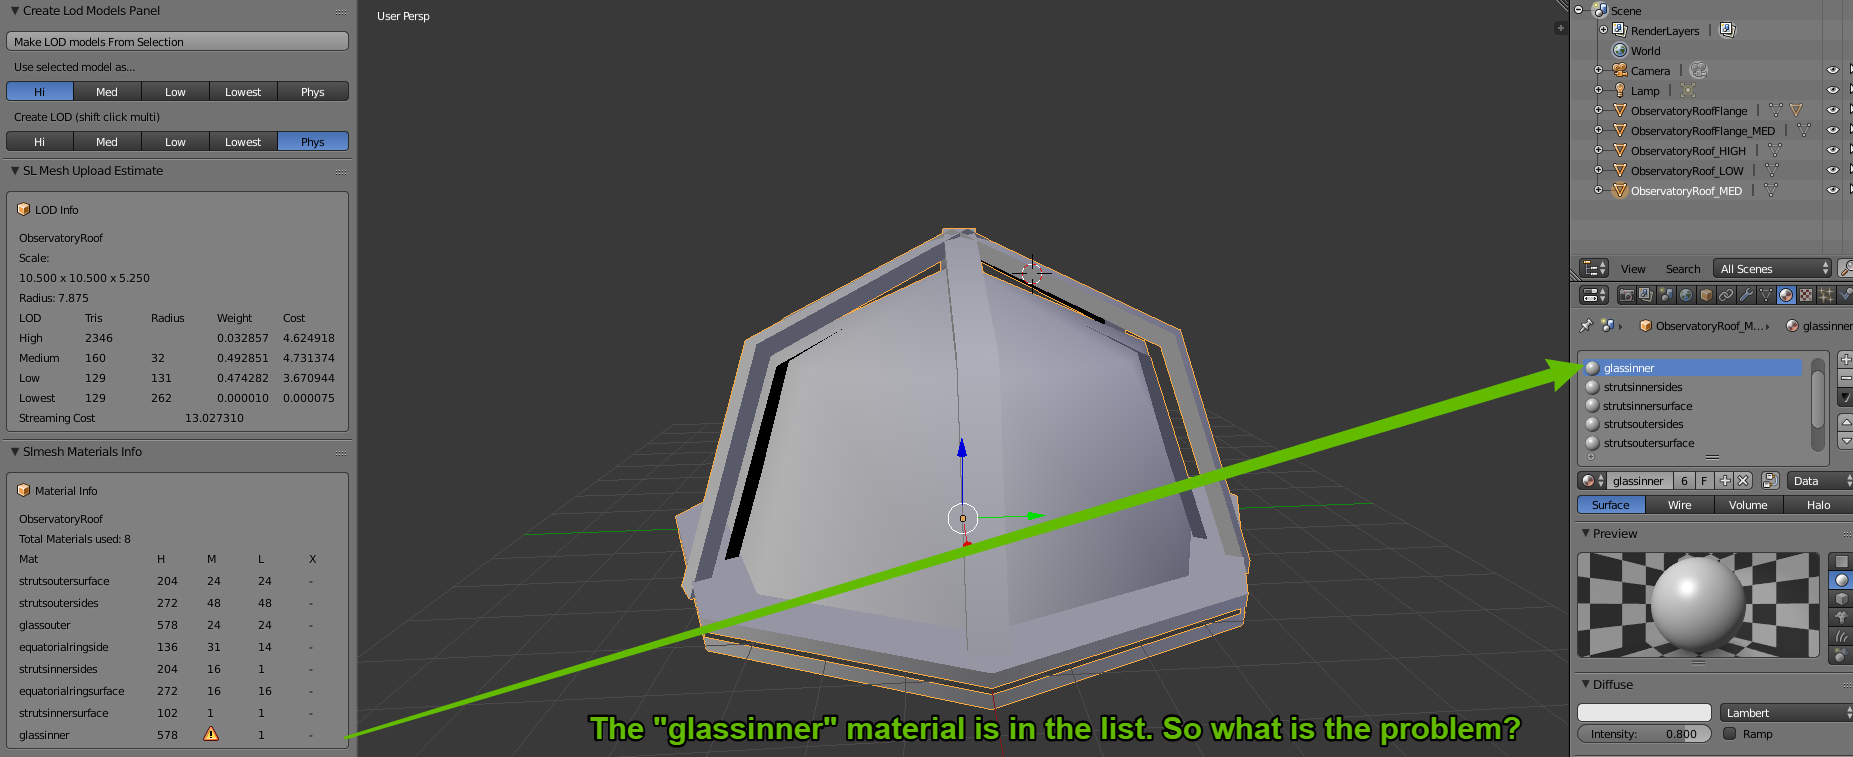
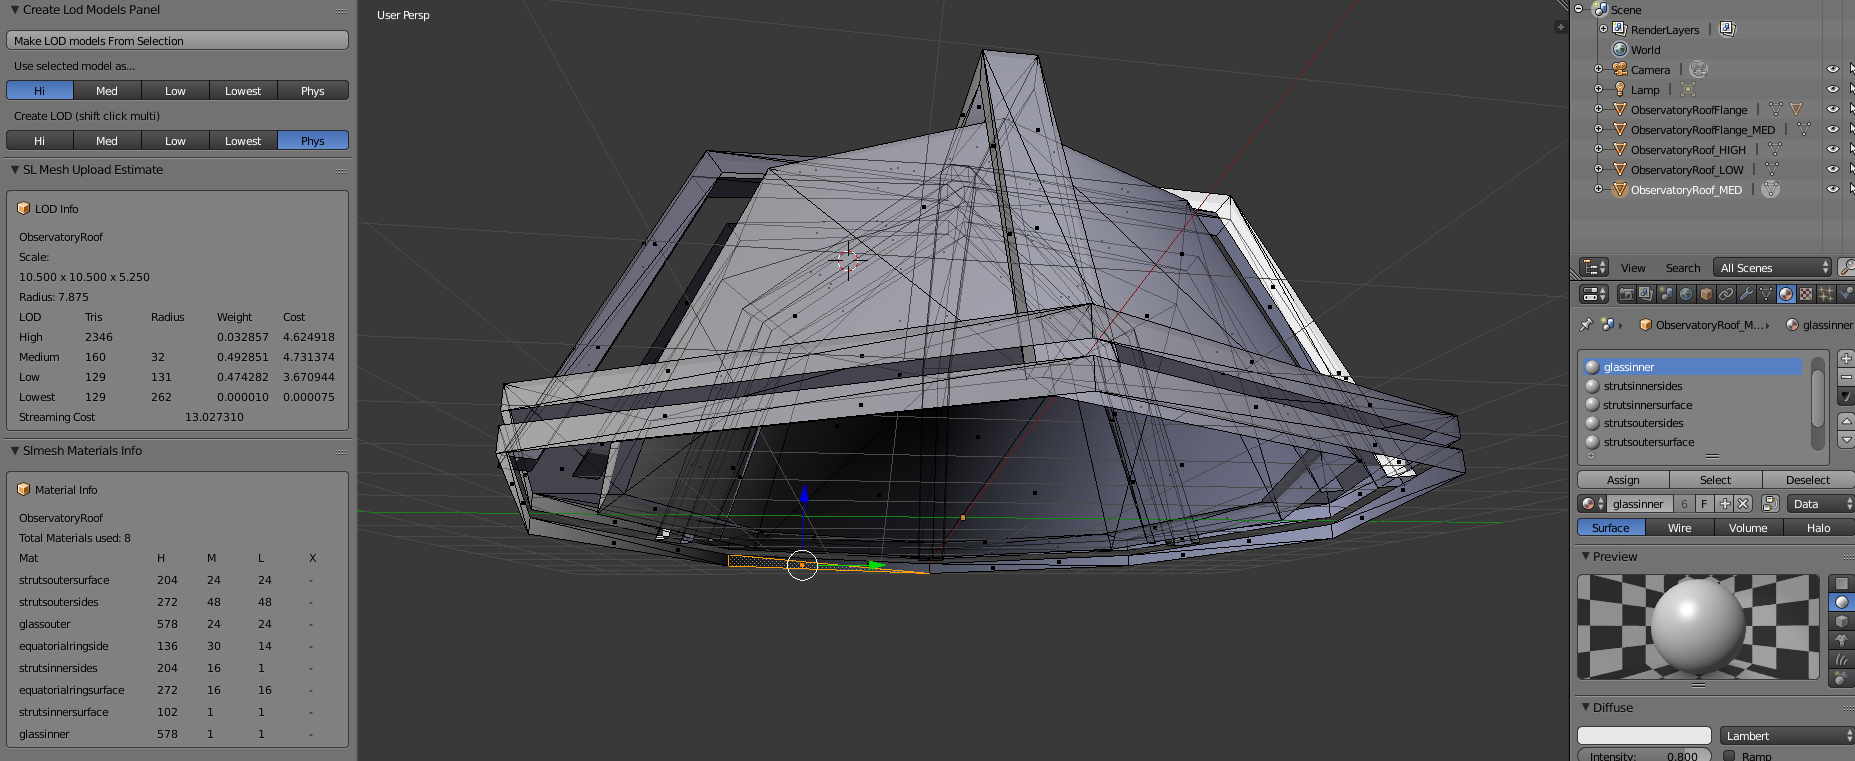
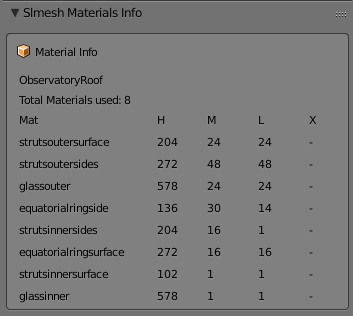
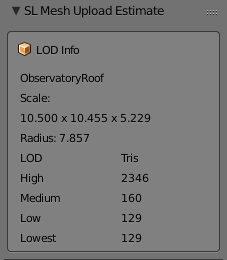
As best I can tell, there has been a bug in the Mesh upload parser (the thing that reads your Collada files and prepares them for upload to SL/OpenSim), so in-grained was this bug that most of us never realised it was a bug. We have all become accustomed to having to place empty triangles in every LOD model to represent the full set of material faces. Given a Mesh "house" whose High LOD model uses 5 materials, "frontwall", "roof", "door", "carpet", wallpaper", we might remove all the geometry from the interior faces for the lower LODs as you would never see those from the outside. However, creating "house_LOD2", as the medium LOD model with only the exterior materials present would result in the error, "Material of Model is not a subset". We would grumble that this was a subset, but with no way around this problem, dutifully return to Blender and add 2 stray triangles and assign one of the "missing" textures to each.  This is painful, time-consuming and frustrating but most importantly it is very confusing for new creators. It also has a further serious side-effect. the LOWEST LOD model is notoriously over-priced in SL, by which I mean that the cost of each triangle in the LOWEST LOD is so high as to make it near impossible and at best time consuming to produce a good LOWEST LOD model. For example, a small hand tool which due to its small size will rapidly be reduced to LOWEST LOD, can typically have no more than around 20 triangles before it starts to seriously drive the Land impact up. If you have to give away a number of these precious triangles just to please the grumpy uploader trolls then you have already lost a large proportion of your allocation. 

Form the next Firestorm release this will no longer be the case. With the exception of the high LOD model all the other LOD models can now have any valid subset of the High LOD materials, they do not even have to be a subset of the immediate parent LOD. 
Thus you can have the following structure
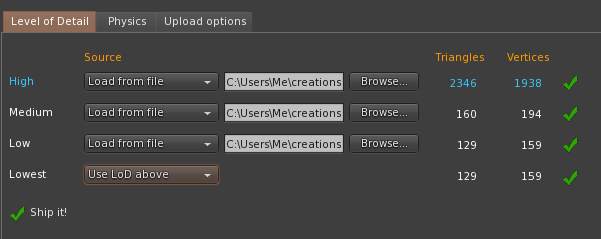
8 faces in the high LOD - A,B,C,D,E,F,G,H
4 faces in the Medium    - B, E, G, H
2 faces in the Low           - A, C
& just 1 in the LOWEST  - F

Or any permutation of these. The only requirement is that the superset of all materials used in all LODs must be present in at least one triangle in the HIGH LOD.

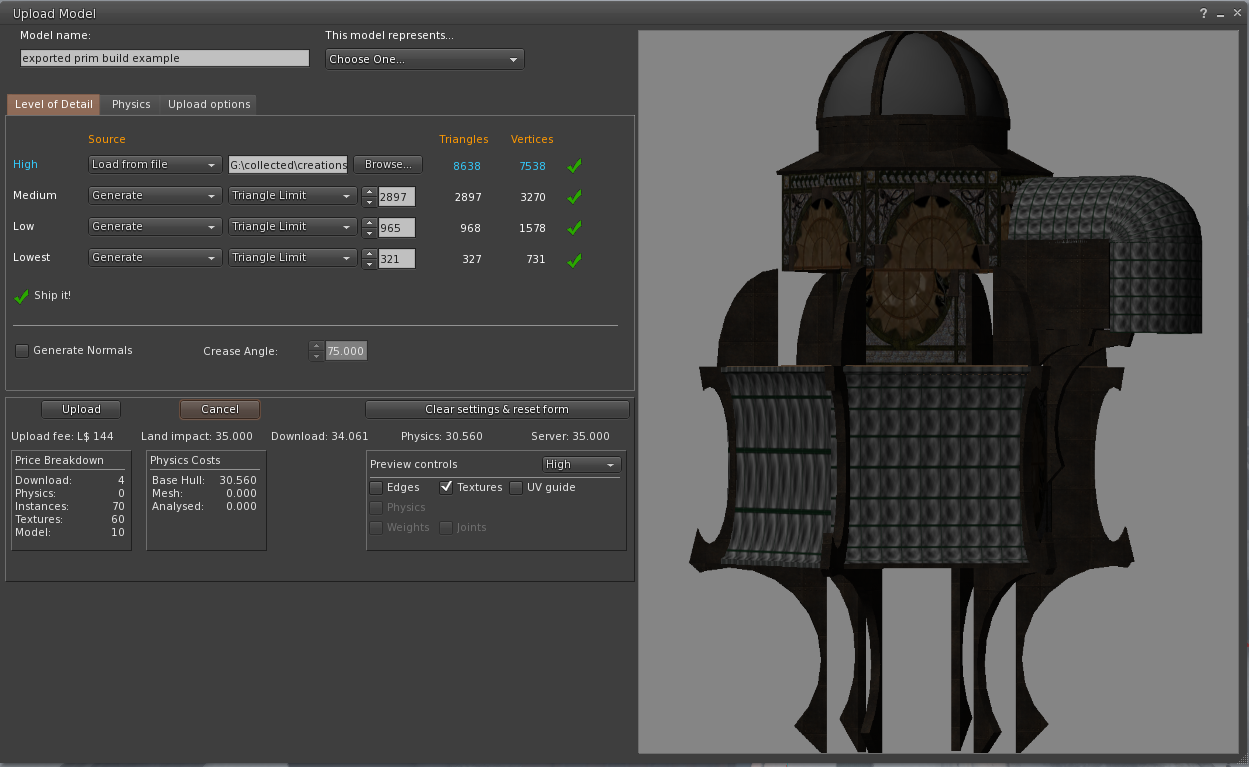
2) Ready-to-use physics presets


The physics shape tab on the mesh uploader is generally not well understood. This is in part because it is a technically complex thing, in part because the viewer has not helped as much as it could. I can't do too much about the former, though I've written a number of blogs that try over the years, the latter part I can do more with.

As of the next Firestorm release, creators will find 3 new options when selecting a physics shape.
1) The cube.
2) The hexagonal cylinder.
3) the user-defined mesh.

There tend to be two sorts of people when it comes to defining physics shapes, those that do and those that don't. For some items it is barely worth worrying about, for others it is essential. However, given that in SL it is often hard to predict how an item might be used once it leaves your protective custody, it does no harm to make sure it has a minimal physics shape that is broadly aligned to the volume of the mesh.

Many people will select the "lowest LOD", often some unrepresentative triangle. This will upload, but it means that once the item is rezzed inworld people cannot interact properly with it. A much better option for many items is a simple cube, and a lot of us keep a simple 8 vertex cube on our drives for just this. You no longer need to do this. The hexagonal cylinder is intended for items that are not quite so "cuboid".

I toyed with providing something vaguely spherical but came to the conclusion that any shape I came up with would fail to meet some need. So instead I added the ability to provide a "user-defined" physics mesh. This is a way to have a shortcut to that "shape you always use". It can be configured in the Settings tab on the upload floater. 


Some items require a custom physics shape, walls with doors and windows that you wish to allow passage through, for example. No defaults are going to help much there, but let me know if there are things that you feel would help. 

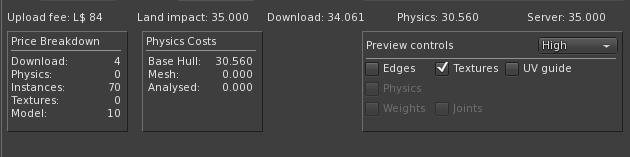
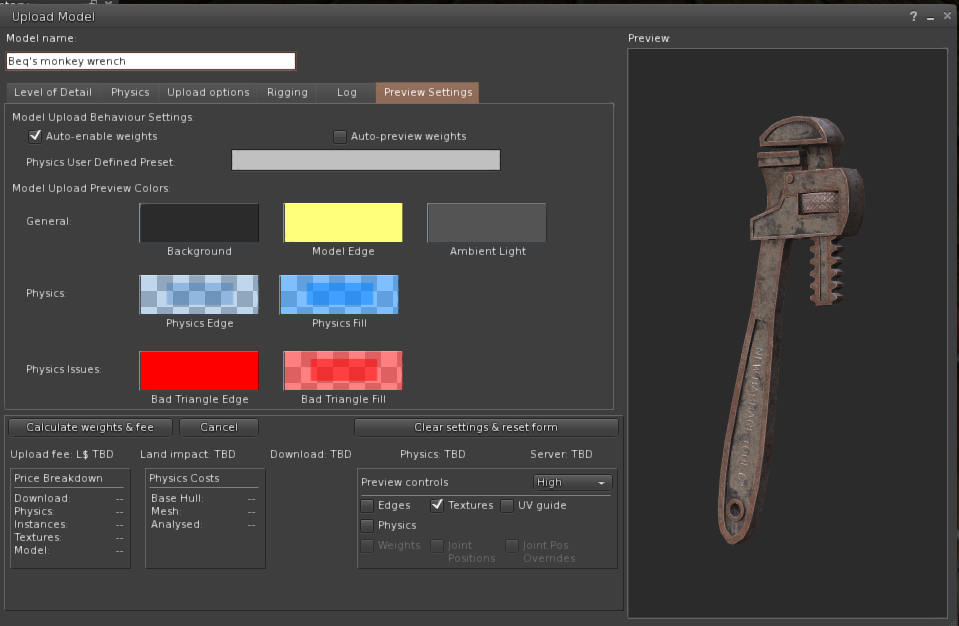
3) Ambient lighting in the viewport.

A couple of years ago, I changed the lighting in the preview window to make the three-point lighting work "better" but for some reason, things always remained dull and flat. Recently, it suddenly struck my partner Liz why this is. the ambient lighting is wrong. Upon investigation, it turned out that it was not just wrong it was "black". I have no exposed this setting on the "preview settings" tab so that you can change it, I have found a dark mid-grey about 33% grey works well and makes the lighting "pop" properly. It is especially useful when uploading with textures.

At the time of writing, there are two minor niggles that I may change before release. 
1) It still defaults to black. I considered this as a good plan but given that anyone upset by better lighting can change it to dullness again I think I will change the default to something sensible.
2) When you change the control the preview will not update until you either pan the model or reopen the uploader. I may not be able to fix this immediately.

I hope these three sets of changes improve the quality of the uploading experience for you as much as they have for me.

Take care.

Love Beq
X

Friday, 7 December 2018

Easing the pain of importing Mesh.

A quick guide to the Mesh uploader changes in Firestorm 6.


But first a quick mention of the "other thing"

The big new thing in Firestorm 6 is, of course, Animated objects or "Animesh" which gives you the ability to take any rigged mesh item that you have modify permissions on and turn it into an animated independently moving item. You can read all about Animesh on the Linden Lab blog the regular places such as Inara and Nalates' blogs. Having spent quite a lot of time over the last few months looking at performance concerns around Animesh and tweaking some of the performance of rigged mesh in general, I am relatively happy that Animesh has an overhead not too much more than if that same mesh were being worn as clothing today. That is to say that a single animesh  of say 30,000 triangles will have an impact on your performance more or less equivalent to a 30,000 triangle dress or xmas sweater.


And now on to the main part of the blog...

A side-show to the main event of animated objects, nestling amongst the many fixes and tweaks since the last release, is my revamp of the Mesh Uploader. I teased some of the information on this previously but I'll now give a quick guide to the updates.

What's changed?

  • Cost breakdown, how the L$ charge is calculated
  • Physics details, the costs of the different types of physics (convex hull, prim)
  • Higher resolution preview image
  • Scalable preview window
  • Improved shading/lighting in the preview window
  • Correct highlighting of degenerate mesh
  • Improved error handling for physics models (avoid some of those MAV errors)
  • UV Guide overlay

Why?

So why change the uploader? Primarily because it is awful. A lot of creators struggle with the obscure and limited error handling, the postage stamp preview and poor rendering. The aim is to improve the tools, this is really the first step in what I hope will be a series of improvements both in the capability of the import tools but at least as importantly, in the feedback you get when things go wrong.

So what are these changes?

First of all, we'll look at additional information panels.
Taking the following object (an old prim building exported from SL)


Cost breakdown:

Ever wondered why that first upload cost you L$15 but the one after cost L$25? This information panel will at least tell you where that final number comes from.

The Download fee is derived from the streaming cost of the mesh, shown as "Download" in the standard Land Impact stats.
The Physics fee relates to the cost of the physics model. It is worth noting that the Convex Hull (Base Hull) is free, while a User supplied physics is charged based on its complexity whether it is mesh or analysed (more on that later).
The Instances fee is L$1 per mesh "prim" in the linkset. As can be seen this build has 70 separate meshes in a single model. 
The Textures fee is the standard L$10 fee per texture upload and is only added when the "inlcude textures" box is ticked on the "upload options" tab.
Finally, the Model fee, is normally L$10, the core upload fee irrespective of the complexity of the scene. It may be possible for this to be more in a multi-model DAE but I have not had a chance to test one.

Physics breakdown:

Personally, I think this is the more valuable of the two new panels. It has always been guesswork as to what the inworld physics cost will be if you use anything other than the default convex hull. 
This panel shows you the possible physics costs. There are 3 values shown but typically only two of these will have a value at any given time.
Base Hull: I should probably rename this to Convex Hull to correspond to the inworld name. The Base hull is the default physics shape, every mesh has one of these, in fact, if the uploader is unable to calculate a credible "base hull" you will get a dreaded "MAV block missing error".
This cost is the one traditionally shown in the LI summary because it is the default state of a newly uploaded mesh. However, if you provided your own physics shape, then inworld you can set the physics shape to the equally confusing "Prim". The next two values are related to the "Prim" physics

Mesh: User Mesh physics, this is the value is you have provided a Mesh model and not used the Havok Analyse function. It can sometimes be cheaper than the analysed equivalent but as all regular readers of this blog will know, it can vary with scale. The cost shown assumes the scale as uploaded.

Analysed: If your user-specified MEsh is analysed (and optionally simplified) using the Havok tools then when the fee is calculated it is based not on the original Mesh model but instead on the number of hulls. Using this new info panel you can, therefore, check the non-analysed physics cost and then examine the analysed costs and decide which you prefer before you upload. 

Moving on from the info panels, we'll look at the most obvious visual change, the preview panel itself.

The preview panel:

There have been a number of alterations to this panel. Firstly I have changed the Colour scheme to be more aligned with the inworld editing, yellow highlight for the edges, with translucent blue for physics. these can be overridden in the depths of the debug settings if you really want.

The next change is my favourite, the scalable preview window. The rearranged upload "floater" is already giving you a larger preview are, but depending on your screen size you can now grab the lower right corner and scale it out to as large as you wish. This comes in really handy for identifying those pesky degenerate triangles in your physics mesh. Alongside the increased physical size I have also increased the resolution of the preview giving a less jagged feel to the render. 

A more subtle change is the lighting of the model. The preview window always had very deep dark shadows and investigation showed that this was not actually the intended behaviour but that the 3 point lighting implementation was broken. I have made a quick fix that improves the general lighting but I have future plans to do more with this.

In addition to the existing edges and textures options, I have introduced a new "UV Guide". This displays a simple checkerboard pattern over the mesh and is useful for ensuring that you exported the right UV map before you get inworld. It is possible to add your own UV Guide and in a future release, I hope to make that directly editable from the preferences.

The final visual change was to fix an annoying bug that has meant that the intended "helpful" diagnostic display to highlight the presence of degenerate (i.e. long thin) triangles was more or less indistinguishable from the build. These errors in the physics mesh which were previously highlighted with tiny black lines marginally thicker than the mesh display are now highlighted clearly in bright red.

The following animation shows a quick overview of the new preview window


Finally, at least for this "overview", I have attempted to improve the error handling workflow.

Improved Error Handling:

Anyone who has spent any time uploading Mesh or helping others to do so will have suffered the pain of the obscure and often misleading errors. In this refresh I have tried to ease the pain a little, there's still some way to go I'm afraid but I hope that this start will save people some of the worst of the shortcomings of the old uploader.

Intercepting MAV errors....wait, rewind .. What is a MAV error?

MAV stands for Mesh Asset Validation (or something close) it is the process that occurs when you click the calculate weights button before the server decides on the costs. A MAV error is, therefore, one of a number of "fatal" errors that prevent the mesh being considered as well-formed and given a set of costs and weights. The annoyance factor of these is two-fold, firstly you have to click the button and wait for the response from the server, and secondly, you have to decipher the meaning of the error message. These MAV errors also commit the cardinal sin of error handling "Please look in the log for more information", if you've ever tried to look in a viewer log file and work out what went on you have my pity. 

MAV Errors then and now

There are four main MAV errors that I can think of:-
MAV error block missing: I referred to this earlier, and it can occur for a number of reasons, unfortunately, and because of this, for now at least, I have not trapped this one. The "block missing" means that part of the Mesh data structure was not present when it reached the server. This is purely a technical fault and of no use whatsoever to the user, so what causes this? The Mesh data upload structure has a number of mandatory "blocks" these include the LOD data, a convex hull etc. The most common (in my experience) occurrence of  "Missing block" is when the mesh is so poorly optimised that the convex hull creation failed. another cause is, once again, overly complex mesh that causes the LOD generation library (GLOD) to fail to produce an adequate simplified LOD.  There may well be others.

MAV error: Degenerate Triangles: (Now trapped) Traditionally this has been reported when your user-defined mesh physics shape is too complicated and in particular it has one or more long thin triangles. These are an error because they cause significant issues for the physics engine. As mentioned above I now highlight these in bright red, and this occurs as soon as the user mesh is specified. along with this the calculate button is deactivated (you would only get a MAV error so I am saving you from yourself) and a red error message explaining the issue is shown.

MAV error: Some hulls exceed vertex limit: (Now trapped) In the past your mesh was sent off for evaluation but I now perform this in the preview itself. Hulls are a simple convex shape made up of at most 256 vertices. If the analysis produced more complex hulls then this cannot be stored in the mesh data structure and is a fatal error to the uploader. This is now trapped and flagged as an error, the calc/upload button disabled and a suggestion of how you might fix the issue provided with the error.

MAV error: Too many hulls: (Now trapped) In the past, you would get a MAV error if your analysed results gave more than 256 hulls for any single instance (aka mesh unit) in the model. Once again this is a technical limitation imposed by the system and it prevents the model being uploadable. This is trapped and provides a suitable error and a suggestion of how to fix the problem. As you might expect by now, the calc/upload button will be disabled.

That's all folks

That about rounds up this Blog and the uploader changes. As I have said a few times above, this is the first stage of what I hope will be a more complete revision. If this is well-received I will look at the feasibility of contributing this back to the Linden Lab viewer so that everyone (not just Firestorm users) can take advantage of it. The Mesh Uploader is a complex and fickle beast and while I have tried to cover many areas and check for loopholes there is a chance I missed some. I have also deliberately neglected the rigged mesh tools a little, both to focus the changes and to not mix up any issues with uploader changes with Animesh.

Love 

Beq
x


Wednesday, 3 October 2018

Shedding light on Mesh uploading - Something I'm playing with...

For some, the entire Mesh upload process is wreathed in fog, a murky, mystery-filled place of confusion. Sometimes this is down to misinformation and poor tutorials out here on the web, but the Mesh uploader does nothing to help its own reputation.

With the above thought in mind, I've started to make a few tweaks to the uploader. Nothing major here but I thought I would share a little of the direction I am going in and see what the feedback is.

While I want to address a number of different problems, from the error reporting to the preview window, I've started with some additional information displays. It has been mentioned many times in the forum that the Mesh uploader is a little "random", and whilst there is a grain of truth to that, it is also in large part due to the opaque nature of the numbers we see. In particular, where is the cost derived from and why does the physics shown on the uploader bear no resemblance to that which we see inworld?


Blogger will downgrade this clip but you can peek at the original here

Very rough and ready but what this shows is some extended information that is returned when you "calculate weights & fee". So what goodies do we have here?

There are 3 sets of information I am showing, we will ignore the middle one for now as it is not useful in its present form, so that leaves...

1) The contribution to the fee

As you can see, your upload fee is derived from a number of components:-

Streaming

Streaming is a charge derived from the streamable size of the object.
Physics
Physics is a fee derived from the physics model, and you can see that it varies with the physics costs that are normally hidden from sight.

Instances

Instances is a little misleading, it is not used in the context of repeats of a mesh, as those familiar with 3D modelling might use the term, it is instead derived from the number of mesh units making up the model. It is effectively the "prim count"

Textures

I don't show this in my quick clip above but it is the 10L charge for any textures uploaded with the mesh. Uploading textures with the mesh has always been an option but to my knowledge is rarely used.

Model

I have never yet seen this as anything other than the 10L value shown in the clip. I suspect in the workflow it is effectively hardcoded.

And so on to the (arguably) more interesting information.

2) The physics costs

Here we find the hidden cost of physics. For years we've moaned about the fact that the Physics cost shown has little relation to that which we get after upload. Most of us will have made the link to the fact that the physics cost shown historically is just the "base hull" cost. That is to say, it is the cost assigned to the shape that is used when "convex hull" is selected. This is the default physics shape post-upload and is a mandatory part of the uploaded asset.

But we can also provide a custom physics model, if we choose to provide it as a mesh then a weight based on the number and area of the triangles that comprise that model is computed. While it has not been visible until now, it does influence the price we pay. For reasons we have discussed in this blog many a time in the past, there are occasions where a Mesh physics model is not suitable; in those cases we use the "analyse" function to convert the triangles into a set of hulls, or a "decomposition" in viewer-speak.

While a base hull is mandatory and always present, the mesh and hull based user supplied physics shapes are mutually exclusive, you may only have one. As such pressing analyze and then calculating weights will blank out the Mesh cost and retrieve an Analysed cost.

Will this help you?

OK, so that's it for now. How this will actually appear in a future Firestorm I'm not yet sure. There is a fine line between providing more information and causing more confusion. so while I think it will appear in some form I'll be hoping to discuss it with users and our support team as well.

Personally, while seeing the composition of the fee is interesting in passing, it is not essential and anyone tailoring their mesh to minimise the upload cost really needs to consider their motivations. However, knowing exactly what the physics cost will be in-world before you upload is a massive time saver and I believe that this will be popular with my builder friends.

I'd love to hear your thoughts on this. Am I completely off-piste here?

Friday, 19 August 2016

It's a material world

This post is another post in my Blender Addon series. We still have some distance to climb to get to the goal of LI estimation in Blender. The Chinese have an old proverb, often attributed to Confucious that states something to the effect "the man that moves the mountain starts by carrying away small stones." With a nod to Confucious, we will carry away an armful or two of rubble today and use those pebbles to make a useful tool that was on my wishlist, a "material usage report".

Materials matter

We know from a previous blog that the Mesh that we see is not how SL sees it, instead, it expects it decomposed into a mesh per material. It is in no small part this requirement that leads to the expectation that each LOD model will share the same material set. If you try to upload LOD models that have mismatched materials you will get an error such as this

The nasty yellow "Error: Material of model is not a subset of reference model" is the bane of a Second Life Modellers life, if you are anything like me, that is. Typically this occurs for one of two reasons; the first is that you've just messed up the materials, and you have a mismatch, that is easy to spot (it may or may not be easy to fix). The second reason is the one that, for me at least, is far more common. You've diligently optimised your model, removing all the internal faces that won;t ever be seen at a distance, simplified those pillars and struts and somewhere along the way you ended up with a material that is in the model but has no actual mesh associated with it. 

Looking in Blender will show the full list of materials that were used, you'll need to go through each in turn to find out which of them is actually empty. 

Gien that our grand tour will require us to cross this small hill on the way to the summit we may as well deal with it. We need to parse our object into materials before we can go much further, so let's count the polygons in each LOD as we go.

In Blender the mesh data has a list of polygons and each entry in this has a pointer to a material index the refers to the "material_slot" of the parent object. We can, therefore, write a short set of routines that will process the models that we have, building on the previous work that allows us to associate objects together as the LOD models and produce a composite report on the materials used by our LOD models and any errors that we find.


In my first stab at this, I used the material_index to build the map, and it worked perfectly because the model I was testing against had the correct material slots. When I tested with the object used to create the error above the report showed an issue, but it was not the right issue.

The curved window section above will be featured in another post, one on mesh optimisation and the lower LOD models are not complete because they (deliberately) do not have the same materials, but of course they do all have index 0. It is not the index that counts it is the material inside and given that the materials are kept per object, we need to use the name, not the index.

Having corrected that bug, we now find that we can reproduce the error from the SL uploader in Blender but provide more information to the user at the same time.
As you can see here, we are still able to show that the High and Medium LOD models are using the same subset of materials but that the LOW and LOWEST are not, what is more, the LOW and LOWEST are in fact using a completely disjoint set of materials, as evidenced by the warning sign in the high and medium LODs.

This is a contrived example to some extent, this is a work in progress and I knew it would not upload but hopefully you can see how the tool has saved a round trip of export and upload. 

Another example

We have used a dome object I have built in the past in previous examples and so I will illustrate how the tool can quickly pin point a material issue and save time.

The first image shows the HIGH LOD model and the report is flagging up an issue with the "glassinner" material in the MEDIUM LOD.

Now we see that the MEDIUM model has the slot in place, so it is not simply that the material is not there. We have to drop into edit mode to uncover the truth. While we were deleting all the interior mesh that would never be visible from in the MEDIUM LOD range, we accidentally deleted all of the  "glassinner" and so it is no longer matching the parent. So we can now assign a single triangle in the mesh to this material and it will fix the problem.


One last note, in the final report here on the left,  the LOWEST LOD (denoted as X due to the L for LOW) is marked as - and not an error.

This is because we have not defined a LOWEST LOD model in Blender and it therefore assumes that you will be generating this upon upload and it does not need to worry about it. Therefore, exporting the HIGH, MED and LOW objects and then importing them wil not give us any material based errors.
I think that these tools are now starting to offer value and if a few people are interested in becoming beta testers for me then I would love to hear from you. Contact me inworld or through Google+ from this blog.

As always, if you find this interesting or think it would be useful to someone please +1, share, whatever else. A typical blog entry here gets about 20 hits, I'd love to reach more people but only if what I am writing is useful.

Love
Beq
x


Wednesday, 6 July 2016

Mesh accounting mayhem

Mesh accounting - Download/streaming costs

This post is the 4th in this series of posts about Blender Addons for SecondLife creation, and we (finally) get to sink our pythonic fangs into something concrete.

Previously...

Post 1 - We started to put a simple addon together to generate five copies of a selected Mesh and rename them according to their intended use.
Post 2 - We took it a step further by allowing the user to select which LOD to use as the source and which targets to produce.
Post 3 - We wrapped up the process, connecting the execute method of the operator to the new structures maintained from the UI.

So what next?

Tonight we are going to try (or at least start) to replicate the streaming cost calculation of SL in Blender.

A quick recap

For those who have not looked lately and are perhaps a little rusty on Mesh accounting here is the summary.
Firstly, I will use the term Mesh primitive to denote a single mesh object that cannot be decomposed (unlinked) in-world. It is possible to link Mesh Primitives together and to upload a multi-part mesh exported as multiple objects from a tool such as Blender.

The LI (Land Impact) of a Mesh primitive is defined as being the greater of three individual weights.
1) The streaming or download cost
2) The Physics cost
3) The server/script cost

Mathematically speaking if D is Download, P is physics and S is streaming then
LI = round(max(D,P,S)) 
Of these S is simplest and generally speaking least significant. It represented the server side load, things like script usage and essential resources on the server. At the time of upload, this is 0.5 for any given Mesh primitive; this means that the very lowest LI that a Mesh primitive can have is 0.5, and this rounds up to 1 in-world. Because the rounding is calculated for the entire link set,  two Mesh primitives of 0.5 each, can be linked to one another and still be 1LI (in fact three can because 1.5LI gets rounded down!).
Physics cost we will leave to another post,  much misunderstood and often misrepresented, it is an area for future discussion.
And so that leaves Streaming cost,
If you read my PrimPerfect (also here) articles on Mesh building in the past, you will know that the streaming cost is driven by the number of triangles in each LOD and the scale of the object.
LOD, or Level Of Detail, is the term used to describe the use of multiple different models to deal with close up viewing and far away viewing. The idea being that someone looking in your direction from half a region away does not want to download the enormous mesh definition of your beautifully detailed silver cutlery. Instead, objects decay with distance from the viewer. A small item such as a knife or fork will decay to nothing quite quickly, while a larger object such as a building can reasonably be expected to be seen from across the sim. Even with a large building,  the detailing of the windows, that lovely carving on the stone lintel on the front door, and so forth, are not going to be discernable so why pay the cost for them when a simpler model could be used instead? Taking both of these ideas together it is hopefully clear why scale and complexity are both significant factors in the LI calculation.


The highest LOD model is only visible from relatively close up. The Medium LOD from further away, then the low and the lowest. Because the lowest LOD can be seen from anywhere and everywhere the cost of every triangle in it is very high. If you want a highly detailed crystal vase that will be "seen" from the other side of the sim, then you can do so, but you will pay an extremely high price for it.

The way that most of us see the streaming cost is through the upload dialogue. Each LOD model can be loaded or generated from the next higher level. One rule is that each lower LOD level must have the same or fewer triangles than the level above it.

When I am working in Blender, I export my Mesh files, drop into the upload dialogue and see what it would cost me in LI. I then go back and tweak things, etc, etc. Far from the ideal workflow.

One of my primary goals in starting this process was to be able to replicate that stage in Blender itself. It can't be that hard now, can it?

..Sadly, nothing is ever quite as easy as it seems, as we will find out.

To get us started, we need to get a few helper functions in place to get the Blender equivalent functions.

We will need to know the dimensions of the object and the triangle count of each LOD Model.
This is why we wanted a simple way to link models that are related so that we can now do calculations across the set.


def get_radius_of_object(object):
    bb = object.bound_box
    return (Vector(bb[6]) - Vector(bb[0])).length / 2.0

The function above is simple enough, I do not like the magic numbers (0 and 6) and if there is a more semantic way to describe them I would love to hear of it, but they represent two extreme corners of the bounding box and the vector between them is therefore 2* the radius of a sphere that would encompass the object.

def GetTrianglesSingleObject(object):
    mesh = object.data
    tri_count = 0
    for poly in mesh.polygons:
        tris_from_poly = len(poly.vertices) - 2
        if tris_from_poly > 0:
            tri_count += tris_from_poly
    return tri_count

The function here can (as the name suggests) be used to count the triangles in any object,
At first thought, you might think that, with triangles being the base of much modelling, there would be a simple method call that returned the number of triangles, alas no. In Blender, we have triangles, and quads and ngons, A mesh is not normally reduced to triangles until the late stages of modelling (if at all) to maintain edge flow and improve the editing experience. Digital Tutor have an excellent article on why Quads are preferred.

The definitive way to do this is to convert a copy of the mesh into triangles using Blenders triangulate function, but we want this to work in realtime, and the overhead of doing this would be phenomenal. The method I settled on was a mathematical one. The Mesh data structure in Blender maintains a list of polygons. Each Polygon, in turn, has a list of vertices. We can, therefore, iterate over the polygon list and count the number of vertices in each poly. For each polygon, we need to determine the number of triangles it will decompose in to. A three-sided is a single triangle, of course, A four-sided polygon, a quad, decomposes, ideally, into two triangles, a five-sided poly gives us a minimum of three. The pattern is clear. For a polygon with N sides, the optimal number of triangles is N-2. What is less clear to me is whether there are cases that I am ignoring here. There are many types of mesh some more complex than others. If there are cases where certain types of geometry produce no conformant polygons, then this function will not get the correct answer. For now, however, we will be content with it and see how it compares to the Second Life uploader's count.

Armed with these helper functions, and the work we did previously, we can now add the counts that we need to a new Blender UI panel as follows.

So let's see if this compares well with the Second Life Mesh uploader.

Spot on. So far so good. Enough for one night, tomorrow we'll take a deeper dive into the streaming cost calculation.

Beq
x

Thursday, 20 February 2014

So what are the laws of Physics?

I've been reworking the Mansard Roof on Maison Horta in Mesh. It is currently a sculptie created a year or two back using Sculpt Studio. The challenge is to get the LI low and have a reliable physics profile and resilent LOD. Nothing new there.

Sculpted mansard with sculpted stone dormas
 I detached the dorma and made a prim model using simple wedges for the most part. The final model being 13 prims with 5 distinct texture faces. I generated the Mesh using Mesh Studio and then switched to Blender. 

The Mesh Studio model

I knew that some of my joints were inaccurate, this was in part my sloppiness and in part lack of precision in the shear and taper options. Blenders remove doubles command allows you to merge vertices that are in close proximity and when used sensibly can tighten up all those poor joins.
Blender model - perspective makes the angles look wrong.

The Blender model can be further optimised, by hand editing we can eliminate unnecessary vertices that lie on un-attached edges (such as the top edge) and their associated geometry, the aim as always is to look for new ways to divide up the shape into triangles. Even now there are a few more savings that could be made but I prefer in this case to avoid long thin triangles.
Optimised by hand.
For medium LOD I can use my intimate knowledge of the use of the item to make firm decisions. The interior will never be visible from far enough away to drop to medium LOD, therefore I can cull all the interior faces. I make sure to keep a triangle with the correct material assigned though to ensure we comply with the basic Rule of SL Mesh that all LODs must share the same materials.

For Low LOD, I am going to use the same model as Medium. This will push up my streaming cost but so long as I stay under 1.5 I will be happy, and it will ensure that the house remains good looking for those spectacular New Babbage roofline shots that people love.

And so... physics. The point of this blog. In second life the laws of physics or not so predicatble as those in in real life. I've noticed this in the past but rarely taken the time to explore much. You may have noticed that when you import a Mesh the calculated physics cost in the upload dialogue is close to useless and this is true of both TPV and Lab viewers.

So how do we get the correct balance of physics shape to physics cost?

Given that my next article in Prim Perfect will need to examine physics, I decided to experiment. The first and simplest task was to use the model itself. In this instance it is actually a pretty simple Mesh so we'll see what happens.

Firstly, we specify the model as before and then for physics we select "Use HIGH". We will not touch analyse. As you can see the uploader predicts a physics cost of 0.440. Brilliant. All good then.

Using High LOD model, No analysis.

But when we get it onto the grid and rez it what we find is a different story...
The physics cost is not 0.44, it is nothing even close to that. The physics cost has rocketed to 1.4. It all works nicely though. But perhaps if we were to use the analyze function we'd get better results. maybe that elusive 0.44.

In the screenshot below we see the upload screen. This time we have selected the Analyse option. We are using the Solid method as in general this is best for block builds (use surface for curved builds). In pracatice you can try the 3 methods and see whcih gives the best (simplest) physics that looks right.
The analyse function has returned and told us that the physics mesh has be decomposed into 6 hulls. That seems plausible so we can accept that and go ahead with the import.
another aspect to note however. The Analyse function has pushed our import cost up. It is now going to cost us 13 Lindens whereas before we only paid 11. What is going on?

So now we have imported the mesh with our highly analysed decomposition, surely we must get better results in world....Errr no.

This is odd. We have used the self same mesh and rather than letting the system make some estimate (using an as yet unknown methodology) we have let the Havok system break up the mesh we provided into the most optimal collision shapes it can. The result, our physics cost has rocketted from 1.4 to 2.6 taking our overall LI from a rounded down 1 to a rounded up 3.

If a non-analysed collision mesh can be much lower (in some cases) how does that occur?  you might be tempted to think that the non-analysed collision mesh is inferior. Well it does not seem to be. I can happily walk back and forth through the gaps. But when we take a look at the Metadata view of the physics we see something very peculiar indeed.

Analysed Mesh with physics shape in blue
First, let's look at the physics model generated for the analysed mesh. A nice tight fit, and near perfect match to our physics template. This may be overkill for out needs but we'll come to that later.

Sure enough we can walk through the doors and if we walk into the wall we will slowly climb the slope or walk on the spot on the flat side.
 No surprises at all, physics mesh doing exactly what we expect, and a good job too given how much we are paying for it in LI.

Now, let's take a look at the physics metadata for the non-analysed physics.


Non-analysed mesh with physics in blue
Wait a minute, that's not what we asked for, that's not what we are observing either.
The physics shape revealed by the "render meta-data" option in the viewer is showing us what appears to be a default convex hull. But that cannot be right. I can walk through the doors and collide with the walls with the accuracy of the analysed mesh above, and yet the viewer is telling me that the physics shape does not even know about the doors.

Is this a viewer bug? I have not tried the Lab viewer yet.

trying to walk through with "convex hull" physics
The last couple of images show the difference in behaviour of the same object. Firstly with "convex hull", secondly with "prim". as you can see, with "prim" I can walk through the gap. This is not news... However, the physics shape is the same in both cases, you can clearly see that I am standing "inside" the supposed physics shape

walking through the same model but using "non-analysed" prim physics.