Showing posts with label fps. Show all posts

Thursday, 21 April 2022

How to manage your FPS for events

 Fantasy Faire is back, so how can we optimise our experience?


Fantasy Faire is one of the most popular annual events on the grid. Featuring stunningly beautiful regions packed with retail delights, alongside art and entertainment events it also draws massive crowds. This heady concoction does not bode well for frame rates. In this blog, I'll go over a few tricks that we can use to improve our performance and enjoyment.

The challenge posed by the Faire is manyfold, we want the best of everything, we want to see the scenery at its best and unlike more mundane shopping events, you often want to see other people. "Watching the Faire folk" is a spectator sport frequently enjoyed by Fairegoers. Observing the visitors in their fun avatars and outfits is as much a part of the Faire as shopping and supporting the charity is. So while, for a typical shopping event, I might suggest disabling avatars entirely or using the "Show Friends Only" function, for the Faire we want to keep as many people visible as possible.

At the same time, we have all these gorgeous worlds that have been built (I can say that without reservation this year as I have taken a year off ;-) ) This means that we want to keep as many features enabled as possible. A perfect storm for lag, and a conundrum for us.

Step 1: Getting yourself ready...

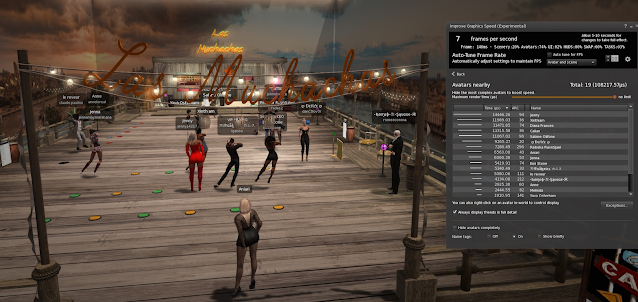
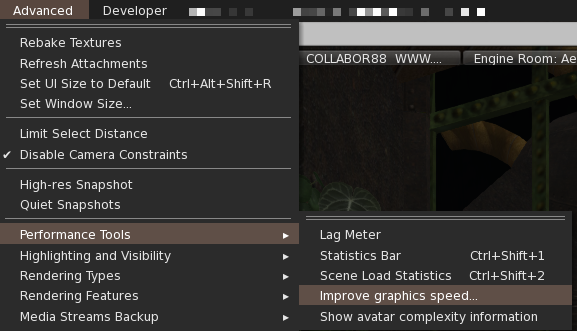
During this blog we'll come back to the new performance floater a number of times so take a moment to locate it. You can find it on the "World" menu, it is also on the "Advanced" menu, as a sub-menu of the "Performance tools", in both cases it is listed under "Improve Graphics Speed". You can also add it to any of your toolbars by opening the Toolbar window (right-click on any toolbar and select "Toolbar buttons...", then pick the "Graphics Speed" button and drag it to the toolbar you want it on. 


While we are looking at the floater, take a moment to note the top few lines. The FPS needs no explanation really, but the summary line below that is going to help us.  The frametime is how long each frame is taking. It should be approximately 1000 divided my the FPS and is measured in milliseconds (a millisecond is 1/1000th of a second). 

Look at the UI number. Notice that if you have chat windows and inventory windows open, then you can increase your FPS by closing them, even minimising them will help.

HUDs on the other hand are misleadingly low impact on the FPS. For the most part, they have a comparatively low direct, measurable impact, but if you have your gorgeous, texture heavy HUDs that come with your head and your body, or any other glossy looking HUDs, then remember that those textures are taking up space in your computer's memory and that of your graphics card. This means less space for everything else and it increases the amount of "shuffling around" that has to happen. 

As such best practice is to remove all the HUDs that you can; this also has the benefit of reducing the script load on the regions that are already heavily taxed managing countless vendors and other scripts.

Use Firestorm's "favourite wearables" capability to get quick and easy access to those HUDs you need on a more frequent basis. e,g, I keep my SLink HUDs, My Lelutka head HUDs and my AO and others all there for quick access. 
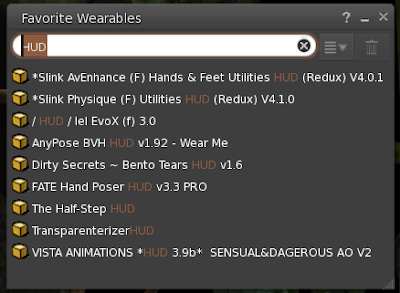


You can also hide all HUDs using "Alt-shift-H", though keep in mind that this does not stop their scripts which will be adding to the server load.

Step 2: Set a good example and de-lag yourself.

Before we depart for the Faire, we should do as we would like others to do and reduce our impact on their  Faire experience. This means reviewing our outfit(s) 

Tip #1 - Try a new look and ditch that laggy body for your visit.

Leave your Maitreya/Legacy/eBody/Signature bodies off until you need them and try a fun fantasy look for a change. Thsi will make you less of a burden on other shoppers in the crowds.

Alpha segmented bodies are a disaster for frame times. Pick a low impact body and why not use the occasion to get in theme. Many fantasy avatars have a very small performance impact by comparison.

By way of example, here is my normal Avatar, which already uses a low lag SLink Redux body, switching to the fun paperfriends steampunk avatar I bought at the Faire last year.
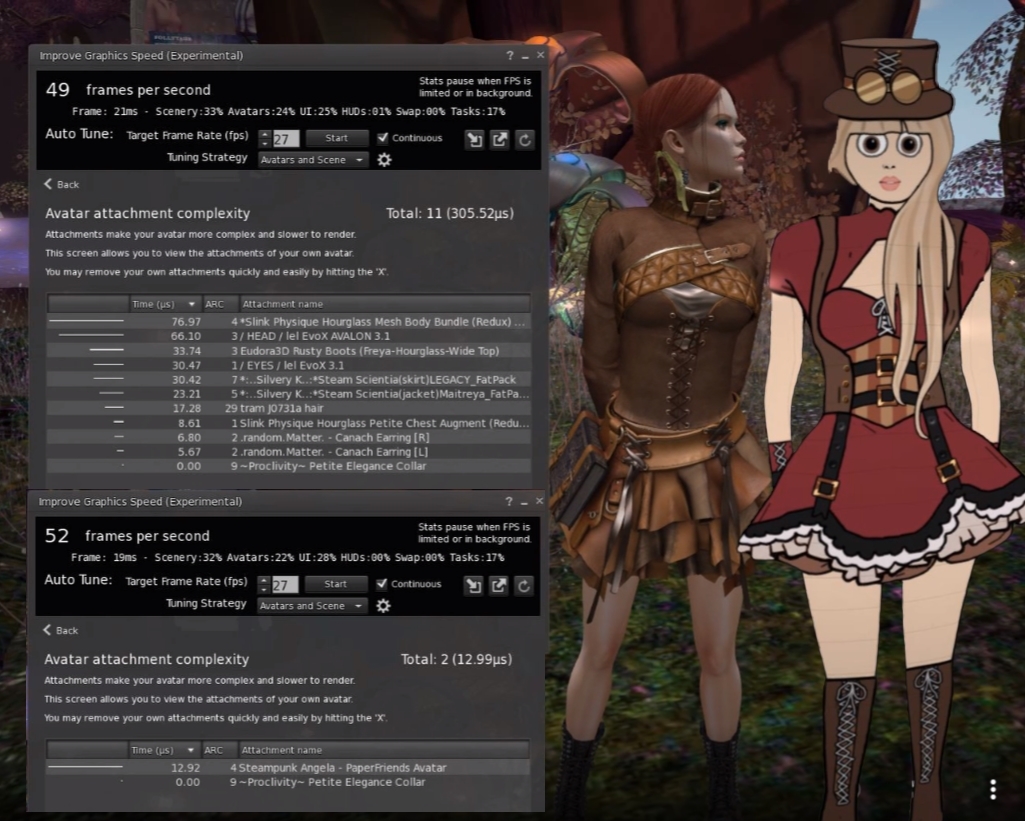

https://gyazo.com/b1f55c19a6f279a285e4d7548ecdd99d

Even though my SLink body is about 1/8th the render time of a typical "popular" body, this fun foldable me takes just 15 microseconds to render, which means I could have 20+ of these avatars around me for less than the cost of a single eBody reborn. 

But, it's not just these extreme low lag avatars; here is a friend demonstrating that size does not matter. This enormous dragon avatar is a fraction of the cost of her regular body choice.
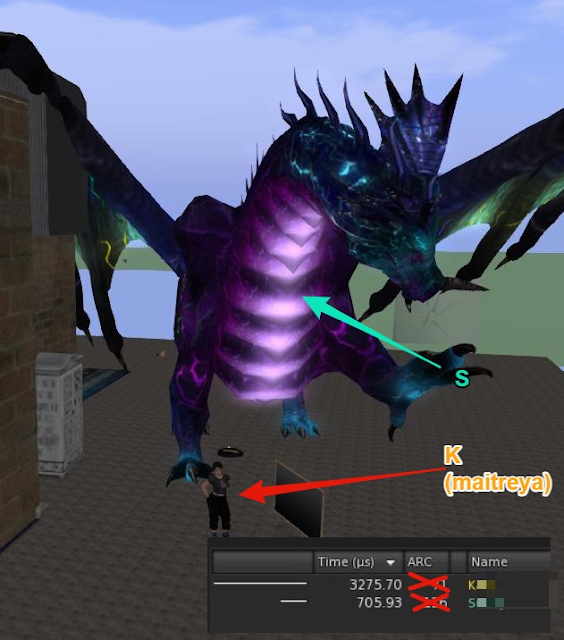

Tip #2 - Use the outfits function in the viewer to set up one or more appearances. 

"But I want to shop for my normal body" I hear you cry. 

If your typical avatar appearance includes one of the popular but very laggy mesh bodies then consider creating an outfit for this, and one for the low lag fantasy avatars, this will allow you to switch whenever you are trying on your purchases. 

Be realistic but be considerate too. Nobody is expecting everyone to just suddenly stop using these poor performing bodies overnight; we're all too attached (no pun intended) to our wardrobes and bodies and we all want to show off our new purchases, but take a moment to review your own render times and if you get the chance, switch to the low lag options and have some unencumbered fun.

Tip #3  - Ignore ARC - it is misleading, wrong and counter-productive.

When assembling your outfits for the event, ignore the ARC and push aside your preconceptions.

The dragon image above is a great example. The Mesh body is 5 times slower to render than the entire dragon, yet the ARC would have you thinking something else. The ARC is just wrong, it is based upon outdated and incorrect assumptions.
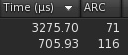

So if ARC is bad then what do we use? 

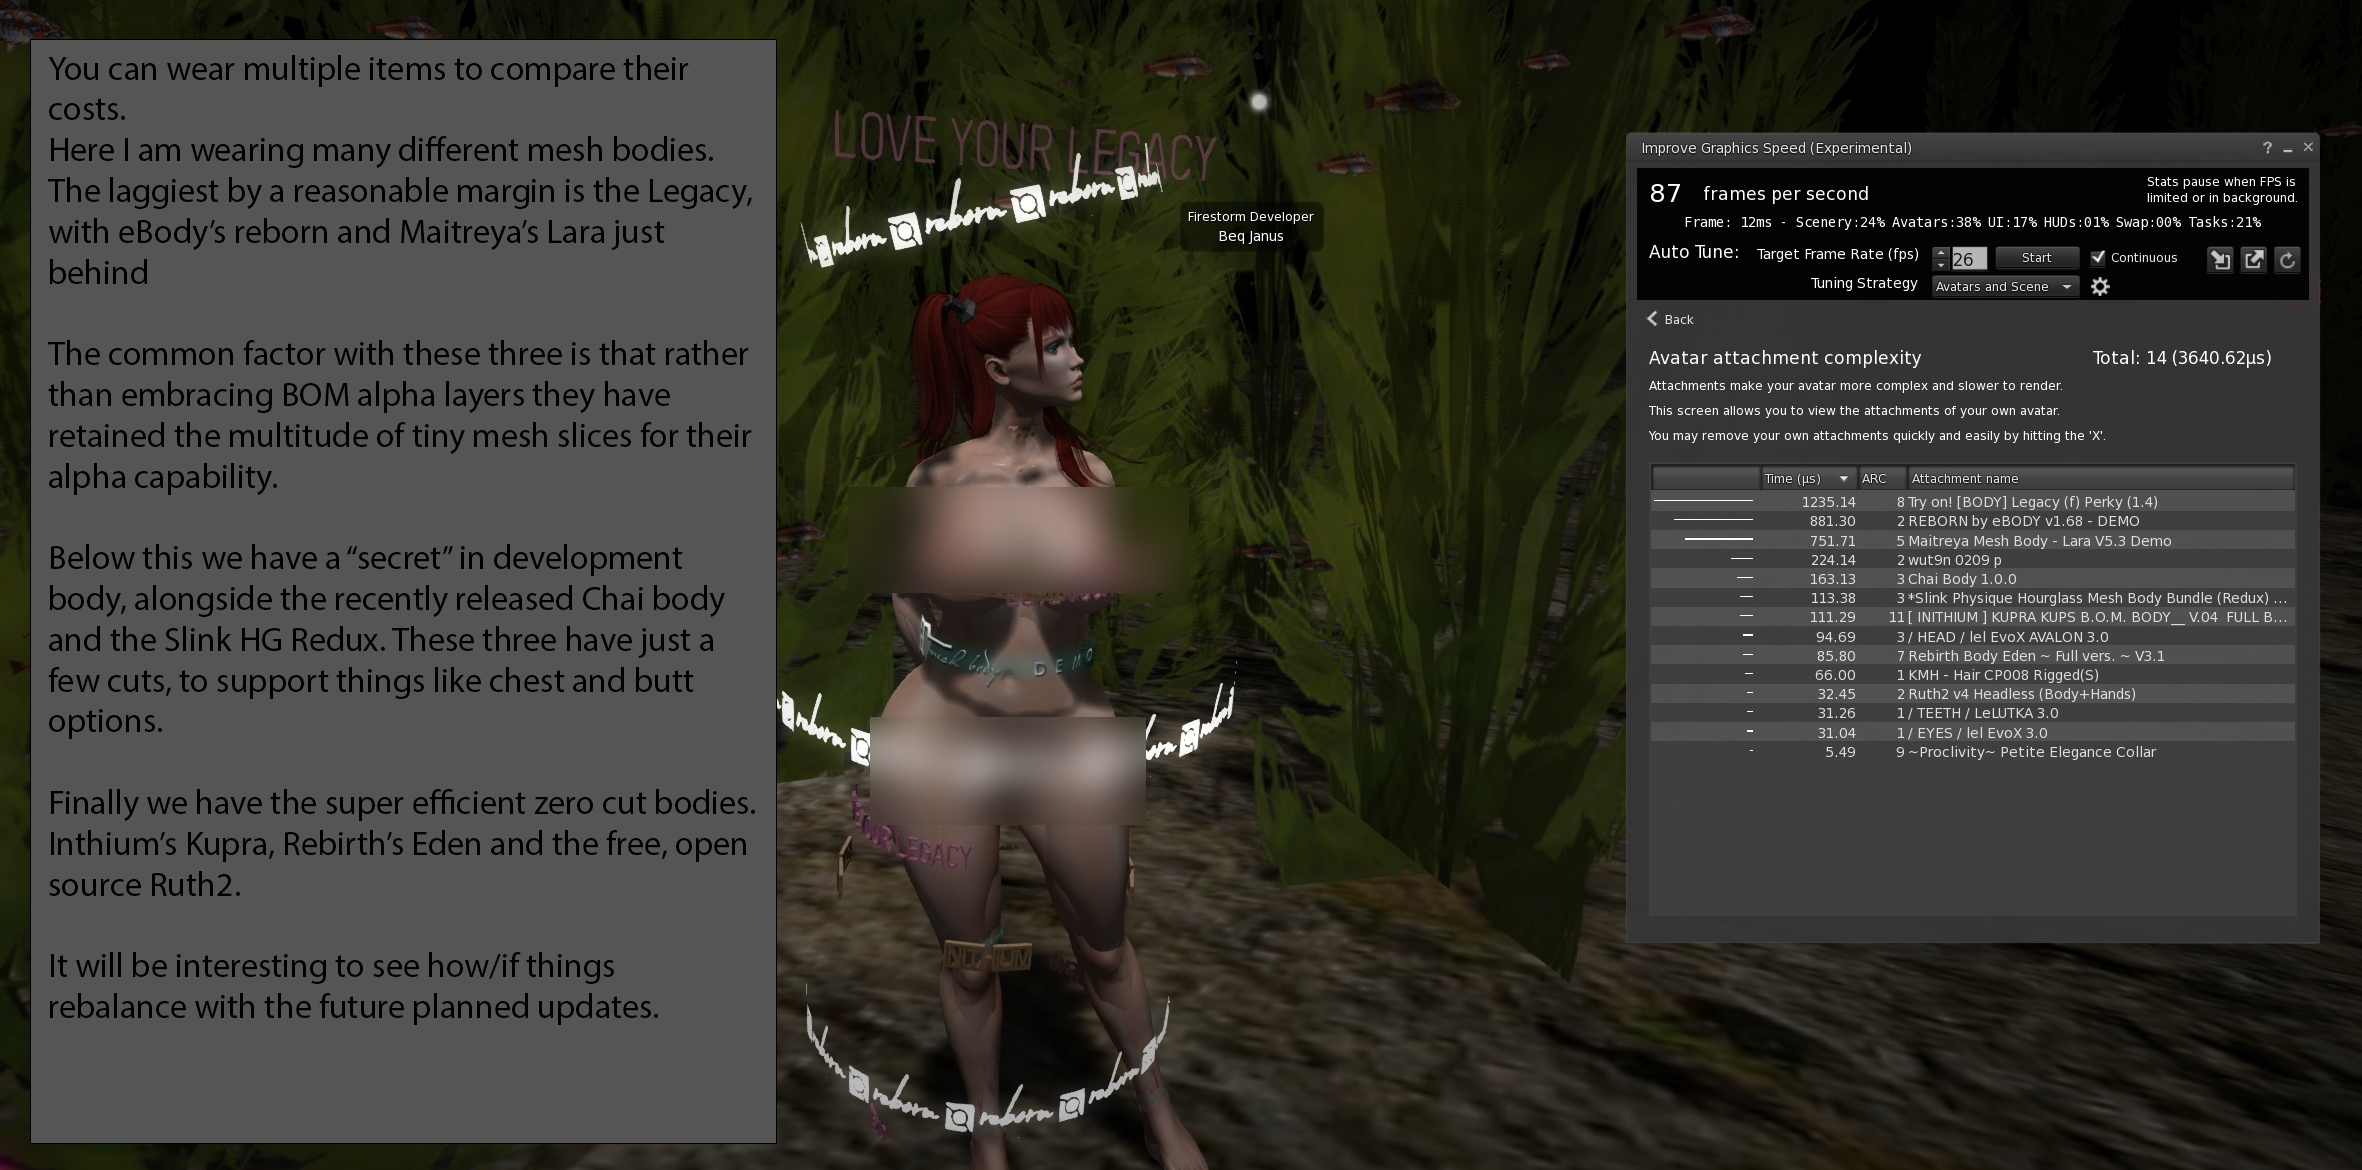
With the latest Firestorm, we have provided a better tool to assess your true impact. The render time, we'll use this to determine which of our attachments are causing the most lag and we can decided to keep them or swap them.

Focus your camera on yourself so that the viewer is showing your avatar, something similar to the photos of me above; then use the "attachments view" of the performance floater to see which of your attachments is the slowest to draw. Try variations, especially with hair, and see how things perform. You may be surprised. As a rule, the worst offenders are typically your body or your hair, or both.

Tip #4 - Make the best of a bad thing

If you are using a segmented mesh body like Maitreya/Legacy/eBody etc. use the HUD to turn off as much of the body as possible; anything that is covered over should be disabled, auto alpha often does a good job but see if you can get rid of more. Every segment that you can set to invisible is a boost in performance for everyone looking at you.

If you are tempted to wear particles, don't, just don't; remove them immediately. They are a considerable burden to rendering. They won't, however, show up in the stats on the current version of the tool as I had no isolated worn particles from those inworld. while you will not see the item render time change, you will see the FPS drop.

You might want to turn down the max particles setting in the graphics preferences too, but don;t for get that particles are often used for effects in the regions.

OK! We've optimised ourselves. We are now ready to go. 

Step 3: Quality vs Speed, the managing the balancing act. - Global settings and Scenery

There are some decisions we need to make, we may want things to look their best, and we may want things to run their fastest. Typically we need to find a middle ground that we're happy with. 

Your choices in the next few steps will be dictated by your hardware/network and your personal preferences.

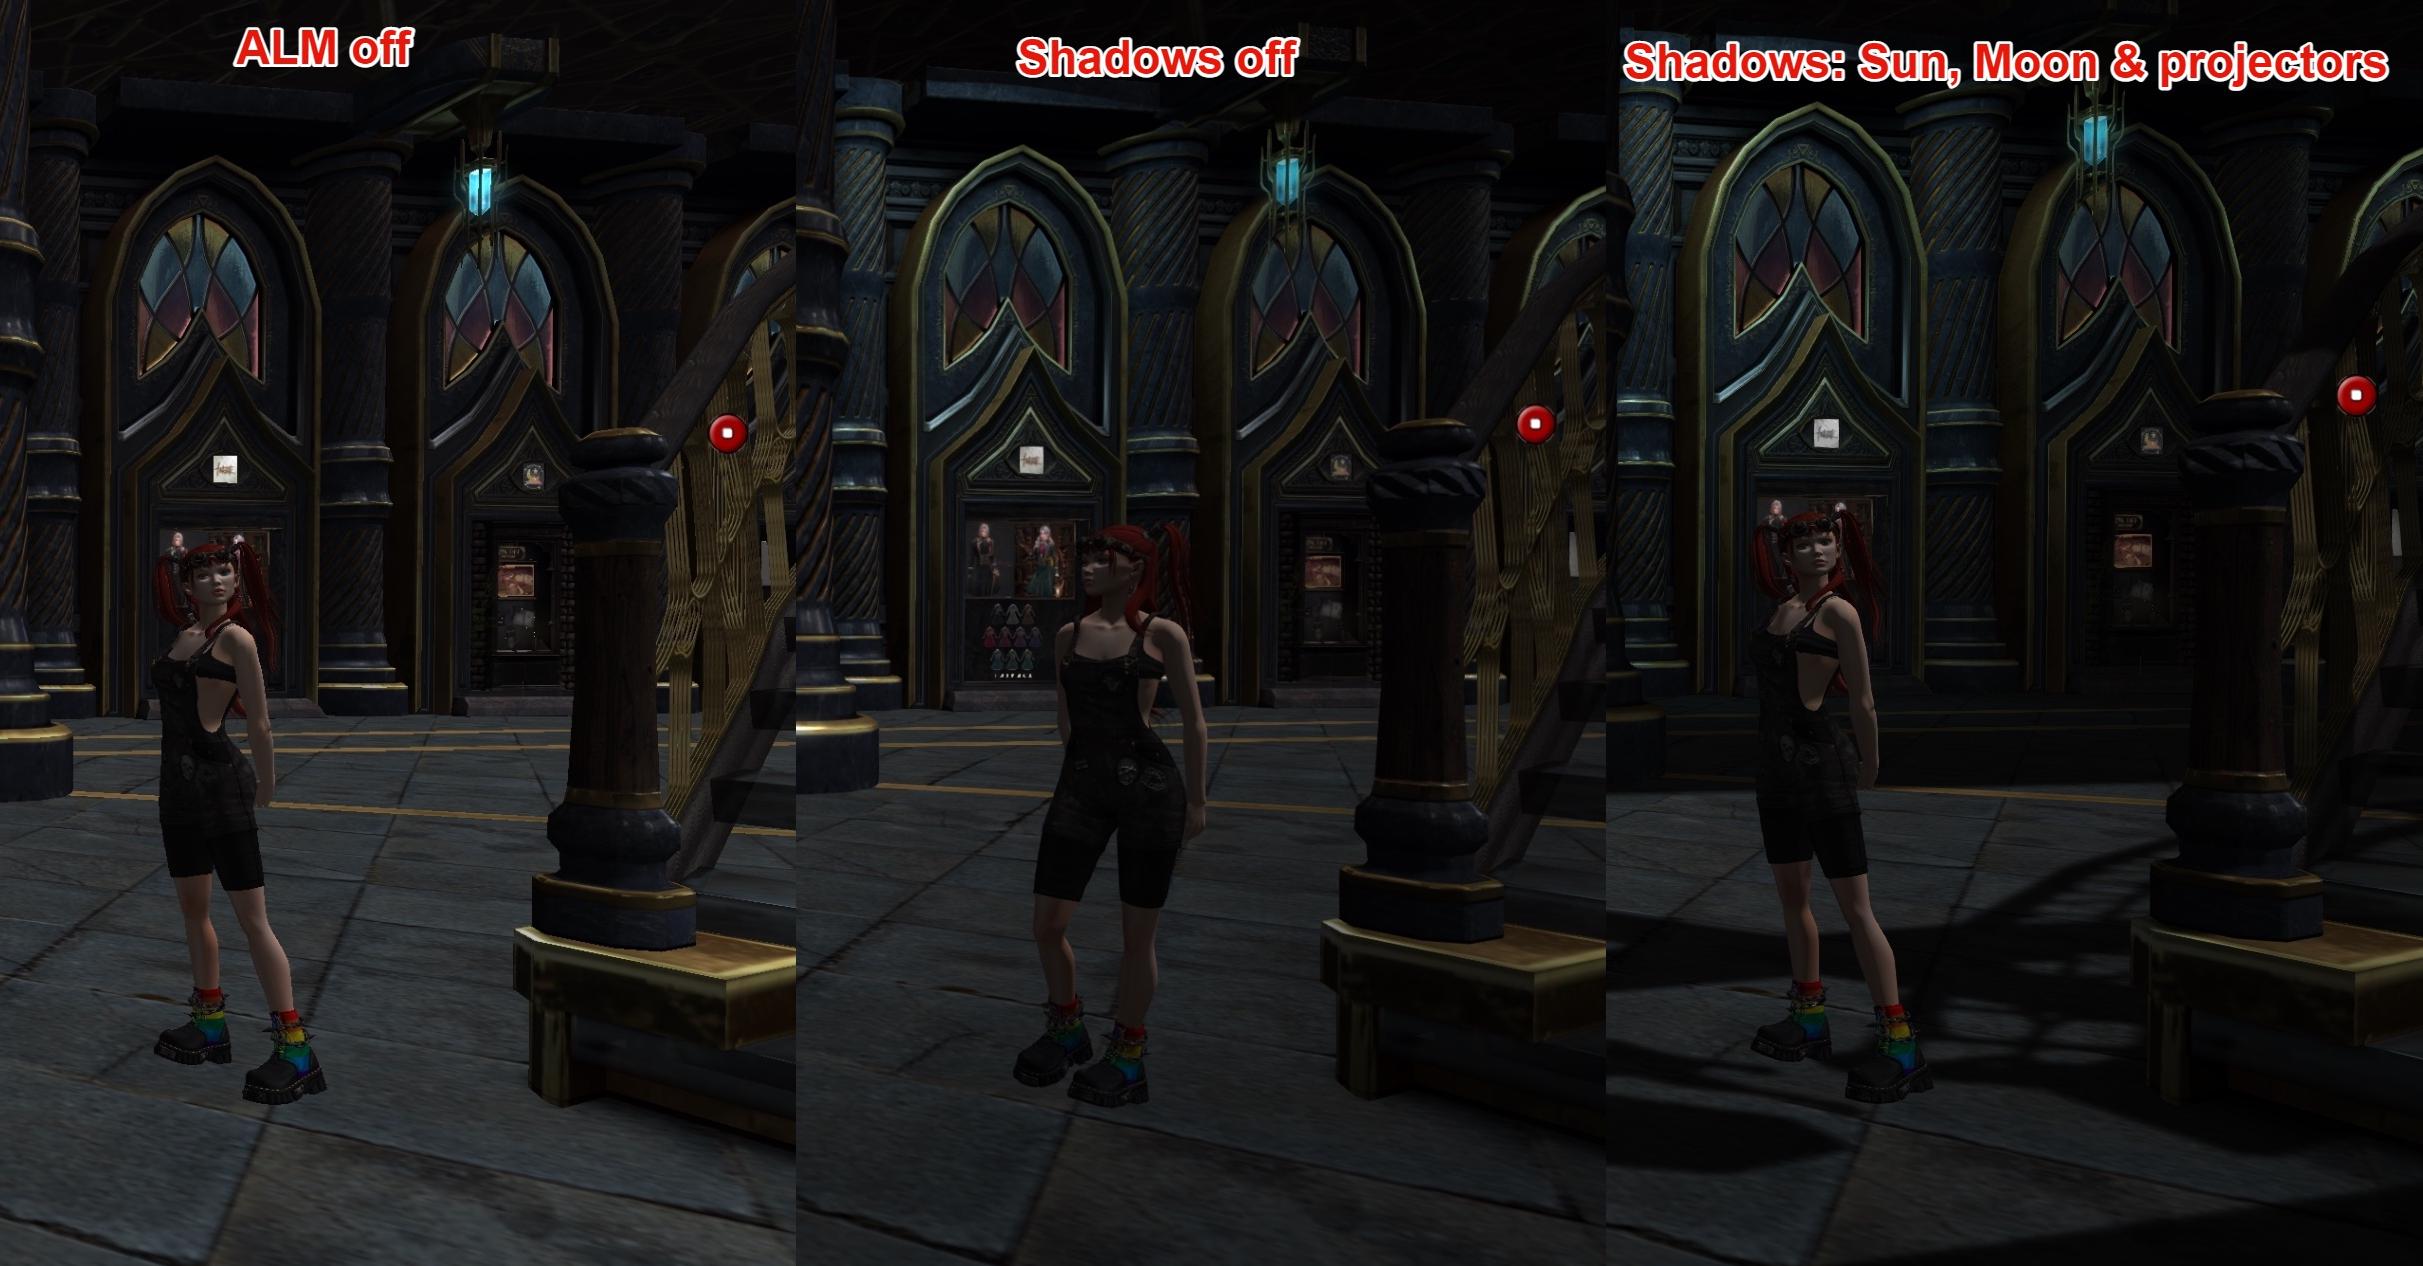
For the best looking experience, you want to ensure ALM is on, Shadows are enabled and Water reflections are set to their highest quality. These come at a high cost though. The next few paragraphs will explain more.

ALM (Advanced Lighting Model) aka deferred rendering.

For many people, turning on ALM should have a minimal impact on their FPS, for some ALM may even boost performance. This is because more processing can be moved away from the CPU and onto the graphics card. When testing this, ensure you are not mixing up ALM with shadows. Turn off shadows if they are on, by setting them to "None" in the preferences/graphics panel. Let your FPS stabilise and make a note of it, then turn off Advanced Lighting, wait and let things settle again. 

If toggling ALM off and on is having minimal impact on your FPS then I would strongly advise you to leave it on. It is very hard to see the regions as the designers envisaged with ALM turned off.

People who may wish to keep ALM off are those with limited RAM (I would suggest anything less that 8GB is considered limited) and those with slow or metered internet connections.

Shadows

 A lot of people think disabling ALM gives them a massive performance boost, often though this is simply because doing so also kills shadows. Shadows are a major source of render time, they are also, of course, a major aspect of good lighting and atmosphere. Rendering shadows requires that every object gets drawn from the perspective of the sun and other lights, this overhead means that shadows at least double or even triple the amount of time it takes to draw a scene. 

Keeping shadows on or off can depend on what your objective is. If you want nice photos then shadows are imperative, if you just want to experience the region as the designer intended then, again, you need the shadows. However, some lighting doesn't cast distinctive shadows and yet the effort to draw them is the same so consider creating a graphics preset with shadows and without so that you can quickly switch back and forth.

Water reflections

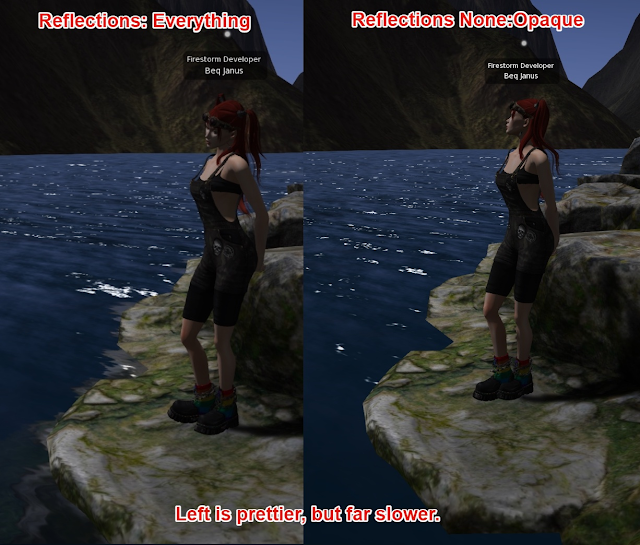
Water in SL looks lovely when all the full reflections and refractions are being drawn, but for technical reasons, even when you cannot see the water all those little ripples and highlights are still being drawn.

The ripples and reflections mean that every object that might possibly be reflected is redrawn, the more detailed and cluttered the region (meaning the more "stuff" there is) the more work is being done for the water, even if you cannot see the results of that work. 

If you are in a region where the water is not visible, or if you do not care too much about the quality of the water, then set Water reflections to None:Opaque. 

In general, it is worth taking a moment to use the performance floater and experiment with different settings to see the impact. In my experience, there is little to no performance difference between the top-level water reflections and the so-called "minimal", however, it does depend on how much "stuff" is around. Slipping all the way down to "None:Opaque" will grant you a significant FPS boost. 

Create a preset with good reflections and no reflections so you can switch easily.

Step 4: Quality and Quantity

If the above three options are all about quality of rendering then the defining factor is the number of objects that the viewer is having to draw. 

Draw Distance

The next tool we have is one we are all probably aware of, the Draw Distance. Draw Distance limits how far ahead we can see. Inside a city scene we can often afford to relax and shorten that distance while in the countryside, or out on the open plains we need to see further. By selecting a sensible DD we limit the amount of "stuff" that the viewer has to deal with this can have a dramatic effect in a busy scene.

Max non-imposters.

Whilst this is technically an avatar setting and we'll talk more about those shortly, it behaves similarly to DrawDistance. When we are in a crowd we can limit the number of avatars that are being drawn at full detail using this setting, but what people often do not realise is that the viewer draws the closest Avatars first. Thus if we set the max NonImpostors to 10, the viewer will draw the ten closest avatars in all their glory but use the imposters (flat cutouts) for those further away. With Imposters being carefully managed you can often improve scene rendering times considerably when things get crowded.

We have now covered the major settings that have a direct impact on the quality/speed balance.

Play with these settings and create yourself a set of graphics presets that you can switch between as best suits the region you are in, and the activity you are enjoying.

Step 5: Friends, family, strangers and lag

At the top of this blog, we walked through choices that we might make to optimise our appearance. Some of you will have followed them; others will have resolutely refused to reconsider your choices :-)

Irrespective of your decisions, we will find many others that have chosen to stay as they were or *shockingly* have not even read this blog ... I know, it's hard to believe, right?

We've made the best choices we can about our scenery; what can we do to protect ourselves against laggy crowds?

We have been trained (erroneously) to use complexity to limit those we render. Complexity still has a role in blocking the extremely slow, but as we observed before, using ARC for any purpose has far too many false alarms and makes people take the wrong decisions.

With the newest Firestorm, we now have render time. I've discussed the background to Render time in earlier blogs, but what we can do now is use render time to automatically force laggy avatars to behave better.

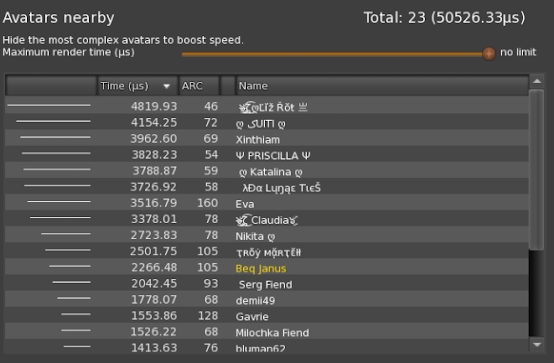
On the Avatars nearby tab, we see the Maximum render time slider. You can use this to manually set a cutoff. What this value should be will depend on your hardware. You can get an idea by going to a club, an event or a busy store and seeing how long typical avatars take to render. 

The render time limit allows the viewer to take some avatar specific actions. If your machine is capable enough and you decided to render shadows in the early sections, you'll find that avatars have a massive impact on your FPS because every avatar takes up to 3 times longer to draw than it would without a shadow. Using the render time limit, we can set the threshold so those complex and slow avatars (yes, those with the segmented bodies, did I mention them yet?) have their shadows unilaterally disabled, allowing you to still render them fully, but without the shadows, a much better visual option than the horrible grey mess of a jelly doll. 

If an avatar exceeds your threshold once its shadows have been disabled, the viewer will create an impostor image. Unlike the JellyDolls, this impostor is typically fully detailed and, from a distance, looks relatively normal. The most noticeable effect is that they will animate far slower, and if you get up close, they will look pixelated.

Use the limit carefully, and remember to set it back to high/unlimited when you want because (in this initial release of the feature, I have not included a simple reset button (it's on the TODO list)

While there is no magic wand that I can wave to make things run faster, and in the end, your machine can only do so much, following these tips will help you understand the impact things have and how you can limit and control them. 

Final words - Autotune and defaults.

In closing, I should mention the AutoTune feature. 

The new Autotune capability of Firestorm is my first attempt to bring some degree of automation to the settings discussed above. Based upon the scene and the target FPS that you ask it to achieve it will tune things such as the water reflections, the draw distance, and the avatar render time. It was specifically designed with crowded events in mind, and it will aim to keep the visual quality of the scene as high as possible using just the controls we have discussed here.

It has been working very well for many people, but for a few, it can be frustrating and a little disconcerting to have their settings changing as they walk around. You'll need to make your own choices. 

If all else fails and you end up with graphics settings that seem confused or broken, simply ensure that autotune is disabled, and click the "reset to defaults" button on the performance floater. 

Have fun; I hope this helps you get a little more out of your machine and a less laggy Fairelands experience.

Monday, 21 March 2022

How to use the new Firestorm Performance Floater and Autotune feature

New Firestorm, new features 

The latest Firestorm release has a new feature (albeit one that I still consider experimental), the "performance floater". In recent blog posts, I've explained  why I created this, in earlier blogs and most recently, in "Upgraders of the lost ARC" I explained a bit about what it does. This post is all about "How to use Performance Floater". 

Bundled with the Performance Floater is the Autotune FPS feature, I'll also explain how this works, and how to best avoid getting yourself into a muddle with it.


For a more concise, and probably more readable summary of these two features please refer to Inara Pey's excellent write up, and you can also click on the '?' icon at the top of the floater to go immediately to the Firestorm wiki page, dedicated to this function, which will be maintained and updated as the feature develops.

What does Performance Floater do for me?

The Performance Floater shows you in real-time what parts of the scene are taking the most time, and slowing down your graphics. In particular, this first release focuses on avatars and allows you to see which avatars are truly lagging you; it also allows you to examine your own attachments to see how they perform.

Ok so what about Autotune?

Autotune is a first look at our attempt to allow the viewer to automatically manage some of your settings to attempt to give you the performance level that you request and keep you there.
Keep in mind, that 

Performance Floater best practices.

Initially, we will ignore Autotune and look instead at manual tuning and how the performance floater can help us.

Given that the motivation behind this feature was to highlight the damage that segmented bodies have done to SL performance, it will come as no surprise that it is most useful when applied in crowd scenes. I wanted to allow a finer-grained tuning experience that would allow you to enjoy a crowded club, or similar scene without having to de-render everyone and completely ruin the atmosphere. So how do we go about this?

Step by step - A quick guide.

Step 1 - Open the performance floater.

The first thing we need is information, it is hard to know whether you've improved anything without measuring before and after. To open the performance floater, we have a few options

Look for the "Improve graphics speed..." menu entry on either the World menu or on the Advanced->Performance tools menu.


It can also be added to your toolbars for quick access. Look for the Gauge icon on the tool pallette

Step 2 - Review the summary stats

We start with the overview panel, which tells us what our current Frame rate (Frames Per Second, aka FPS) is. You may also see a warning such as "User limited FPS" or "In Background", these are intended as a reminder that you are not getting the full potential because you have either deliberately limited the FPS or are "tabbed out" on another screen/application such as Discord/Chrome.

Below this is the summary data and the first clue as to what is happening to our FPS.


A more complete explanation of these numbers can be found here. What we can find here though is the first hint about what we need to do. 

Best practice - Start with the largest number as this is where the biggest gains can be made

If scenery is the largest number then we might start to think about whether our draw distance is too high etc. However, if we are sightseeing or taking photos, then we might want the scenery to be in full glorious detail. If we are shopping we want to see the goods on display, but don't really need to see the displays far away. Think about what it is you are aiming for. 

Most of the time you will find that either scenery, avatars or both are high. But occasionally we can find that the other numbers are worth a quick look. If the UI is more than a few percent then consider closing down unwanted chat windows and inventory, etc. If the "HUDs" costs are high, then you should remove as many as you can or simply hide them all using the "show HUD attachments" option on the Avatar menu (alt-shift-H on Windows). 

Best practice for general FPS health - Close unnecessary UI and remove (not minimise) HUDs 

Keep your UI windows closed and remove HUDs when not using them (the "favourite wearbles" feature is amazingly useful for this.)

"The scenery is killing my FPS"

In this first release, the amount of fine-grained tuning for scenery is very limited (I was focused more on the Lagatar problem). However, we provide quick access to a couple of the controls that make the biggest difference. 

Clicking on the graphics settings panel in the floater will take you to a subset of the preferences found on the main preferences panel. Here we can make wholesale changes to the quality of our graphics using the "Quality vs speed" slider, or tweak individual parameters. The main features exposed here are Draw distance, shadows and water reflections. Draw distance and water can be changed dynamically, and you can watch the impact. Changing shadows is slightly more disruptive as the viewer has to change how things are drawn and this causes a "pause", especially on slower machines.

Best practices for scenes - dumb down the water, shrink the draw distance, remove the shadows. 

In general, we want to keep the visual quality as high as we can, whilst still being able to move about. With this in mind, you need to pick and choose between the options.  Since EEP, water reflections and refraction have been a terrible burden (a fix is coming from LL, but it is not here yet), You can still have decent looking water, without reflections. Of course, the most obvious (but frequently overlooked is Draw Distance. It's simple really, drawing more "stuff" takes longer. reducing the draw distance shrinks the number of things that need to be considered by the viewer. In a club or shopping mall, shrink the DD to 64m and you'll be more nimble.

Water - If you are not near water, or do not care about water reflections then you should almost certainly switch water reflections to "None; opaque" this gives a big FPS boost whilst still leaving the water looking reasonably nice. For the biggest win, you can always fully disable water on the advanced menu, under rendering types. But don't forget to turn it back on.


Shadows -  The most visually disruptive change. I love to have shadows in a scene, but shadows will typically more than halve your FPS. So if you really need that extra boost then foregoing shadows is a good choice. Use the shadows setting on the floater or in the preferences. this is very useful if you are at a shopping event or club where the shadows are probably not that important.

Things not to do (probably) - Killing Advanced lighting - ALM. 


A lot of people automatically reach for the advanced lighting kill switch in preferences and proclaim the amazing boost they get. For many people, that boost is dominated by the fact that the shadows get disabled too. try turning off shadows only first. Disabling ALM can have detrimental effects on some machines as it prevents some GPU use, loading more on the CPU. However, if you are on a poor network, then ALM will reduce the bandwidth as materials will not be fetched.

OK, so that's the global scene dealt with.

"OMG the avatars are killing me"

When the statistics suggest that avatars are a significant amount of the frame time we can look at the avatars nearby and decide what to do.  It does not take many segmented avatar abominations to totally destroy your performance. Modern BOM bodies without the "alpha cuts" or segments are far more performant. So how can separate the good from the bad?


The bar graph on the left of this screen gives a quick visual indication of the costs. This was my favourite feature of the original Linden Lab design, though it was used to show ARC, which as you may have gathered from my other writing, is practically useless.

Along the top of this panel we have a slider, this controls the maximum time we will allow an avatar to take. On the screen above I have 23 avatars in the scene and they are taking a total of 50 milliseconds. Without going into a maths lesson this is a problem, a very large amount of time is being consumed. We can also see that the top 3 "offenders" (those avatars taking the longest) are a large chunk of that total. 

If we slide the slider from the right to the left the limit will decrease. In this example, I can set it somewhere around 3800, and any avatars above the limit will be "optimised".

The optimisation works at a fine-grained level that was not possible in the past. The first thing that we do is remove the shadows of the laggiest avatars, this will halve their render time. When this happens an 'S' will appear in the column between ARC and Name. The further you decrease the slider the more avatars will be affected. When an avatar has had their shadows removed and is still laggier than the limit you have set then we take the decision to force it into an Imposter. An 'I' will appear between the ARC and the name.

Imposters are not everybody's cup of tea, but in a crowded club, a few imposters can lift your FPS whilst still allowing a decent visual experience. Try it out and decide for yourself. Derendering is another option of course (not supported directly on this release but accessible on the people floater as usual), "Render friends only" is of course another choice but keep in mind that you cannot easily bring them back. If you don't want to see anyone at all (yourself included) then the check box at the bottom of the panel allows you to disable all avatars.


Best practices - go little by little, and don't forget to reset later!

The most common complaint during early testing was from people finding that they were seeing everyone as imposters. The slow animating, flat, low-resolution cutouts are great at a distance but not so nice up close. If you find you are seeing them everywhere then you probably forgot to reset your "Maximum render time" slider.

Things to remember: 

  1. Both this and Autotune change your settings. Use graphics presets to save and restore sane settings just in case.
  2. What you see is the cost of drawing this scene on your machine. Something not in view will show as very low cost. When looking at your attachments, make sure that your avatar is in view and not partially hidden.

Is it me? How can I be sure?

Your own avatar will appear in the list highlighted in yellow. Due to how the viewer works, it costs a little more to draw your own avatar than it does to draw others, so even if you are identically dressed to another avatar you will show more expensive on your screen (they will see themselves as more expensive too). 

However, you can check the cost of your own attachments by looking at the "Your avatar complexity" panel. This panel lists all of your non-HUD attachments and their costs. You can now see what is the most costly item you are wearing and decide if you can do better. You can also use this to compare the impact of different items, try on different hairstyles and see which ones are laggier. In the market for a new body? Grab the demos and wear them all, compare the performance as well as the looks before making your choice.

Can't Firestorm do all this for me? Auto tuning, the pros and cons.

Succesful Auto tuning requires a little restraint and some managing of your own expectations. 
There is nothing I can do to make your decade-old potato of a laptop, run at 50FPS in a sim packed with Mesh avatars. Not happening. However, Auto-tune can and will try to do the best it can for you. 

Basic Autotuning

When using Autotune we set a target FPS level and whether we want to adjust the avatars only or the avatars and the scenery. We can also decide if we want it to run continuously while we continue to enjoy ourselves or to run once and then stop.

Troubleshooting tip: why is my friend flat, pixelated and their animations slow?

If you unexpectedly see imposters everywhere then double-check that Autotune is not forcing your Render time limit too low. If so, turn off autotune and manually adjust the slider.


Autotune FPS - Best practice #1 start low. 

Consider this, you are at a club, surrounded by gyrating mesh bodies. Your FPS has dived to single digits, and not even high single digits, you just want to move around a bit but it is like wading through molasses. You can't really turn off all the avatars, because then you'll barge them all out of the way and spend the next half an hour apologising. 

Set the Autotune to something higher, but not too high, Try 12 FPS maybe? Once you have selected the target FPS, you can hit start. The target will be shown at the top of the floater, Starting as Yellow or Magenta, and hopefully turning green when we reach or exceed the target.

The Autotune will consider the factors and try to tune subtle things such as avatar shadows first. Then resorting to other measures. You'll see the Mac Render Time slider zipping to and fro. If you are too ambitious then the Autotune will try its hardest and perhaps overshoot, then undershoot and you'll be back and forth and not settling. Pick something comfortable and within reach and you'll find the experience more rewarding. 

Autotune FPS - Best practice #2 Avatars only or Avatars first?

By default, the tuning strategy will be set to "Avatars and Scene" this allows the engine to consider avatars first and then if it cannot get enough boost from the avatar tweaks then it will resort to scene wide changes. Which of these you want is very dependent upon where you are and what you are doing.

If you are wandering in a scenic region and there are a number of people around then you might select "avatars only" to ensure that you keep the scene at the settings you like but allow the engine to degrade the avatar quality of others as you walk around. 

Autotune FPS - Best practice #3 Experiment with autotune settings (but don't forget that you did)

The "gear" icon on the autotune panel takes you to advanced options. some of these are rather obscure and I won't explain them in detail here, but feel free to experiment. What is the worst that can happen? It will change your settings and everything will look weird. Use the Firestorm graphics preference save/load options to store a setting to return to should that happen.

Have fun, I hope that this feature helps.

Most of all I hope that through this new way of presenting the determining performance you not only be better able to manage your experience in SL but will learn more about the impact we all have on one another's Second Life. 

I hope to extend this feature with future releases and integrate it with the Linden Viewer so that a similar feature is available to everyone no matter what viewer they are using. What is more, the next few months should see some dramatic changes in the rendering performance going live in Second Life as Linden Lab has been working very hard on performance tuning. I hope to be able to adapt these tools to the "new normal", to provide more options and add more "intelligence" to the tuning.


Saturday, 11 September 2021

Why crowds cause lag, why "you" are to blame and how "we" can help fix it.

Everything is slow, and we're to blame...


OK, buckle up; this one is going to be a long one.....

We all know the deal, you go to a shopping event, and you wade through a tar pit of lag until you can click the "render friends only" button and remove all the avatars. 

More Avatars = More Lag

Why do avatars cause so much load?

If you look through the blogs and forums, you'll find that there is much conjecture over the causes, and you can easily find an "expert" who'll explain to you the problem of onion skin meshes, triangle counts, poor LODs, and invisible duplicate meshes to name but the most common. 

As with many myths and pseudo-scientific speculation, there is an air of plausibility, and often enough, a grain of truth. However, while many of these may contribute to lag, the hard experimental evidence points to something so large that it eclipses them all.

We'll examine each of these "usual suspects" as an appendix at the end of this post. For now, let's cut to the chase.

The number one cause of lag is...Alpha cuts

Alpha cuts? You know that nice little convenience feature, the one that lets you hide parts of your body? The ones where over the years, people have nagged and pushed for more and more detail in the alpha slices. Every one of those little areas is a "submesh", and (as I'll explain) these are the number one cause of avatar-induced lag without any shadow of a doubt. Until BOM, of course, it was not a convenience feature; it was the only way to alpha a mesh body. A requirement because of a shortcoming that dates back to the first use of mesh bodies. But these days, we have BOM, and for the majority of uses, this same alpha effect can be accomplished with more precision and far more efficiently using an alpha layer.


Why are these specifically such a problem?

Every mesh object in SL is made up of one or more "submeshes". Each submesh represents a texture face on that model (allowing it to be coloured, textured, or made invisible independently from the rest.)

A mesh object can have at most 8 texture faces (submeshes); after that, if we need more independent faces, we have to add another object and start to add faces to that, repeating until we are done. 

In the viewer rendering pipeline, every submesh results in a separate package of data (known as a drawcall) being sent to the GPU (this parcel of goodies gets unwrapped by the GPU and used to draw part of the final image that will appear on your screen).

This is important because "drawcalls" have a substantial overhead. You can picture it like this.

We have a production line in our living room, making little sets of triangles and sending them off to our client (the GPU). We cheerfully pack triangles into a box, along with all the necessary paint and decorations needed to make them look pretty, wrap them up securely, put a bow on top, walk to the post box, and pop the box in the mail to the GPU. 

How long does this take us?

If we break this process down, we find that packing the triangles themselves is remarkably quick; we can pack 10,000 triangles rapidly (for illustration, we'll say 5 seconds). But packing it into the box with all the other paraphernalia and walking to the post box with it takes an awful lot longer (let's say 5 minutes just for this illustration). In fact, it takes so much longer that it doesn't really matter how many triangles we are cramming into the boxes; the time spent dispatching them will dwarf it.

If we had a mesh body of 110,000 triangles to send to the GPU. Placing it in one large box will take us, 
11 x 5 seconds to pack triangles in a box = 55 seconds (let's call it 1 minute)
  1 x 5 minutes to send that box. = 5 minutes 
The total time to send our body was 6 minutes. 

If instead, we chop up the body and send it out in 220 separate parts:
11 x 5 seconds to pack the triangles = 55 seconds (it is the exact same number of triangles)
220 x 5 minutes = 1100 minutes
Total time to send our body is now 1101 minutes, or 18 hours and 21 minutes.

That Mesh body your avatar is wearing is very likely to be in the Render time equivalent of hours rather than minutes. We'll be looking at some "real" numbers next time. 

To put this in context, here are some "typical" numbers collected in an in-world survey, jumping around places in SL. 

BodyTotal facesaverage visible faces# times slower than best in class (higher is worse)
Maitreya Lara30423012.78
Legacy147134018.89
Belleza Freya111619010.56
SLink HG redux149301.67
Inthium Kupra83181.00
Signature Geralt9033708.22
Signature Gianni11594319.58
Legacy Male10461743.87
Belleza Jake9074018.91
Aesthetic2052054.56
SLink Ph. Male BOM97451.00

Notes:
I quote the average number of visible faces instead of the total faces because the drawcall cost of fully transparent "submeshes" is avoided in almost all viewers. This number varies depending on the outfits worn, so it is only fair to judge by the "typical" number visible during our sampling. 

As you can see, we are all paying a remarkably high price for the convenience of alpha slicing.

Bodies are, of course, the number one offender, closely followed by certain brands/styles of hair and heads.

Don't blame the body makers.

Let's be clear why we have ended up this way. It is the lack of a clear understanding of how bad this was. In this ignorance, many designers, body makers, and most importantly, you and I, the customers, have not only let this continue, but we have also encouraged it. Demanding more cuts, more flexibility. I've seen blog posts and group messages written out of complete ignorance, asserting that "[body creators] who have forced their users to adopt BOM and removed alpha cuts" had "got it wrong". 

No, they got it right; this was entirely what was hoped for; it's just that people were not ready for it, and arguably the tooling and support were not either.

So what now? How do I get a lower lag body? I like my wardrobe 

Write to the CSR of your favourite body and ask for a cut-free edition. 

Let's face facts. We all like our wardrobes, and we don't like to give that up, and we don't necessarily need to. The same body, the same weights, can work without the cuts. None of your clothing goes to waste, though you will need alpha masks to take the place of those HUD-based alphas and the "auto-alpha" scripts. 

If enough of us ask for an efficient version, then one of two things will happen:
EITHER:
The body makers you contact will provide uncut versions alongside the cut versions and share some of the knowledge as to why the uncut ones are better. 

I sincerely hope that they will; in the end, this ought to be less painful for them - they have to spend a lot of time slicing those models up and tweaking things.

OR:
New bodies will fill the gap for performance, and slowly people will move over. We already have two female cut-free bodies for those willing to move. 

There is, of course, a second part to this. Those lower lag bodies need alpha layers, and clothing creators need to start offering alpha layers; with the recent success of the Kupra body and this finally happening anyway, and over time this will help make clothes more flexible as they will no longer have to "cut the cloth" to where the alpha cuts are. For older clothes,  it is worth noting that many outfits do not need an alpha; many more can work with standard off-the-shelf alphas. So all those old outfits are probably fine. What is more, if you place the alpha layers into the outfits folder with the clothing, then they will be automatically worn and replaced.

Finally, remember, this is not do-or-die. We can still choose to wear an older laggy body when we want a specific older outfit that we haven't managed to get an alpha for and for which standard alphas do not work.

This is all very well, Beq, but what about X?

There are undoubtedly a bunch of you going, yep, but my XYZ outfit needs blah and what about this corner case over here?

None of those are going away. You will still have the choices. If there is an apparent reason why you need to have a more complex body, then nobody is stopping you. All I am doing here is waving a red flag to highlight just how much damage this "convenience" function is doing. 

For example, time and again, people raise the "oh but I must have onions cos BOM has no materials", The appendix talks about this. If you need onion skins, you can have them, but if you have them on a 12 mesh body, you'll now have 24 meshes. If you have them on a 240 mesh body, you'll now have 480... kill the cuts. After that, I'll moan about onion skins, but it'll have far fewer teeth :-)

If we can move to a saner "normal" where bodies aren't made up of hundreds of tiny fragments, then we can all afford to have extra onion skins for our materials, etc., without breaking the bank.

Can't the viewer make this better?

Not entirely, no. In the course of investigating this, I have identified a few things that can be optimised. But, even if I make the rendering cost of tiny meshes more efficient, all we do is move the scale a little; things would still be 10 or more times slower, and more importantly, we are still wasting time doing a largely pointless activity.

People who know me will have heard me mutter, "The fastest way to do an unnecessary task is to avoid doing it at all." when looking at optimisation. In fact, an amused friend recently sent me a link to this exact engineering philosophy coming up in a SpaceX interview. 

In the long term, the picture does change a bit. One day, we are promised that the viewer will migrate to a more modern pipeline; when we reach that point, the overhead of these so-called "draw calls" will be diminished, and the argument may flip back towards total triangles, etc. 

However, that is not yet. In fact, that is likely to be a good couple of years away, and keep in mind that some people do not even have a machine that can run a modern rendering pipeline. 

To put it bluntly, we can act, all of us, me, you and your friends, we can act now, to fix this problem and move to a far more sane world where we can go to large events without having to disable all our settings. Or we can wait and hope things get better naturally before everyone abandons SL for being a laggy swamp and goes someplace else.

Finally, there are a few "nice to haves" that we could really do with a mix of viewer features and server-side features. 

1) An easier way to make alphas; this is something I have proposed to the lab in a Jira feature request but is not currently on the "book of work".

2) We also need a few UI/LSL tweaks to allow HUDs to wear/remove alphas without things like RLV. 

3) Perhaps this is really #1. We need solid, reliable tools that tell us, both as creators and most importantly as users, whether an item is efficient or not.

But none of these is required for things to start moving forward. But at the same time, all of these "nice to haves" are entirely doable. Nothing here is out of reach. 

Come on then, Beq, prove your point.

OK, so there's a lot of blame being assigned here, mostly to ourselves as users, so I'd better have a good argument to back this up... I think I do, so before you flame me in the comments, let me show you why. My next post will share some empirical data gathered through weeks of performance testing that supports my arguments; I'll show you the extensive testing done and explain how you might try to do something similar to see it for yourself.

UPDATE: Part 2 is now online - warning statistics ahead 9/10 of you will be bored the other half will love it.

Appendix

But what about ...?

Here's a quick appraisal of the typical perspective on lag. The high-level summary is that most of these are valid observations and identify some form of inefficiency. Whether they contribute to FPS loss is another question, and until we get rid of the massive issue around draw calls, their effect is moot.

The poor LODs and poor LOD swapping:

There are several issues here that get conflated, and while each is a valid problem, they do not, on the whole, impact your rendering performance (hear me out on this).

For a long time now, I have been ranting about how poor LODs affect the quality of our lives in SL. This has not changed; moreover, the bugs that affect Rigged mesh rendering mean that they rarely get shown even when a creator has provided good LODs. 

So that's two issues, 
1) Creators do not provide proper LODs 
2) The LODs are not shown. 

Number one is moot if number 2 is not fixed and number 2 is not being fixed by the lab because of number 1.  That is to say that if we make rigged mesh behave as it "should" (thus fixing point 2), then your clothes would vanish very quickly because of point 1, which leads to grumpy people. 

We are, as they say, between a rock and a hard place...

But does it affect the FPS? Yes, to some extent. If you have a high detail LOD that is being drawn at a distance where most of the triangles resolve to a small number of pixels, then the GPU has to shade each vertex, and this can mean that a pixel in the final render is being shaded more than once, this is known as "overdraw". It means that your GPU is doing a lot more work than it needs to. Simply put, if every pixel on your screen was shaded once and then had to be done against, then clearly, it takes twice as long as shading just once would. This is a great example of a GPU bottleneck, which we rarely see in SL due to the draw call problems that dwarf everything else. These are real problems; they are just hidden from view right now. 

So it's those feet, those invisible feet!!!?

Or increasingly "OMG those lag inducing multi-style hairs". 

You'll see this on many blogs that discuss complex bodies and the impact of rendering, and to be fair, this is entirely plausible, and I have believed it myself. However, tests prove otherwise. 

Due to limitations in the Bento body, we do not have usable toe bones nor the morph targets that would allow us to distort the foot meshes to fit our shoes. As a result, we have multi-pose feet on our bodies. 

Once upon a time, I used to wear SLink single pose feet; I would wear the flat feet in a sandals outfit and the high feet in a high-heels outfit, etc. At some point, market pressure for convenience won out, and body makers started to package all the feet together. Now, when I am wearing my feet, the mesh will be many feet, all bundled up. If I have 6 poses for my feet, then 5 of these will be fully transparent. Leaving just the one set visible. 


We also see a similar trend in hair; rigged hairs with "style HUDs" that allow us to alter the appearance.

I am as guilty as anyone for thinking that this causes significant (wasted) effort and thus lag in the viewer. Undoubtedly, there is overhead; let's not ignore that all of this data has to be downloaded, unpacked, and held in RAM...This is all wasteful, BUT it is not a significant contributor to the rendering lag, which is what we are focussed upon today; this is primarily because most if not all viewers now have an optimization in place that prevents the rendering of fully transparent meshes (thanks I believe to NiranV  Dean's nifty optimisation). 

A problem for the future? Probably. A serious issue right now... No, there are far bigger fish to fry.

Is it Triangle counts?

OK, this is the high-poly elephant in the room, I guess. 
"OMG, XYZ body is 500,000 triangles. What a nightmare, no wonder it lags me out."

This, as it turns out, is highly subjective, and while triangles ultimately do impose a certain load, it does not at the present time matter anywhere near as much as it should. 

There are so many uninformed, technically inept, or just plain lazy creators out there who throw absurdly dense meshes into SL* and as with the poor LODs above, they are undoubtedly a source of lag and of load, causing overdraw and unnecessary, or at least inappropriate, data storage and transfer. This is predominantly going to manifest as GPU load, with a side-helping of RAM pressure and cache misses.

Thus, the full answer is more subtle and depends a little on your computer. In general, if you have a dedicated graphics card (GPU), then the chances are it doesn't matter that much in terms of FPS right now. Remember our box packing antics? We need to pack an awful lot of triangles before it starts to approach the cost of dispatching the box. If you have a machine that relies on the onboard graphics, then the story is slightly different, but even then, the number of triangles (within reason) is not the number one cause of lag. 

I'll illustrate this more clearly when we get to the benchmarks and numbers (which may be tomorrow's post)


* In their defence, creators (clothing creators in particular) are under pressure to deliver new content at a high rate and for surprisingly low returns (for many). If you consider the amount of real-world time that has to go into producing an item and then consider the Second Life price and shelf life, you can start to appreciate that corners are cut to meet demands. So, once again, we are in part to blame; we, the consumers, do, after all, create the marketplace and the demand. Far too many of us accept inefficient content, and perhaps more importantly, we limited tools to identify well-made, efficient content


Is it Onion skin meshes?

"So.. it's those damnable onion skins, I knew it." 
Well, yes and no, The onion skins are indeed one of the contributors, but they are to some extent guilty by association with the actual FPS murderer. Every onion skin is another draw call, and each onion skin layer is a complete skin; it doubles the number of drawcalls. But doubling 6 meshes into 12 is not anything like as much of a problem doubling 60 into 120 or 120 into 240. Every onion layer you add to your body made of N meshes, you add another N drawcalls. 

It is for this reason that people who moan at me, "Oh, but we must support materials, and we need layers", get an unconcerned shrug. If we lived in a world where all our bodies were 10 meshes. If some people need to have 20, then that's fine. You are not going to notice, especially when most people will have them empty. Moreover, you could have onion layers as an optional wearable. Thus avoiding the cost for the majority of us and giving optionality to the others. Ironically, Maitreya detached the onion layers in just this manner and got nothing but grief for it!

End of Appendix.