That was a long time ago now, Blender has moved on and while MS remains perfectly adequate for many users, the loyal Mesh Studio user base has been challenged once again by instability and uncertainty. There is no suggestion that the product is anything other than the victim of circumstances ( and a pernicious bug) but it seems appropriate to update the "fallback plan" tutorial(s)
What are we going to learn today?
For this first "tutorial" we will look at the basics. After a quick reminder of what MS and similar tools do for us, we'll look at exporting to Blender, an initial cleanup, and then re-exporting.What is a Prim2Mesh tool and why do I need it?
Let's have a quick recap on what it is that Mesh Studio and similar products do for us. Prim to mesh tools are typically used by builders/creators who wish to work inside Second Life, and/or who lack the skills required to create mesh in an external tool. They provide a convenient interim solution bridging the gap between the simple (but powerful) prim building in Second Life and the complex and frequently daunting Mesh creation tools such as Blender, Maya and 3DS Max. I will focus here on Mesh Studio but for the most part the same applies to similar products.
With Mesh Studio, the user is free to create their object using any prims that they like, this includes pretty-much any slices, twists and other tortures. Once the user has their model built (and ideally) textured, they simply drop in a script and use a menu-driven interface to analyse the prims and produce a mesh. The product is composed of two parts, an in-world scripted system that sends a detailed description of the linksets to an off-world server via a web API. The Mesh itself is constructed on this external server and provided as a zip file containing the Collada (DAE) model ready to be uploaded into Second Life. Herein lies the Achilles heel of these solutions; any tool that depends on an external service is beholden to the operator of that service.
The menus and other scripts allow some pretty sophisticated constructions. In fact, the entire crystal palace exhibition glasshouse, a recreation of the original Hyde Park crystal palace from the late 19th Century, was created entirely using Mesh Studio by Vic Mornington, a long-term New Babbage resident and Mesh Studio connoisseur.
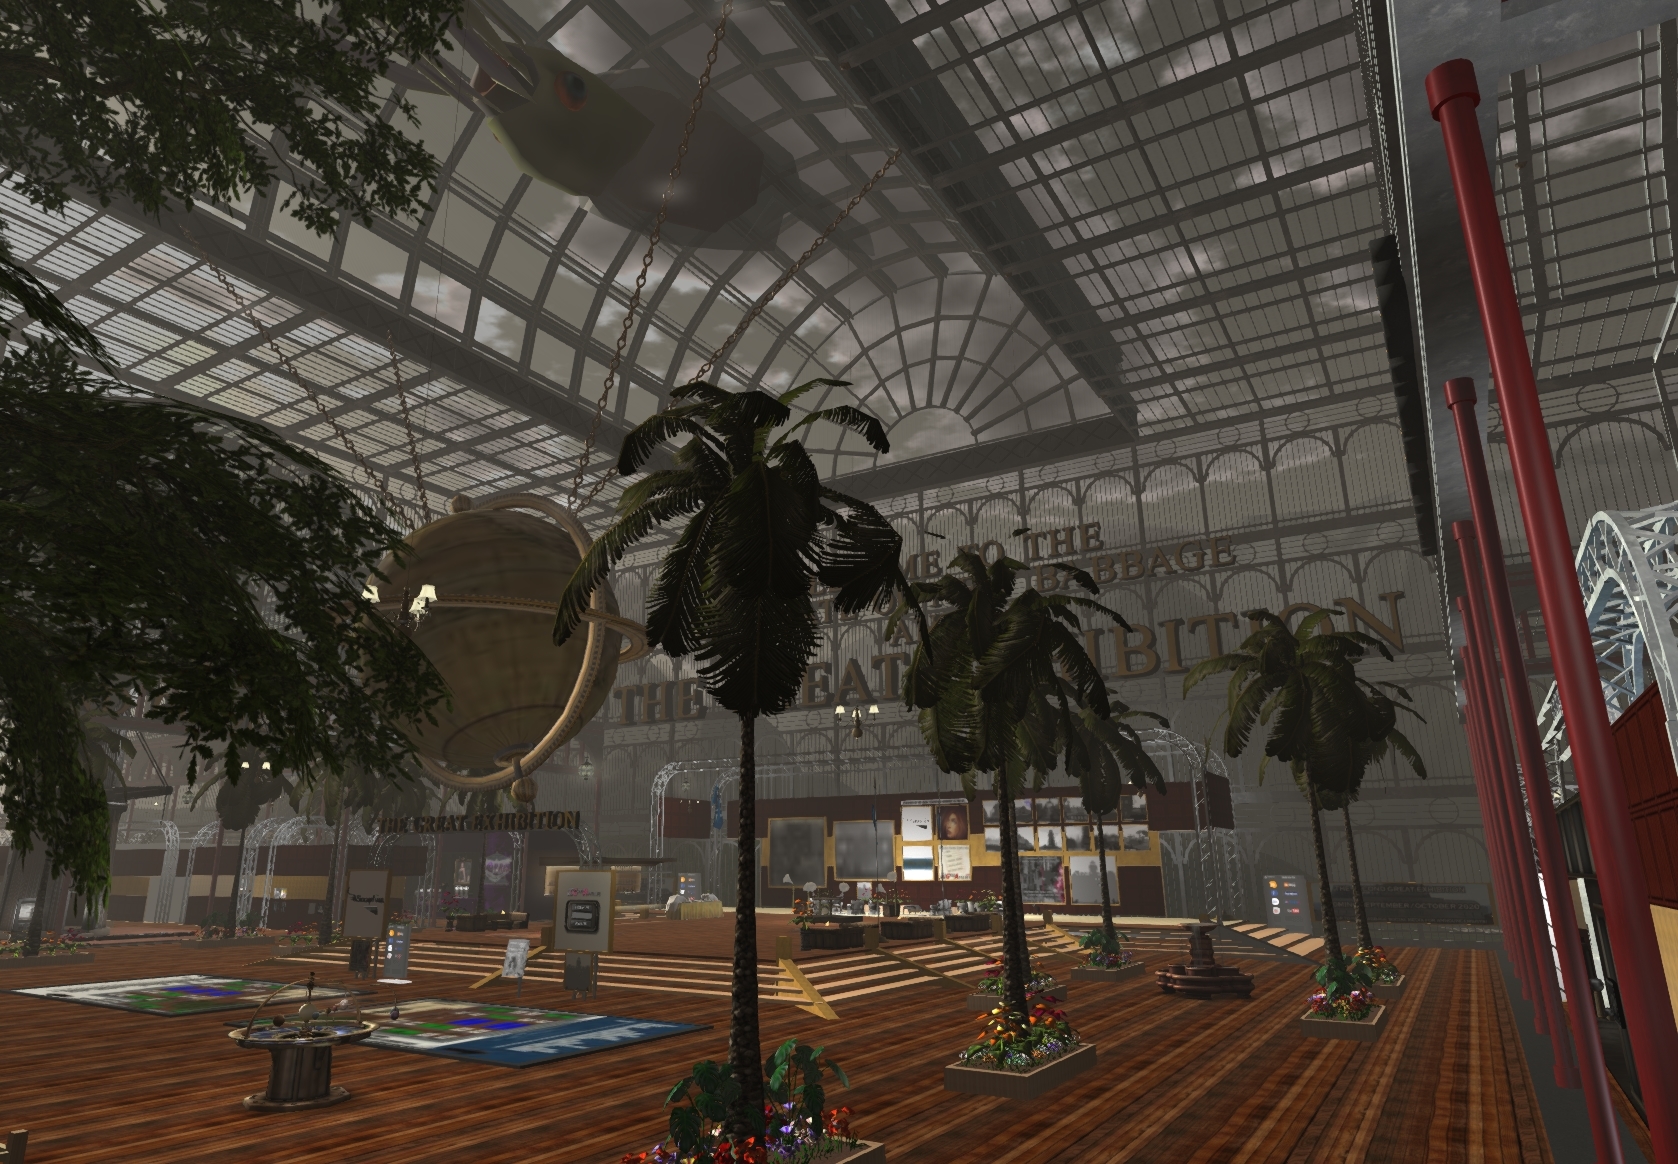
Full size : https://gyazo.com/fcfafb7cd350502aa75d009de632b913
The key features that Mesh to prim tools include are:-
1) some control over the mesh complexity (how many edges make up a curve or straight-edge
2) the elimination of unused mesh faces (transparent faces are not "meshed")
3) Simple mesh validation, checking that the number of materials used does not exceed the SL limit of 8
4) The merging of prims into one or more mesh units and elimination of some of the duplicate vertices.
5) The correct UV mapping to ensure that the resulting mesh can be textured the same way as the prim model.
The 2016 blog post linked above explains why this workflow is useful, it can be especially helpful when working on a project that needs to fit into a specific inworld scale and many creators use Secondlife tools to "prim-out" a rough model to use as a scale template.
So what do you do if the tools are not working?
You have your model, the deadline is approaching, you finish tweaking the textures and click on the menu....nothing...the server is down.
Blender and Firestorm to the rescue.
Blender is a free, open-source 3D creation tool. It stands squarely against many of the leading commercial packages that dominate the professional world and is increasingly making inroads into the commercial world of games and VFX. Blender has a reputation for being rather unfriendly to use, personally, I think that this is overstated. All the big 3D desktop creation packages have complex user interfaces and no shortage of peculiarities, I tried learning any number of them in the past and found myself bemoaning the complexity and yearning for the solid ease of plugging prims together. The fact is that with power comes complexity. Someone used to Maya will swear it is the best, A 3DS Max aficionado will be equally convinced that their tool of choose is the best one. There is no single answer, pick one and stick with it. If you have no specific reason to pick one tool over another then Blender has two very significant points to consider. 1) It is free 2) It has a vast and ever growing ocean of tutorials and youtube channels. But don't choose blindly, if you have a friend or mentor who swears by another tool and you can afford that tool, then perhaps that is the better choice. The discussion that follows will not apply directly to those of you choosing a path other than Blender, but for the most part, the principles will remain the same.What you should not listen to is all the moaning and whinging from people who used it in the past and failed.
1) They may not have failed because of Blender, in many cases it is simply the learning curve of moving away from the SL interface to something more complex.
2) They may not have tried a recent version of Blender (if they bemoan the mouse button selection, for example, nod politely and walk away - that has been configurable for many years and since last years revolutionary version 2.8 left-click select is the default).
Any tool is going to take practice and commitment. Pick one and commit. There are many excellent tutorials for Blender, prefer 2.8 ones over 2.7 at least until you know enough to work around the UI changes. Andrew Price's "Donut" tutorial series is as good a place as any to start. Look around SL for support groups for your chosen tool too.
And so onto the viewer... I will be using Firestorm because I am, of course, biased, but a number of other Third Party Viewers (TPVs) support the export of prims as Collada and the workflow should be very simple to translate to your chosen TPV if required. I will be using the Firestorm dialogues in my examples, but they will most likely have direct equivalents in other TPVs.
Please note: The Second Life viewer from Linden Lab does not have any export capability at present. Feel free to lobby your local Linden if this is important to you, Jiras are more effective than pitchforks.
SL-Blender roundtrip summary
The rest of this post is going to go into detail and the blogger platform is not ideal for formatting this so bear with me. I'll try to create a supporting video as I did before but I know many people prefer to read than watch, so I'm going to try to capture as much as I can in text as well.It is probably worth re-stating our objective here. We are not looking to do anything advanced in terms of mesh creation, we are not going to bake textures, for example. Moreover, our objective is to retain (as far as possible) the UV layout (the texturing) that we established inworld. This simplified workflow is to enable people to export a prim model, "clean it up a little" and re-import it into Second Life/OpenSim with (hopefully) a lower Land Impact (LI), a workflow analogous to that of the Prim2Mesh tools.
Here is the high-level summary for the TL;DR crowd:-
I should note here that this is not the only workflow the steps can often be mixed up as best suits the purpose and things are often best taken iteratively. These techniques, however, should be sufficient to get you through most clean-up jobs.Step by step overview
1) Grab Blender, I will be using 2.82. Download it here
2) Export the mesh from SL. I will be using Firestorm (of course), many other TPVs should work too.
3) Import the mesh into Blender.
4) Prepare the mesh for cleaning.
a) Restore quads - establish some nice edge flow that will pay dividends later.
b) Join the mesh - make sure our UVs are safe first though.
5) Cleaning.
a) Remove doubles.
b) Simplify the geometry -we'll look at a non-definitive selection of strategies.
6) Export again.
What won't we cover?
- We will not cover, creating LOD models in this article, though I may hint at options. I will look at this in a future blog.
- We will not examine UV editing, our objective is to leave those untouched
- We will not look at physics objects. I have older blogs for that and future ones planned.
Step 1, download and install Blender.
Get the latest stable version from Blender.Org, at the time of writing this is version 2.82, though I am eagerly awaiting 2.83.Step 2, grab your TPV of choice and export your prim model.
I am going to be using this old seahorse sub prim model, it comprises a number of useful features for our purposes, some transparent mesh, that we do not want to export, a few different textures and a couple of sculpted prims. It will pose a number of problems and has some rather awkward geometry to deal with.
Triaging the patient
Before we export it is worth taking some time to make sure things are as clean as possible.I've deliberately picked a rather poor example, in the movie that accompanies this post you will get to see me trying to clean this up, applying the tricks I list here.
The model I am using is a steampunk seahorse submersible that I first built in around 2008. IT was never intended to be meshed, it has never been prepared for use with a prim2 mesh tool. For this exercise though we are simply going to export it clean it up. I
I have taken a few steps to clean up beforehand and I would strongly recommend the same to you.
If there are prims that should "join" try to align them as close as you can. I will demonstrate how to fix cases where this has not happened, but as you will see it is easier if you do some work up front.
The model consists mostly of prims, the distinctive curved tail is a sculpty as is the exhaust array fin on the rear. The tail has some leftover vertices that we will also clean up in Blender. The top opens up using alpha-switching, which for a physical vehicle in 2008 was the only realistic means to get an opening submersible. With this test we are not going to open it up at all, so I have even set the interior to transparent where I can. this is no different to optimising your prim builds for Mesh Studio by removing the hidden faces.
We would quite like to export the textures, and we need the sculpts (the tail and brass fins on the back). Exporting the textures will be useful throughout the process, they will allow us to see when we take a wrong turn (the UV layouts get messed up); even if you are only using a "UV checkerboard" it will help you see when you need to take a step back and try a different option.)
Finally, before exporting I ensured that the rotation of the model was aligned to the axes.
Exporting
To export it we use the "save as..." menu, accessible by right-clicking on the object, if you have pie menus you will need to click more and more again to find the option. From "save as..." click "Collada".You should be presented with a dialogue that looks a little like this.
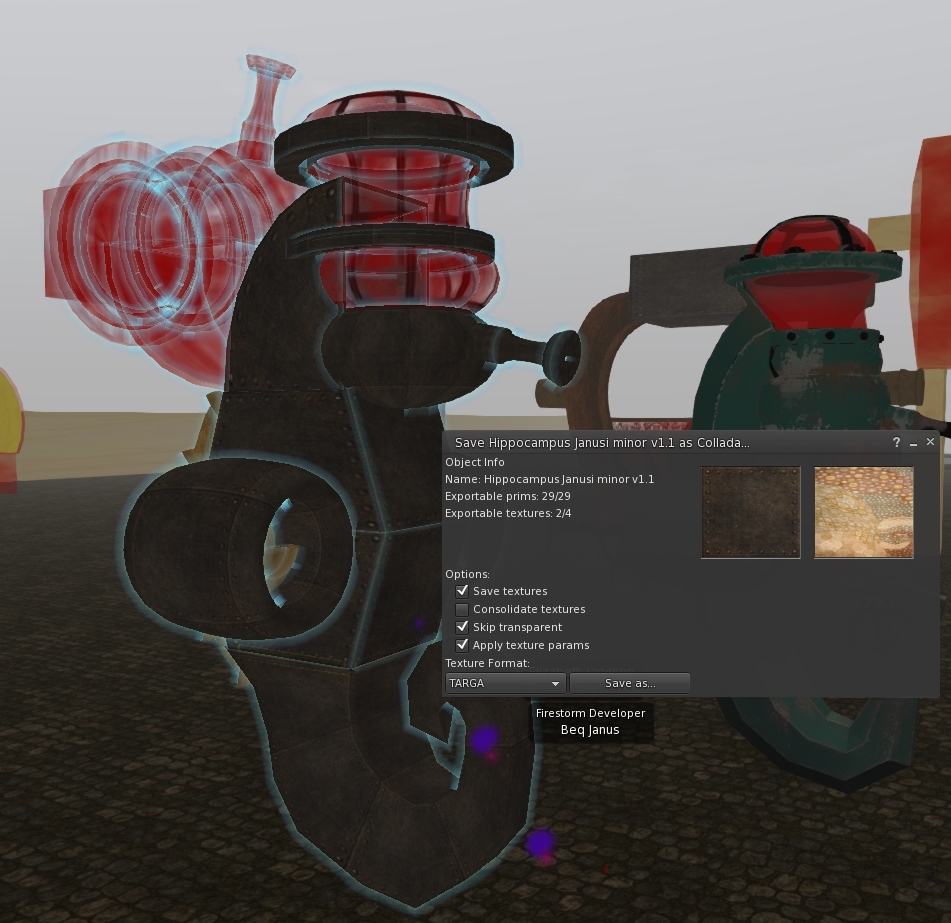
In this case, we see that the object consists of 29 prims and that all of them are exportable. This is great news, in order to be exportable you have to be the creator of the prims and for sculpts you have to be the creator of the sculpt image that underlies the sculpty too. For the submersible, it is all mine.
The textures, however, we fail on 2 of them. They happen to be full perm, both taken from the Linden provided library I believe (the glass and the brass) but as I am not creator I cannot export them and those prim faces will be exported blank. If I wanted I could actually save these separately because the permissions allow it but they are not essential to our purpose here.
The options we pick are important.
- Save textures - We would like to save textures where we can, this will allow us to see the textures when we import it into Blender later.
- Consolidate textures - shown here "unchecked" but actually we want it checked. This will combine all the uses of the same texture into a single material in the export. Without this, every prim that has the rusty metal texture will get its own copy. This would be a real pain later.
- Skip transparent - very important here, we do not want all the extra mesh that results from the hidden faces, by enabling this option we can avoid that.
- Apply texture params - this ensures that the texture repeats and rotations are preserved in the export, it ensures that the UV mapping is the same as you see inworld.
Finally, we can select our preferred format to save the texture images in, if you expect to work with the textures I would suggest sticking with Targa, it is a lossless format and while the source image has already undergone lossy compression, we do not need to add further artefacts at this stage.
Please note: that the export code pre-dates materials and as such all normal maps, spec maps and other materials settings are ignored completely.
Once we are happy we click "save as", give it a name, and save it to our local disk.
Something to remember, it is well worth taking a moment to ensure that your object is rotated to 0 degrees (or at least some whole number) I failed to remember that in my tests and I had to fiddle about cleaning that up in Blender.
And on to Blender....
Step 3 is to import it into Blender.
You will need only a few skills to follow this tutorial, but I am not going to try to include a beginners guide to Blender in this post. Please watch the first episode or so of the aforementioned Blender Guru Donut project. It will do a far better job of equipping you with basic Blender skills than I can.With that out of the way, I'll assume that you can navigate in the 3d viewport, and find a few of the main menus, I will try my best not to assume much more than this.
Start with a new scene, delete the default cube if it is there.
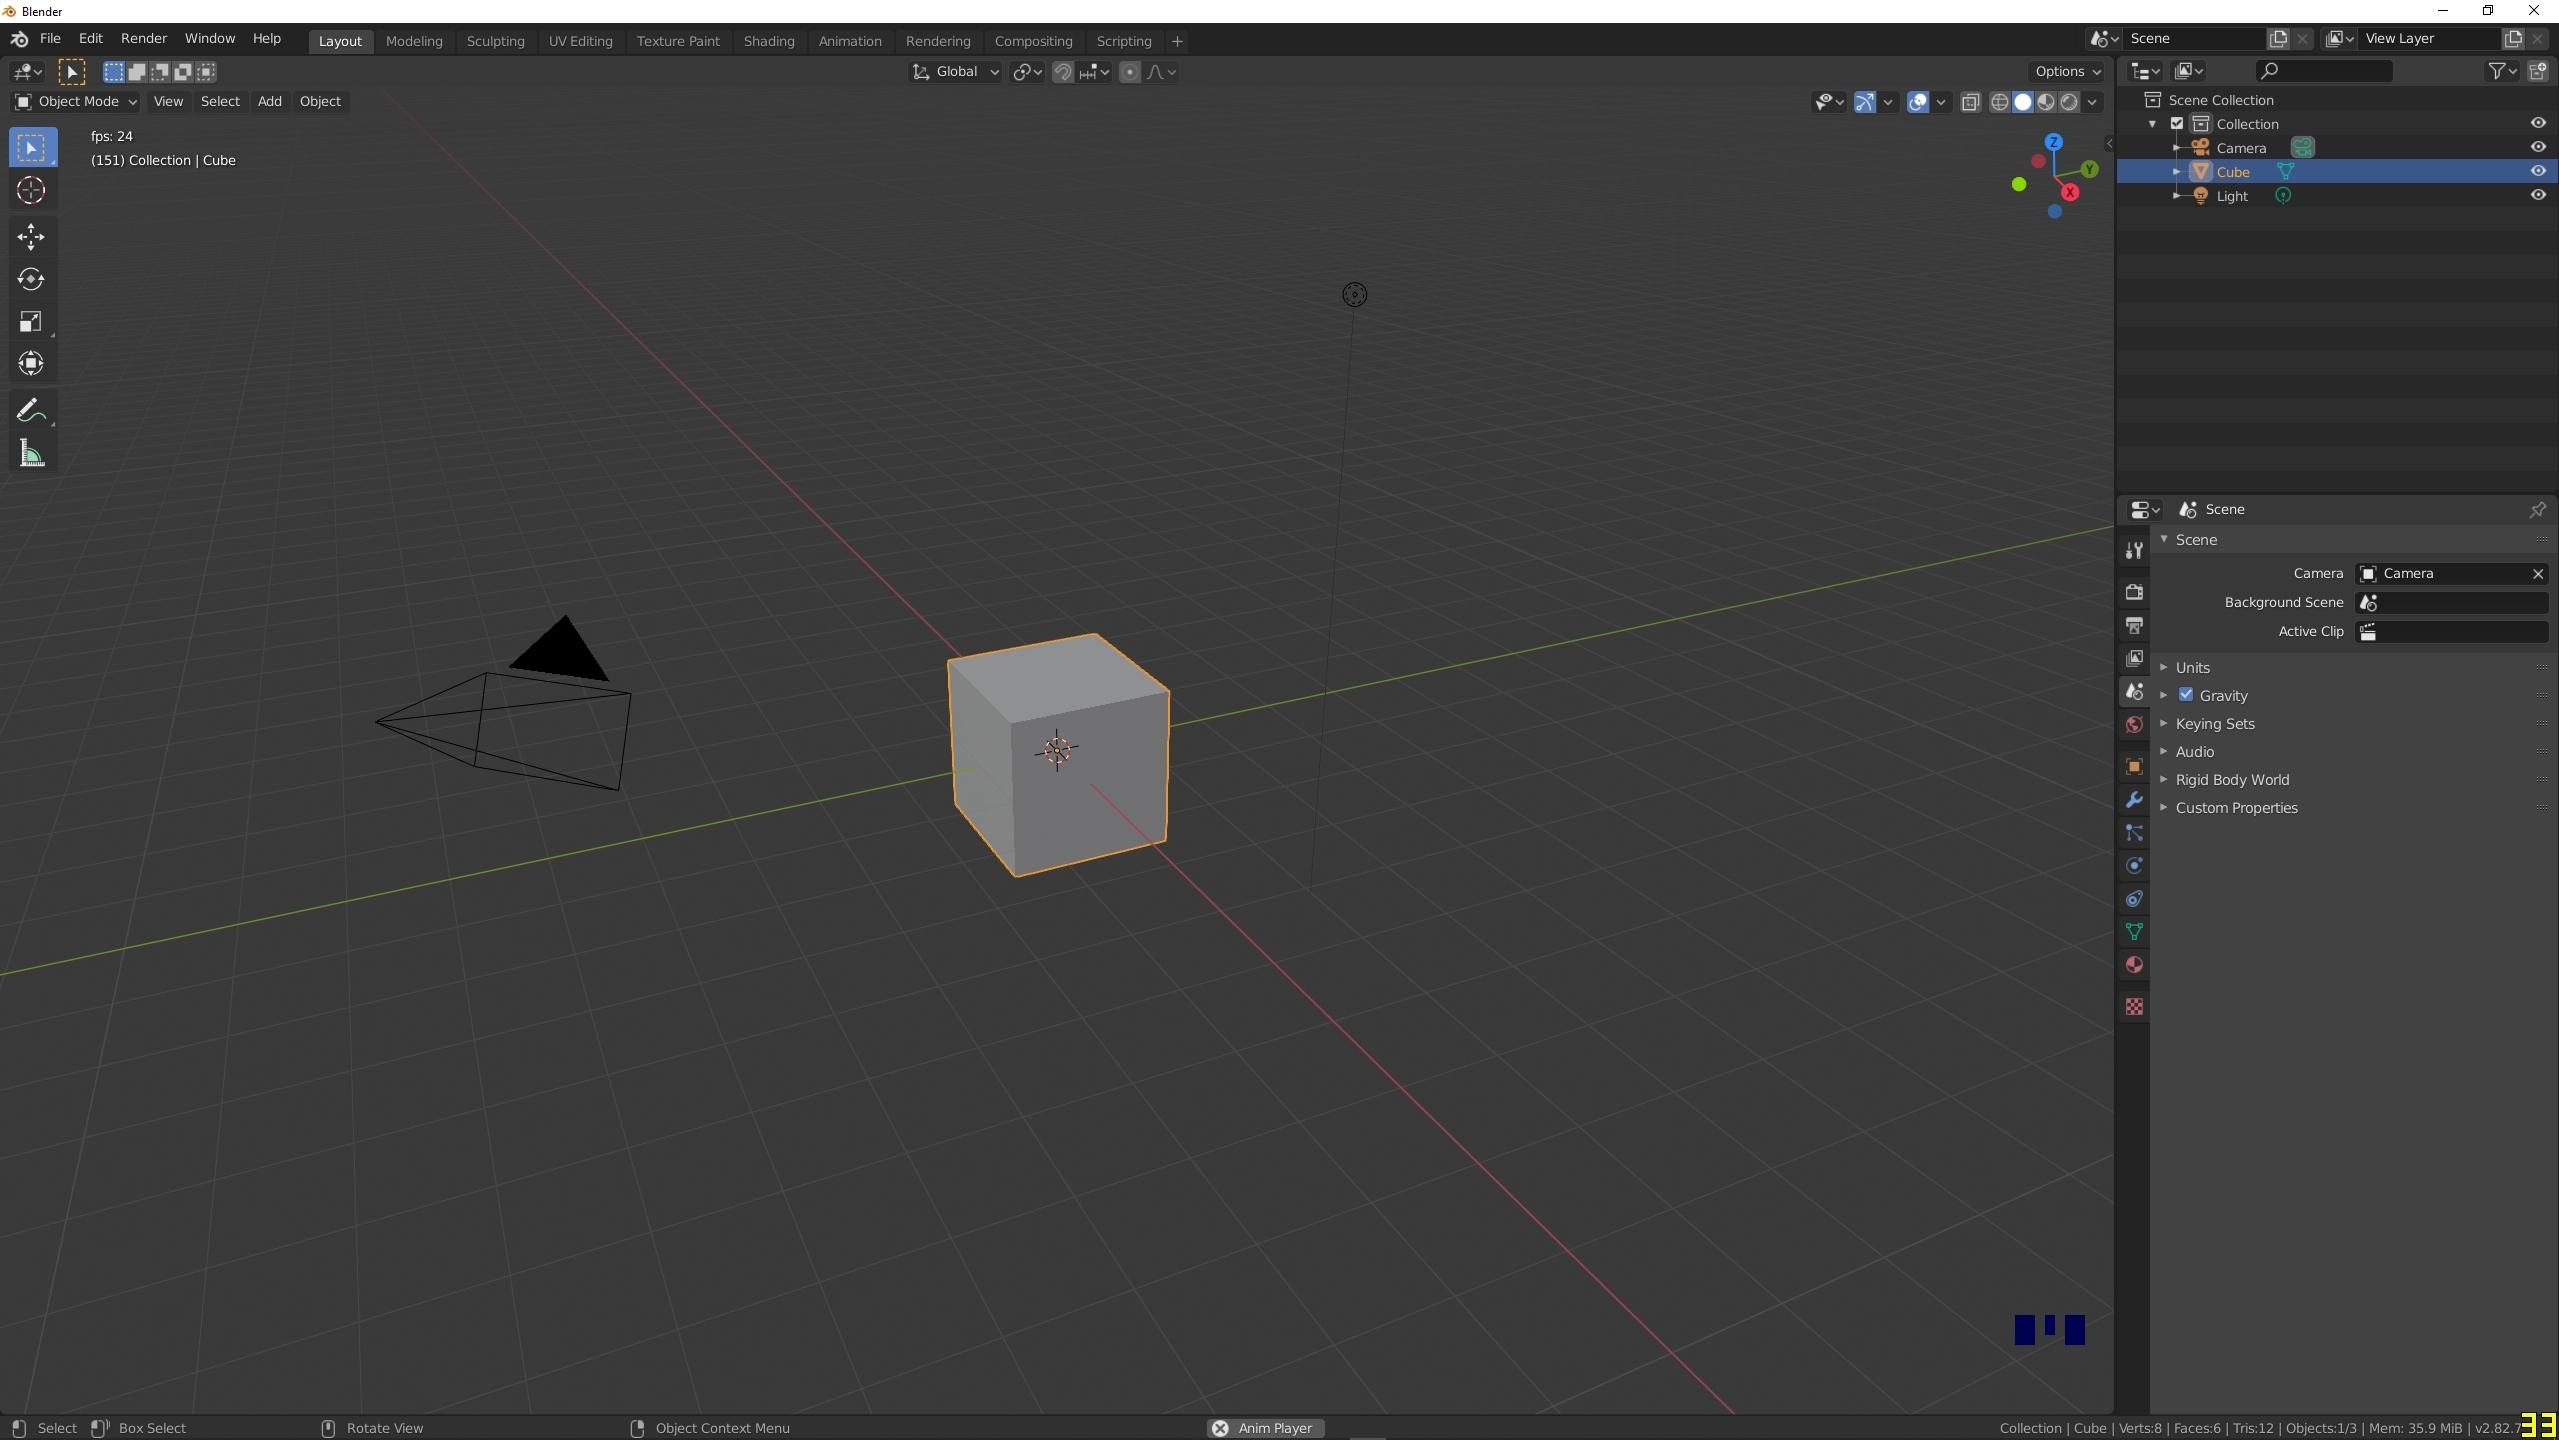
Importing Collada is very easy, File->Import->Collada, locate the file on disk where you saved it. click "Import Collada" to import.
Your object(s) should appear in the viewport. Depending on how you have Blender setup following your "basic" tutorials you may well see your import mesh as entirely grey even if you exported the textures. To change this go to the top right of the 3d viewport and enable the rendered view. This will put you into the Eevee rendering engine and your textures should now be visible.
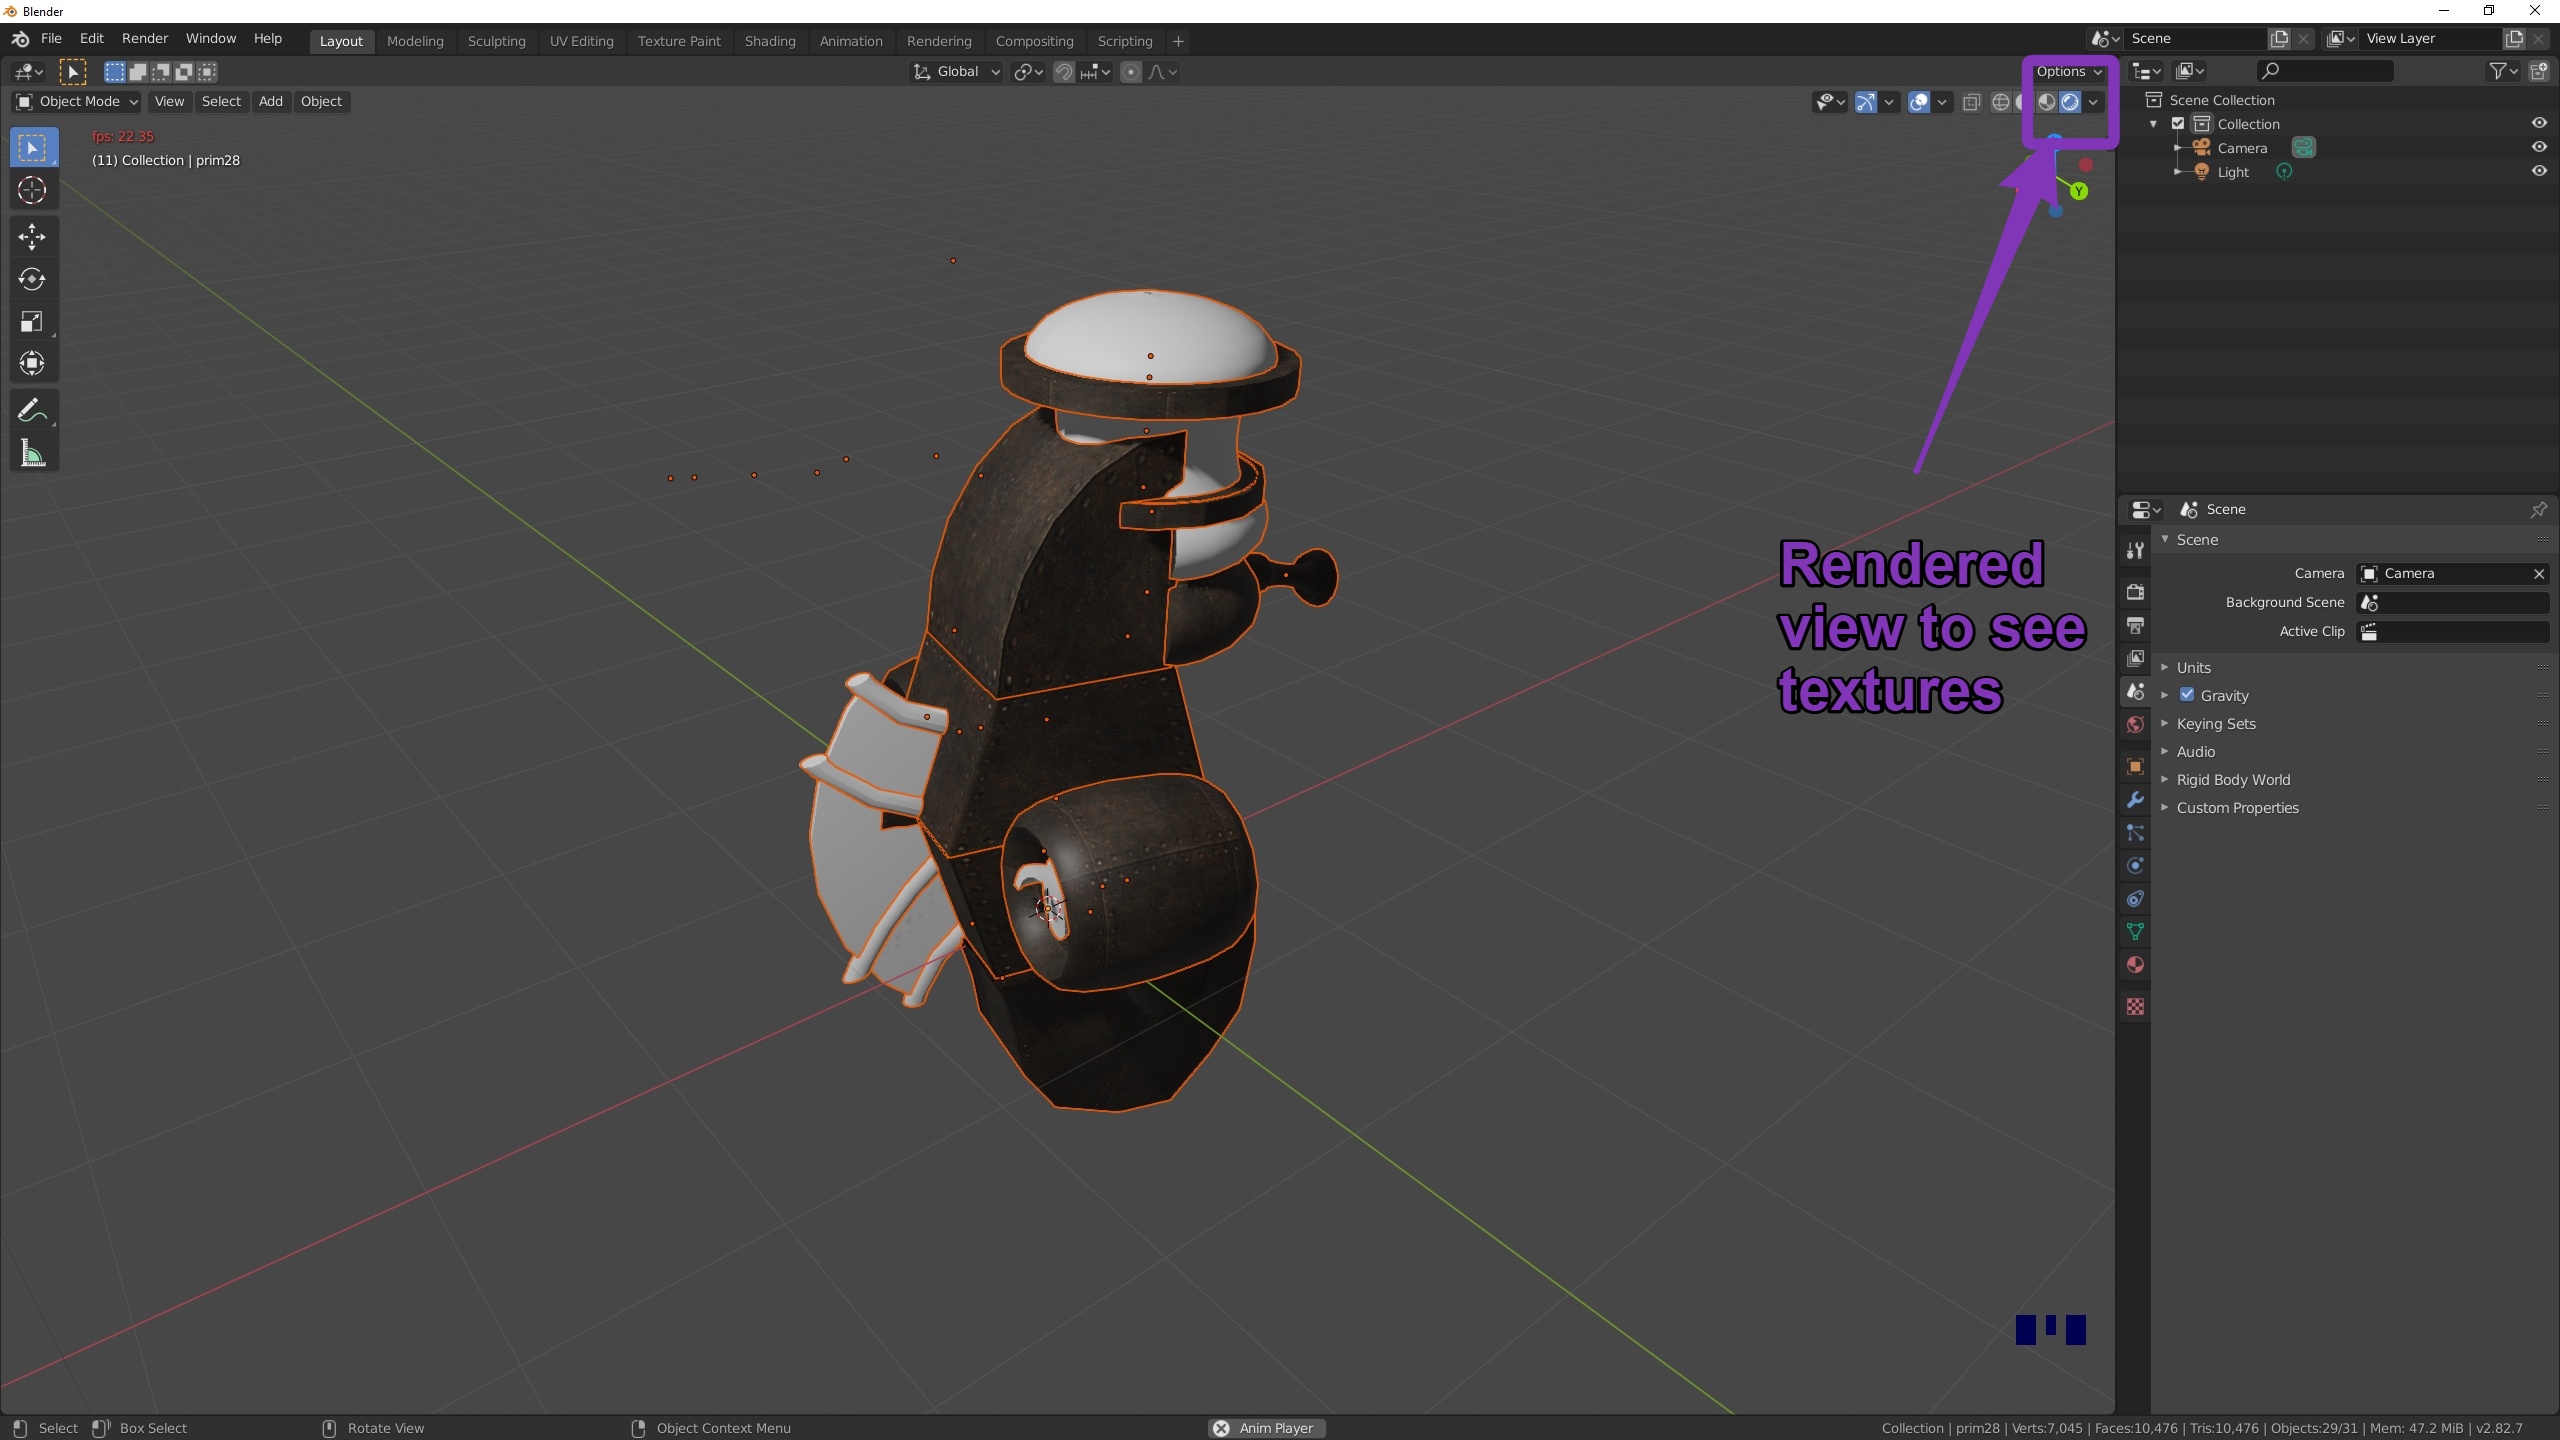
As you can see from my images, there is an acne rash of little orange dots. These are the centres of the individual prims. We will normalise these, along with the scale and rotation. so that everything is starting from a nice origin. (If you forgot to align your model before saving it, now is the time you'll repay that debt).
Applying the loc/rot/scale is easy. Press 'a' to select all the objects, then ctrl-a to apply transforms. You will be presented with a menu, you can select "all transforms" or a subset if you prefer. There will be no noticeable change to the model except that any "origin acne" will be cleaned up as all the objects now have their centre at the global origin.
Joined up thinking
The viewer export has saved every prim as a separate object. Sometimes this is useful, but most of the time it is not what we want. At some point, we will need to join some or all of the prims together. In my example I am happy for this to be a single mesh, it will have fewer than 8 texture faces in total and thus it will be suitable to upload as a single item.Linking meshes is simple enough. Ensure that you are in Object mode (you should be by default, press TAB if not). "Object Mode" will be shown on the top left. Working in Object Mode is a bit like working at prim level in SL. We can select the objects we want to link together (pressing A will select them all), selected objects will have an orange outline.
Once you have them selected hit ctrl-J (join).
Oh dear.... that was not what we wanted at all. We selected all the objects but as soon as we joined them all the UVs went bad. You can see this in the video, the blurring of the textures is an indication that all the UV data was lost.
The problem here is that we have more than one UV map, in fact, the exporter gave every object a uniquely named UV map. This may be considered a bug in the exporter. I would certainly entertain making this option in a future Firestorm release. However, for now, it is how it is.
Ctrl-Z will safely undo the damage, Undo is you friend in Blender, there are 30 levels of undo by default I typically increase that to 100 in the preferences.
The next step is a bit of a pain, we need to go through each prim and rename the UV map to be the same as all the others, then when we join they will show as a single UV map..
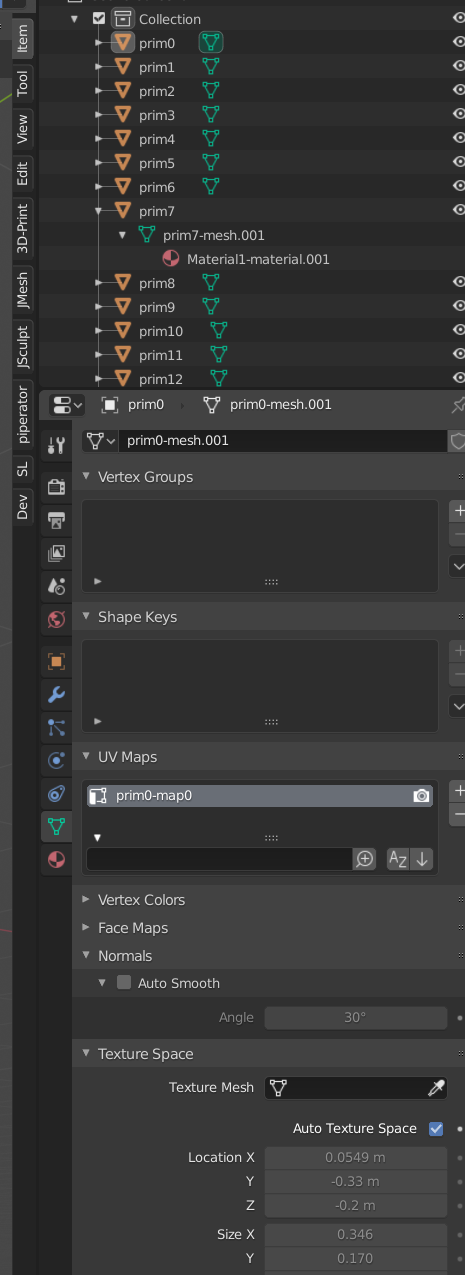
The UVMap details are located in the mesh tab of the properties window on the right of the screen.
look for the green triangle with tiny circles at the points. Click in the box and rename the UVMaps from primN-map0 to something simple like combined-map or just map0
The important part is to ensure that all objects share the same map. Doing this for a large number of objects is a royal pain in the posterior, so I cheated...
(spoiler: I wrote some python to do this, but fear not, I will be releasing this as part of my free/open-source SL tools Addon SOON)
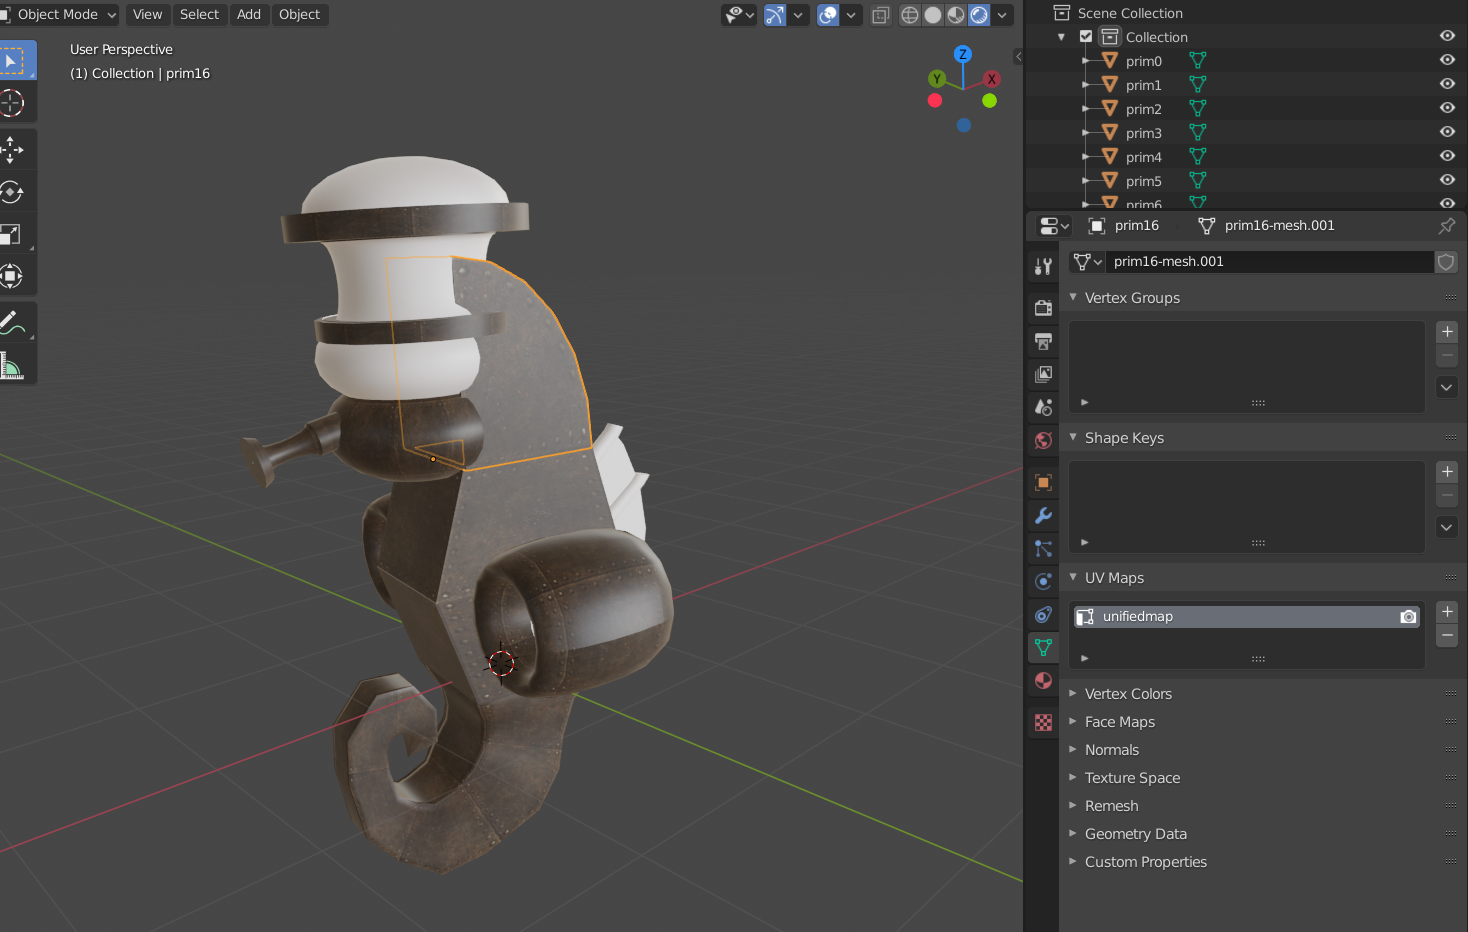 | |
I have now updated all my UVmaps to share a "unifiedmap".
Now I can safely ctrl-J and all the meshes are joined as one and all the UV information has been retained. This gives us the combined single object mesh we see below.
|
Let's get cleaning
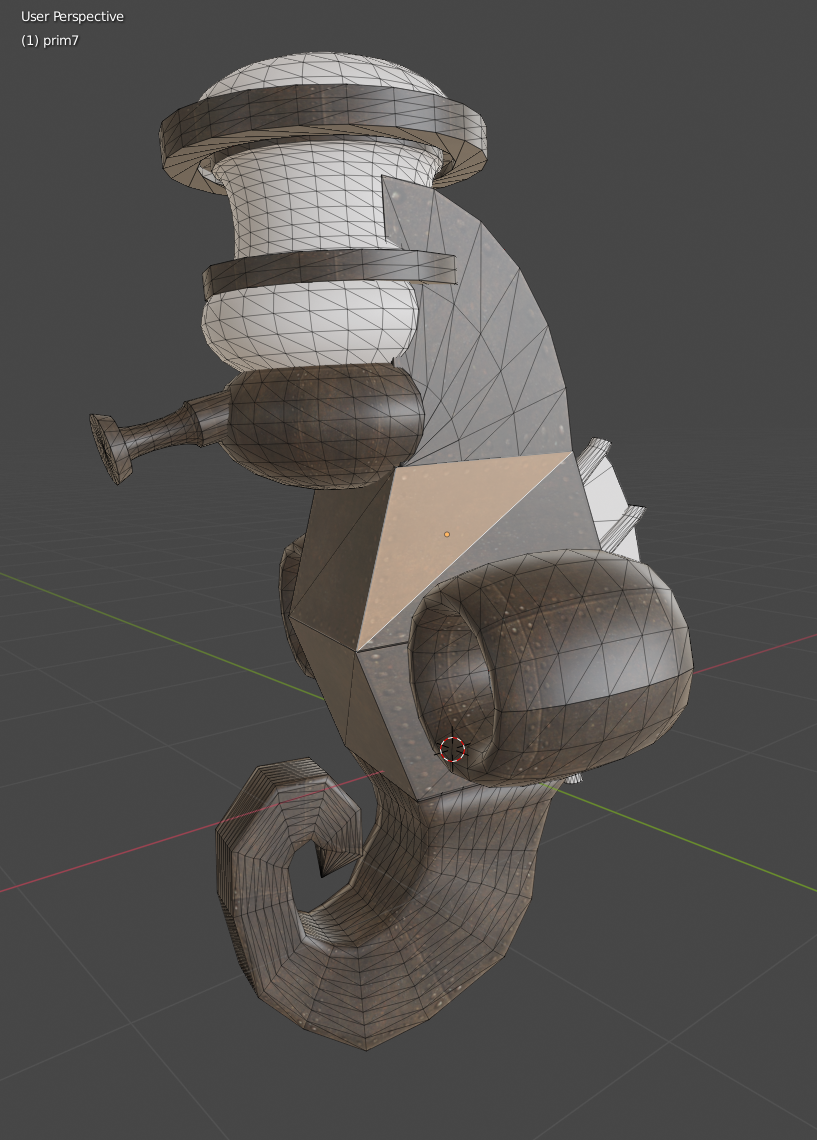
Press TAB to enter Edit mode. Tip #1: Convert to quadsThe first thing we can see is that the mesh is made up of triangles. This should not be surprising, but it is inconvenient for editing and it breaks any "edge flow" and loops that we have. It is an unwritten rule of Mesh creation to work in Quads as much as possible. The following animation will show the benefits of having proper edge flow in the mesh by showing the selection of edge rings and loops before and after the removal of triangles.
To remove the triangles we select all (A) and then press alt-J, this converts triangles to Quads where possible.
The quad conversion process can be complicated, it is not an exact process; the "tunable" setting on the quads converter can be used to control the angles that are used in the conversion. You can see how I use this to tweak the behaviour in the neck area.
It is not unusual for a few triangles to get left where you would have expected quads. We can clean these up using the "dissolve and join" trick we'll look at shortly
Our mesh is far cleaner to look at but we've not actually improved the geometry because we've left all the vertices in place.
Simplifying and refining
One of the tricks that Mesh Studio does for us is combining co-located vertices where possible. We can actually do a far better job in Blender as we have direct control. But for now, we'll just keep it simple. The objective here is not to rebuild/redesign this mesh, those skills we can work on later, we simply want to clean up this mesh and optimise, replicating where we can the functionality of our more familiar inworld tool.
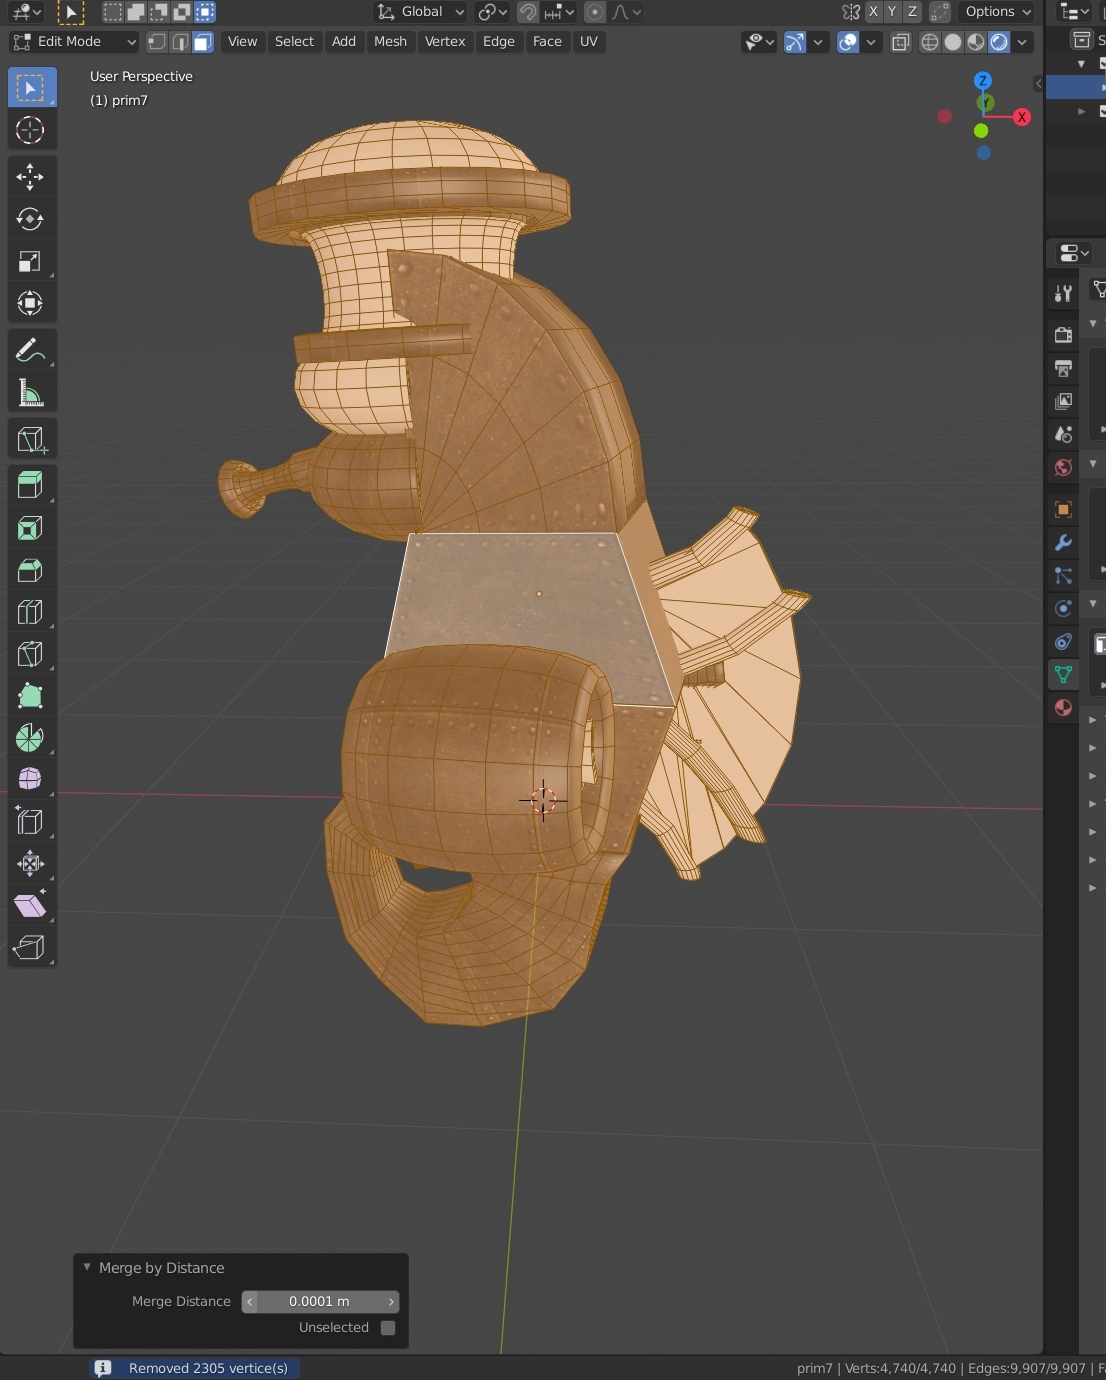
Tip #2: Merging
What do we want to merge? where prims were aligned next to one another in SL we want them to be physically joined. to do this we want to merge the vertices that are on top of one another. In Blender, we can select the whole mesh or just the parts we want to work on and then use alt-m to find the merge menu, and pick "merge by distance" this is the new and more logical name for what was called "remove doubles" in earlier versions of blender. When we merge by distance we can control how close vertices need to be in order to be merged.
The merge tool, as most are in Blender, is not fully applied until you commit the changes and move to another operation and thus it can be tweaked back and forth. Even after this, you have ctrl-z of course. I use undo a lot to test whether one operation works, then undo and try another.
Other merge options are equally useful.
if you have two prims that you had wanted to join, but their vertices were not properly aligned then you can merge them manually. Select the vertex you wish to move and the one you wish to move it to, then Alt-M "merge at last", this merges all the selected vertices into the last vertex selected. Merge at first does the opposite, while "At center" while find the central point of the selected vertices and merge them there. Play with the various options to see which work best for you.
Merge at cursor, is also powerful but is best used in conjunction with more advanced tricks that I will save for another post.
Getting more tricksy...
We've done the simple things, our precious UV layout is still in place, but look at the mesh, it is still more complex than it needs to be.
Second Life Prims have 4 vertices per straight edge, one at each end and two spaced along the edge. These do have an impact on surface lighting but are typically removed in mesh. This is most evident in the back of the "neck" of the seahorse
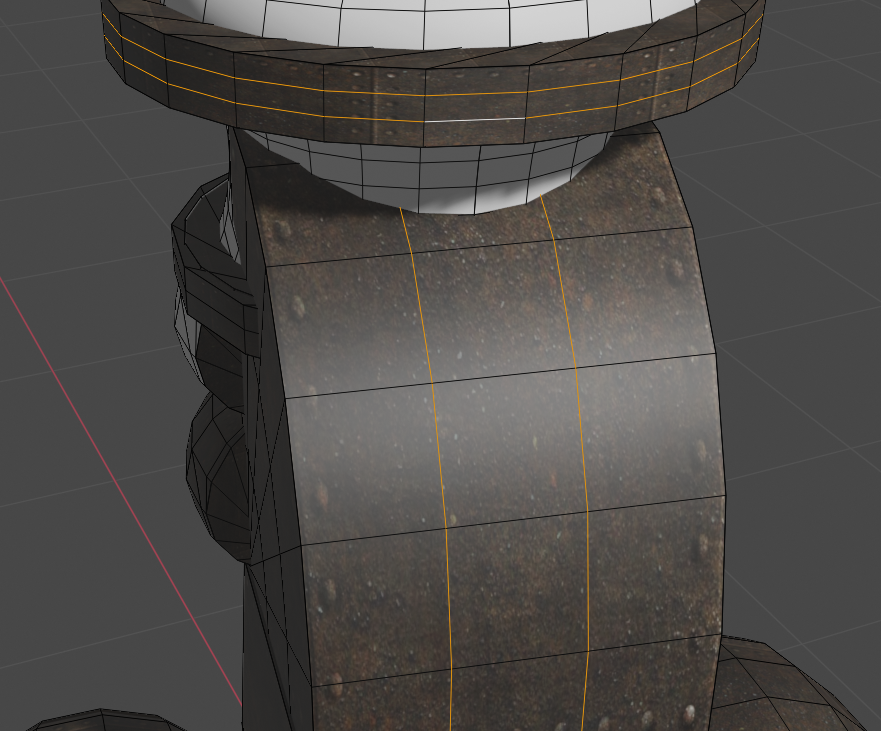 The edges (highlighted) are not needed and so we will remove them. There are (at least) two ways to do this, the first is the most simple but may also miss some opportunities that we, as humans, can spot. Tip #3 : Limited dissolveLimited dissolve is an awesome tool. It can help you in LOD production as well as the basic clean up. so what does it do? It traverses the mesh and examines the angles between edges if a given pair of edges have an intersection angle of less than the threshold then it will try to dissolve them. What we want to do here is the bare minimal dissolve, removing vertices that are on straight edges and add no real value to the mesh topolgy.Select all of the parts that you want to clean. Probably this is everything, in which case, in edit mode, hit 'a' to select all. Next press 'x' to get the delete menu and select "limited dissolve". A small control panel should appear in the bottom left, inside this you can set the maximum angle beneath which you want to dissolve. Set this to 0.1. You should find that all extraneous geometry on flat faces has vanished. this may leave ngons (mesh "panels" with more than 4 sides) but don't worry this will be resolved later when we triangulate again. As we see in the video, that extra edges on the back of the neck are dissolved, but also the inner curves on the side of the neck, which when we triangulate later become a single triangle fan. In that case, I had 6 sides of a tube, there were 3 concentric rings of triangles as shown by the quads there beforehand. In total, 30 triangles. when we export this, it will be just the 6. That's not a bad result. The following clip will show me performing this. Tip #4 : Manual dissolving.In edit mode: highlight the edges that you wish to remove.note that now we have edge flow back we can use alt-shift-click to select the entire loop, be careful you have only selected what you need though. Next press 'x' and from the menu that appears pick "dissolve edges" 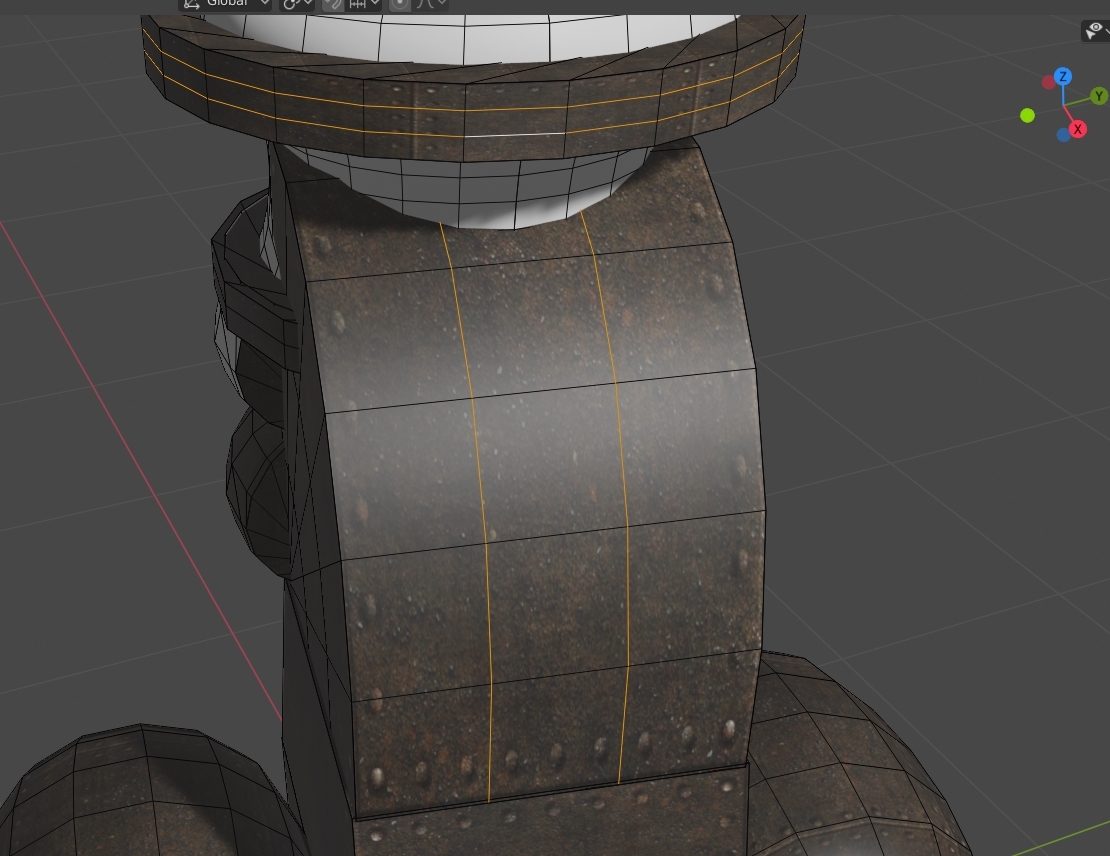 Two points to note here. Firstly, dissolve only works when blender feels it is able to remove the edges and vertices without breaking the integrity of the model. If you cannot dissolve then there is probably a dependent vertex that is blocking you. Continue cleaning up and come back to this later it may have been freed up. Dealing with it otherwise is outside of the scope of this guide. Secondly, the quad conversion can go awry at times. We tried to minimise the problems using the sliders but often there are still places where the automation does something a little less than obvious. This is the time to fix those too. I illustrate this in the following gif. This is a pretty extreme example, but one that can happen. The result here is nice clean quads.  Repeat this process across all the model until you feel you've removed all the unnecessary extras (this is why method 1 is preferred where possible - it saves a lot of time). Patching and RepairingWe've gone a long way now to cleaning things up. I've used a particularly complicated model to test this with and for most simple items you may well be done at this point and can skip to the next step of re-exporting the DAE ready for Second Life. However, what if you have broken geometry that you'd like to clean up? Here's a few more tricks that might come in handy.As always, this post is only scratching the surface of what you could do, and none of what I write here is necessarily the best way, it is certainly not the only way. With this in mind here are just a couple of final shortcuts and tricks that I use. Tip #5 Hot key selection mode switching while editing.In Blender, you can by default select one of vertices, edges or faces, in fact you can enable multiple at once but I find that confusing so I will not cover it here. As of Blender 2.8, you can quickly switch using the 1, 2 and 3 key on the top row (not the numpad as they control view).Pressing 1 will let you select vertices, 2 for edges and 3 for faces. Tip #6 : relinking vertices. 'f' for fill, is the best way to joinWhen you have two vertices and you wish to join them you can often highlight them both and press 'j' to join. but it does not always do what you want. You can quickly rebuild bad geometry by combining the dissolve edges, mode switching and filling tips.Here you can see me cleaning up the results of a poor "limited dissolve" applied earlier using these few simple moves. I iterate through the mesh, switching to vertex mode (1), selecting two vertices and joining them (f), then switching to edge mode (2), selecting the unwanted edge and dissolving it (x). A few other tricks that are not essential but which I use a lot include: Tip #7 Selecting thingsI talk a lot about operations that act upon selections but how do we select?In the gui there are many ways and I won't describe those in-depth, the icons and tools are mostly self-explanatory. box select, lasso select etc. I will instead focus on the keyboard short cuts and quick operations.
Tip #8 Iterate and save often
In the next section, I'll explain how to save and to export (two subtly different things). Save often, use the versioning I describe and don't be afraid to try things out. you can often go over the process a few times to continually improve the results.
Exporting our work.Finally, we are ready to export so that we can return or work to Second Life.Make sure that you leave edit mode and return to object mode. Like many 3d tools the changes made in edit mode in Blender are not "finalised" until you leave edit mode. to switch back we need only press tab. We will save our work as a blend file first, an optional step but worth doing in case we want to make further changes once we see what this looks like in-world. To do this go to the file menu at the top, and click save as ... (shift-ctrl-s is the short cut). You will be asked for a filename. One of my favourite "lesser known" features is that if you pick a name that already exists in the file selector, the field at the bottom will go red to warn that you are going to overwrite, there are two symbols a '+' and a '-' at the far right of the field, these will automatically add and increment (or decrement) a number in the filename allowing you to keep "versions" of your progress. I tend to use this all the time and end up with tens or hundreds of iterations that I clear up once I am finished. This image shows that I am trying to save my prim cleanup work in progress. You can also see that I have 22 versions of another model (my fully blender-native recreation of this model as it happens) in the same folder. If I click the '+' it will save as 'hippocampus prim cleanup WIP1.blend". 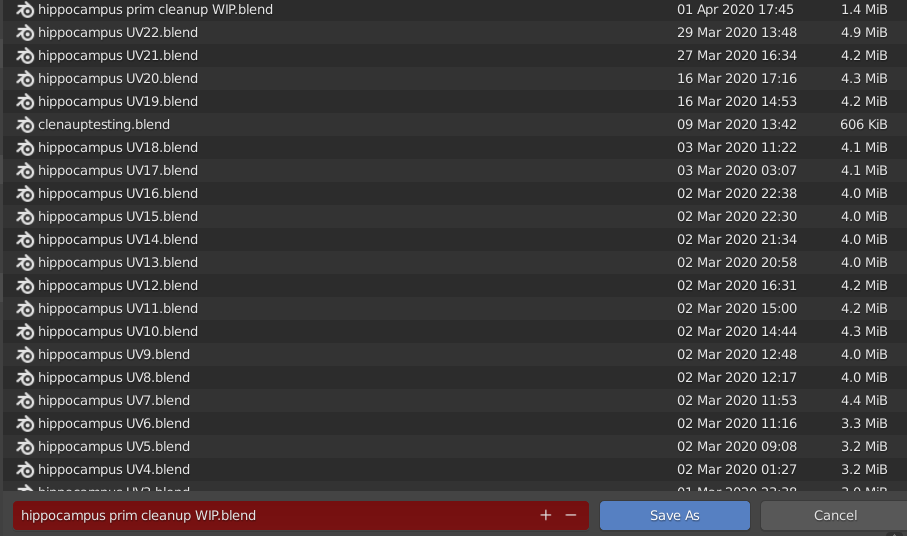 Pick a filename and save your blend file. Now we will export the Collada (DAE) file. First, we will highlight just the mesh objects we wish to export. If you joined things into a single mesh then click the object you need. If you left it in multiple parts then shift-click to select all the ones that you want. Next go to the file menu, export, Collada 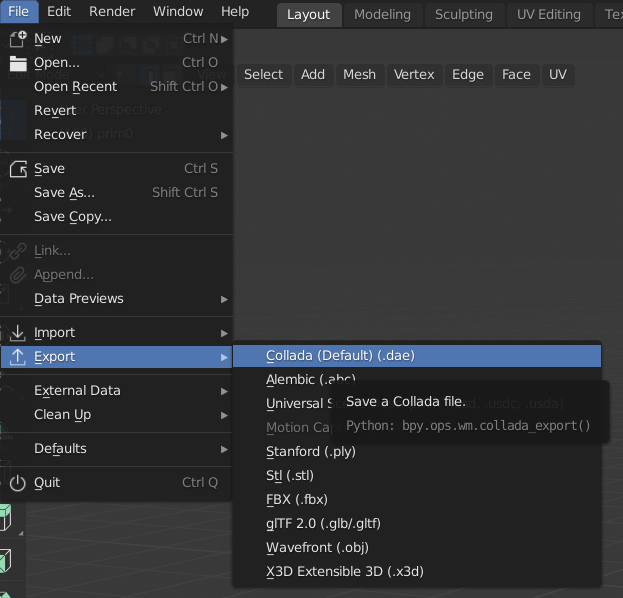 You will now be shown a file dialogue. It will default to the name we chose when we saved the .blend file. There will be an "Export COLLADA" button highlighted. DON'T PRESS IT YET! This is one aspect of the new Blender I don't like very much as it makes life harder for new users. The defaults for Collada export are rarely what we need. To change the settings we have to press the "cog" to expand the settings on the right-hand side. 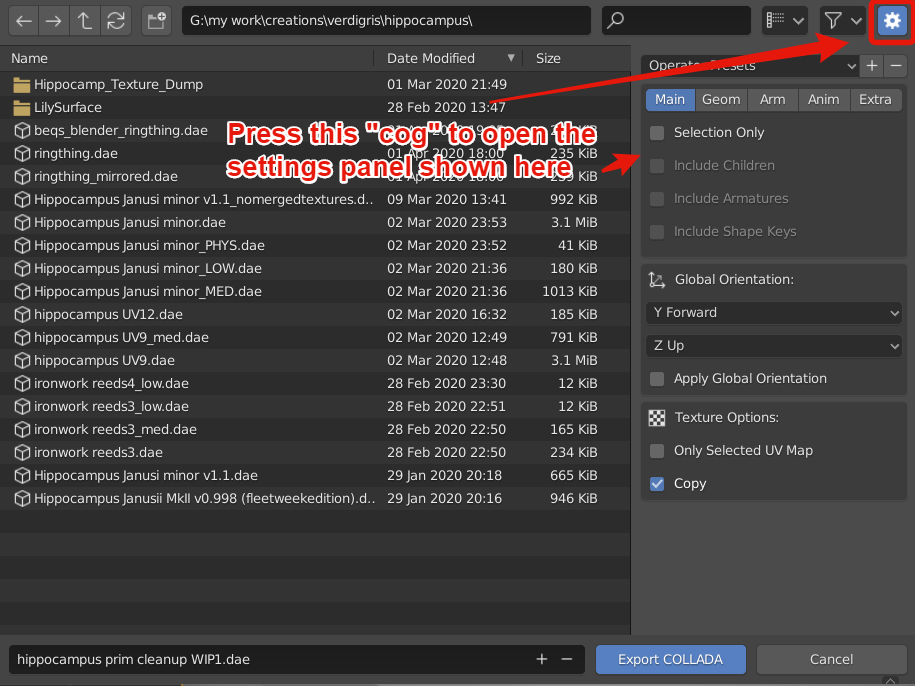 In this settings box, we need to enable selection only. But there is a preset available, so let's use that. Click the "Operator presets" and select "SL + Open Sim static". If we do not do this, Blender will export all the objects in the scene including the lights and cameras, sometimes this is fine, but as you get into more complex objects it is worth getting into the habit of explicitly exporting only the parts that you want. We can now press the "Export COLLADA" button. If things work properly you will see a small message pop up on the screen saying "Exported N objects" depending on how many objects you had selected. It is always worth keeping an eye on that, if it is not what you expected then something went wrong, double-check that you had "selection only" selected and that you had remembered to come out of edit mode. And that's it, you can now upload as normal. A few last notes
Don't forget that you may well have joined your objects. If you had prepared the linkset as if you were using Mesh Studio then you will presumably have limited your "mesh faces" to 8, if not then be careful to check that you only had at most 8 materials in your mesh or you will get one of the mysterious "MAV errors" or a "model not a subset..." type error in Second Life.
Most of what I have taught in this blog should be "non-destructive" with regard to UV layout. However, an over-zealous use of the dissolve tools will leave areas in a mess and I have not tried to explain how to dig yourself out of that hole. Try to keep things in rendered mode, so you can see the textures and the effect your changes have on them.
This concludes what I think you'll agree was a far longer delve into the cleanup process than the 2016 one. The steps I show are I think quite straightforward, and hopefully, with a little practice, you'll learn not to fear the tools. What I have explained here can be translated into other tools such as Maya or 3DS Max. My weapon of choice is Blender and for me, it is the right tool for pretty much everything I need to do. The thing I want to say though is that no matter what tool you use if you are starting from a background of Second Life prim editing, they are all going to be daunting, they are all going to be hard, and you will struggle, stumble and fall at times. Start simple and build up from there, when you fail, pick yourself up, and try again. You'll get there.
Love
Beq
x
|
I am in your debt. I have only just started delving into Blender for making SL mesh objects and while my models are quite basic,the exported results were always less than satisfactory as I lacked all of these nuances and settings which you have addressed. Thank you ever so much for your step-by-step guidance.
ReplyDeleteI am very glad that this was useful, and the very best of luck with your building endeavours :-)
Delete